1. Getting Started
Target Detect is built around a simple three-step loop:
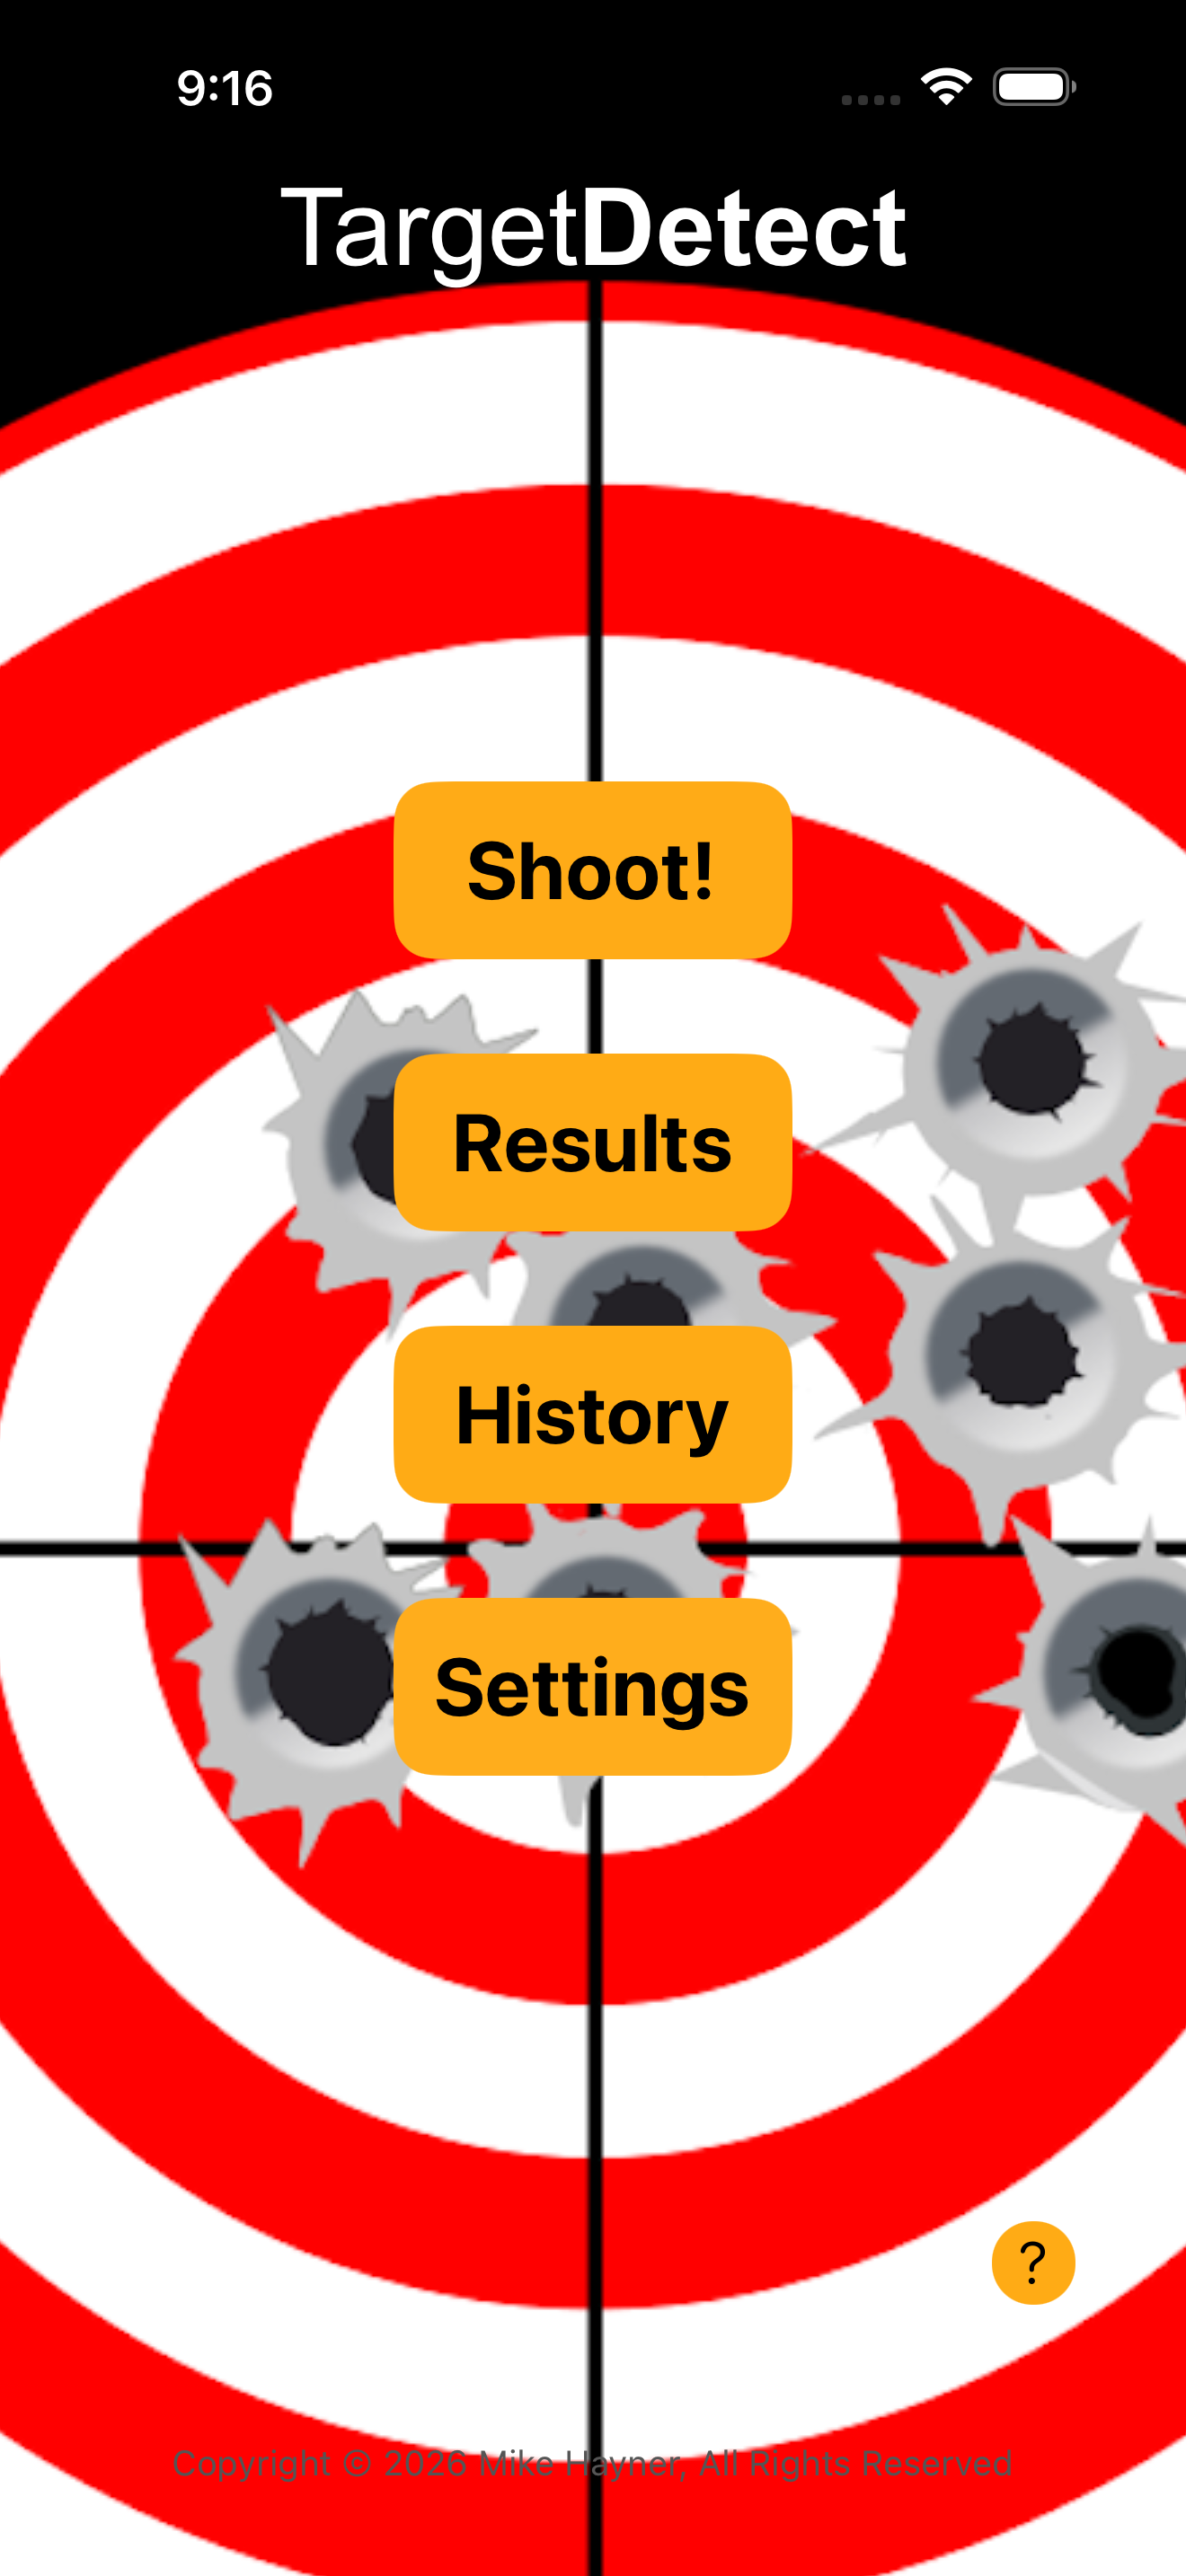
Shoot. Start a session. Log what you're firing — firearm, distance, ammunition, drill, conditions. That part takes seconds.
Photograph. Capture the target right in the app using the in-app camera. Built-in framing guides help you line up a straight-on shot. No calibration or alignment required.
Analyze. A custom machine learning model finds your shots, scores the target, and calculates the statistics that matter — group size, score, accuracy (CEP from POA), precision (CEP from POI), and more. The session lands in your history so trends can build up over time.
Always follow the three rules of firearm safety.
Most app screens with a toolbar have a small ![]() button — tap it any time for an on-screen guide to what each toolbar icon does.
button — tap it any time for an on-screen guide to what each toolbar icon does.
2. Your First Session
- Tap Shoot on the home screen.
- Fill in the session details using the form fields:
- Location — where you're shooting (range name)
- Firearm — which gun
- Distance — how far the target is
- Target — the target type (NRA bullseye, B-6, IPSC silhouette, etc.)
- Drill — the drill you're shooting (Slow Fire, Rapid Fire, etc.)
- Ammo — what you're firing
- Notes — anything you want to remember (weather, optic, position, mood)
- (Optional) Tap Shot Timer if you're shooting a timed drill and want the app to detect shot timing by sound.
- After the range is safe, tap the camera icon to capture the target through the app. Use the yellow framing guides to line it up straight-on.
- The app auto-detects your shots and shows them with markers overlaid on the target.
- Tap Save (the checkmark) to commit the session to your history.
You can review it later via Results or History on the home screen.
3. The Shooting Screen
The Shoot screen has three main areas.
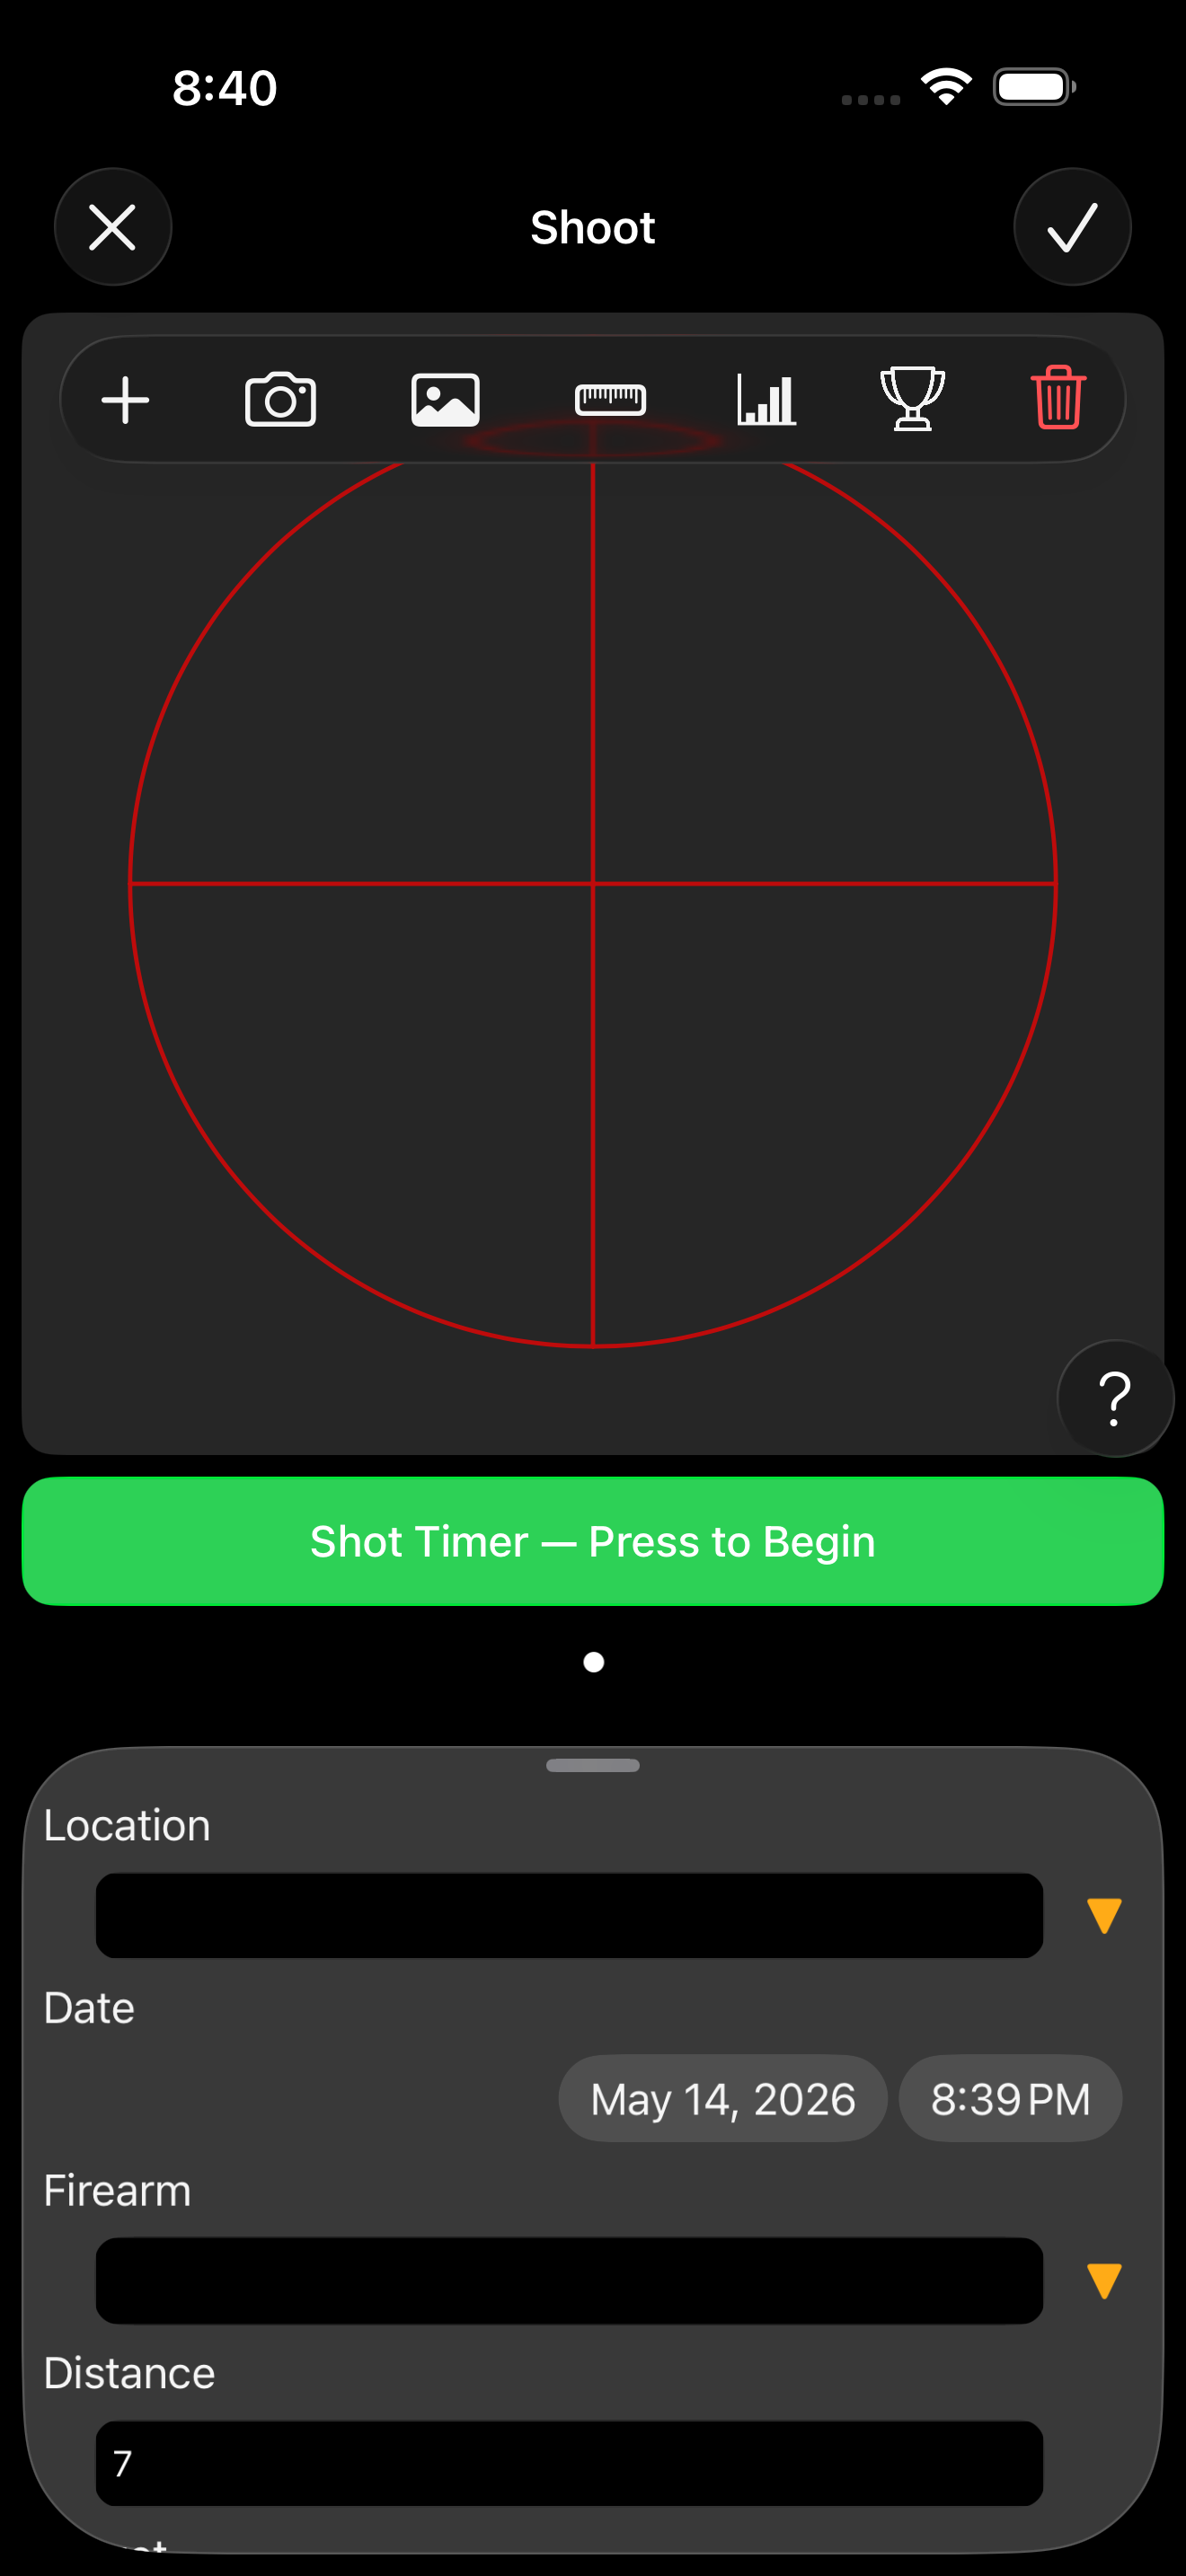
The target preview
At the top, the most recently captured target appears with shot markers. Before any photo is taken, you see a placeholder crosshair. Page indicator dots beneath the image show how many targets are in this session — swipe to switch between them.
The toolbar
A row of icons across the top of the target preview:

 Previous Target / Next Target — Step through targets in the session
 Add New Target — Add a new target to the session
 Capture from Camera — Replace the current target's image with a new one captured by the in-app camera
 Select from Photo Library — Replace the current target's image with one from your photo library
 Score / Edit Target — Open the target scoring screen for manual hole placement and ML detection
 Toggle Reporting — Include or exclude this target from your aggregate statistics. The target is still saved either way — this is the toggle you use when you want to record a target but keep it out of your overall numbers (a test target, a fluke, or one shot under conditions that wouldn't be fair to average in).
 View Analysis — Open the analysis view for the current target (score, group, CEP, per-shot table)
 Delete Target — Remove the current target from the session
Camera and Photo Library both replace the image on the target that's currently shown. To capture a new target in the same session, tap + first to add it, then use Camera or Photo Library to fill in its image.
The form
Below the target image (or accessible by pulling up the bottom sheet on iPhone), the session metadata fields. Each dropdown opens a list where you can pick an existing entry or add a new one inline.
Shot Timer button
A green Shot Timer — Press to Begin button appears between the target and the form when shot-timer support is enabled (see Settings → Options → Show Shot Timer). Tap to open the timer.
Saving and discarding
- Checkmark (top-right) — Save the session
- X (top-left) — Discard the session (with confirmation if any data was entered)
4. Scoring a Target
The Target Scoring screen is where the target overlay is aligned to your photo and shots are placed (or adjusted) on it. By default, machine learning finds and places them automatically — but everything is editable.
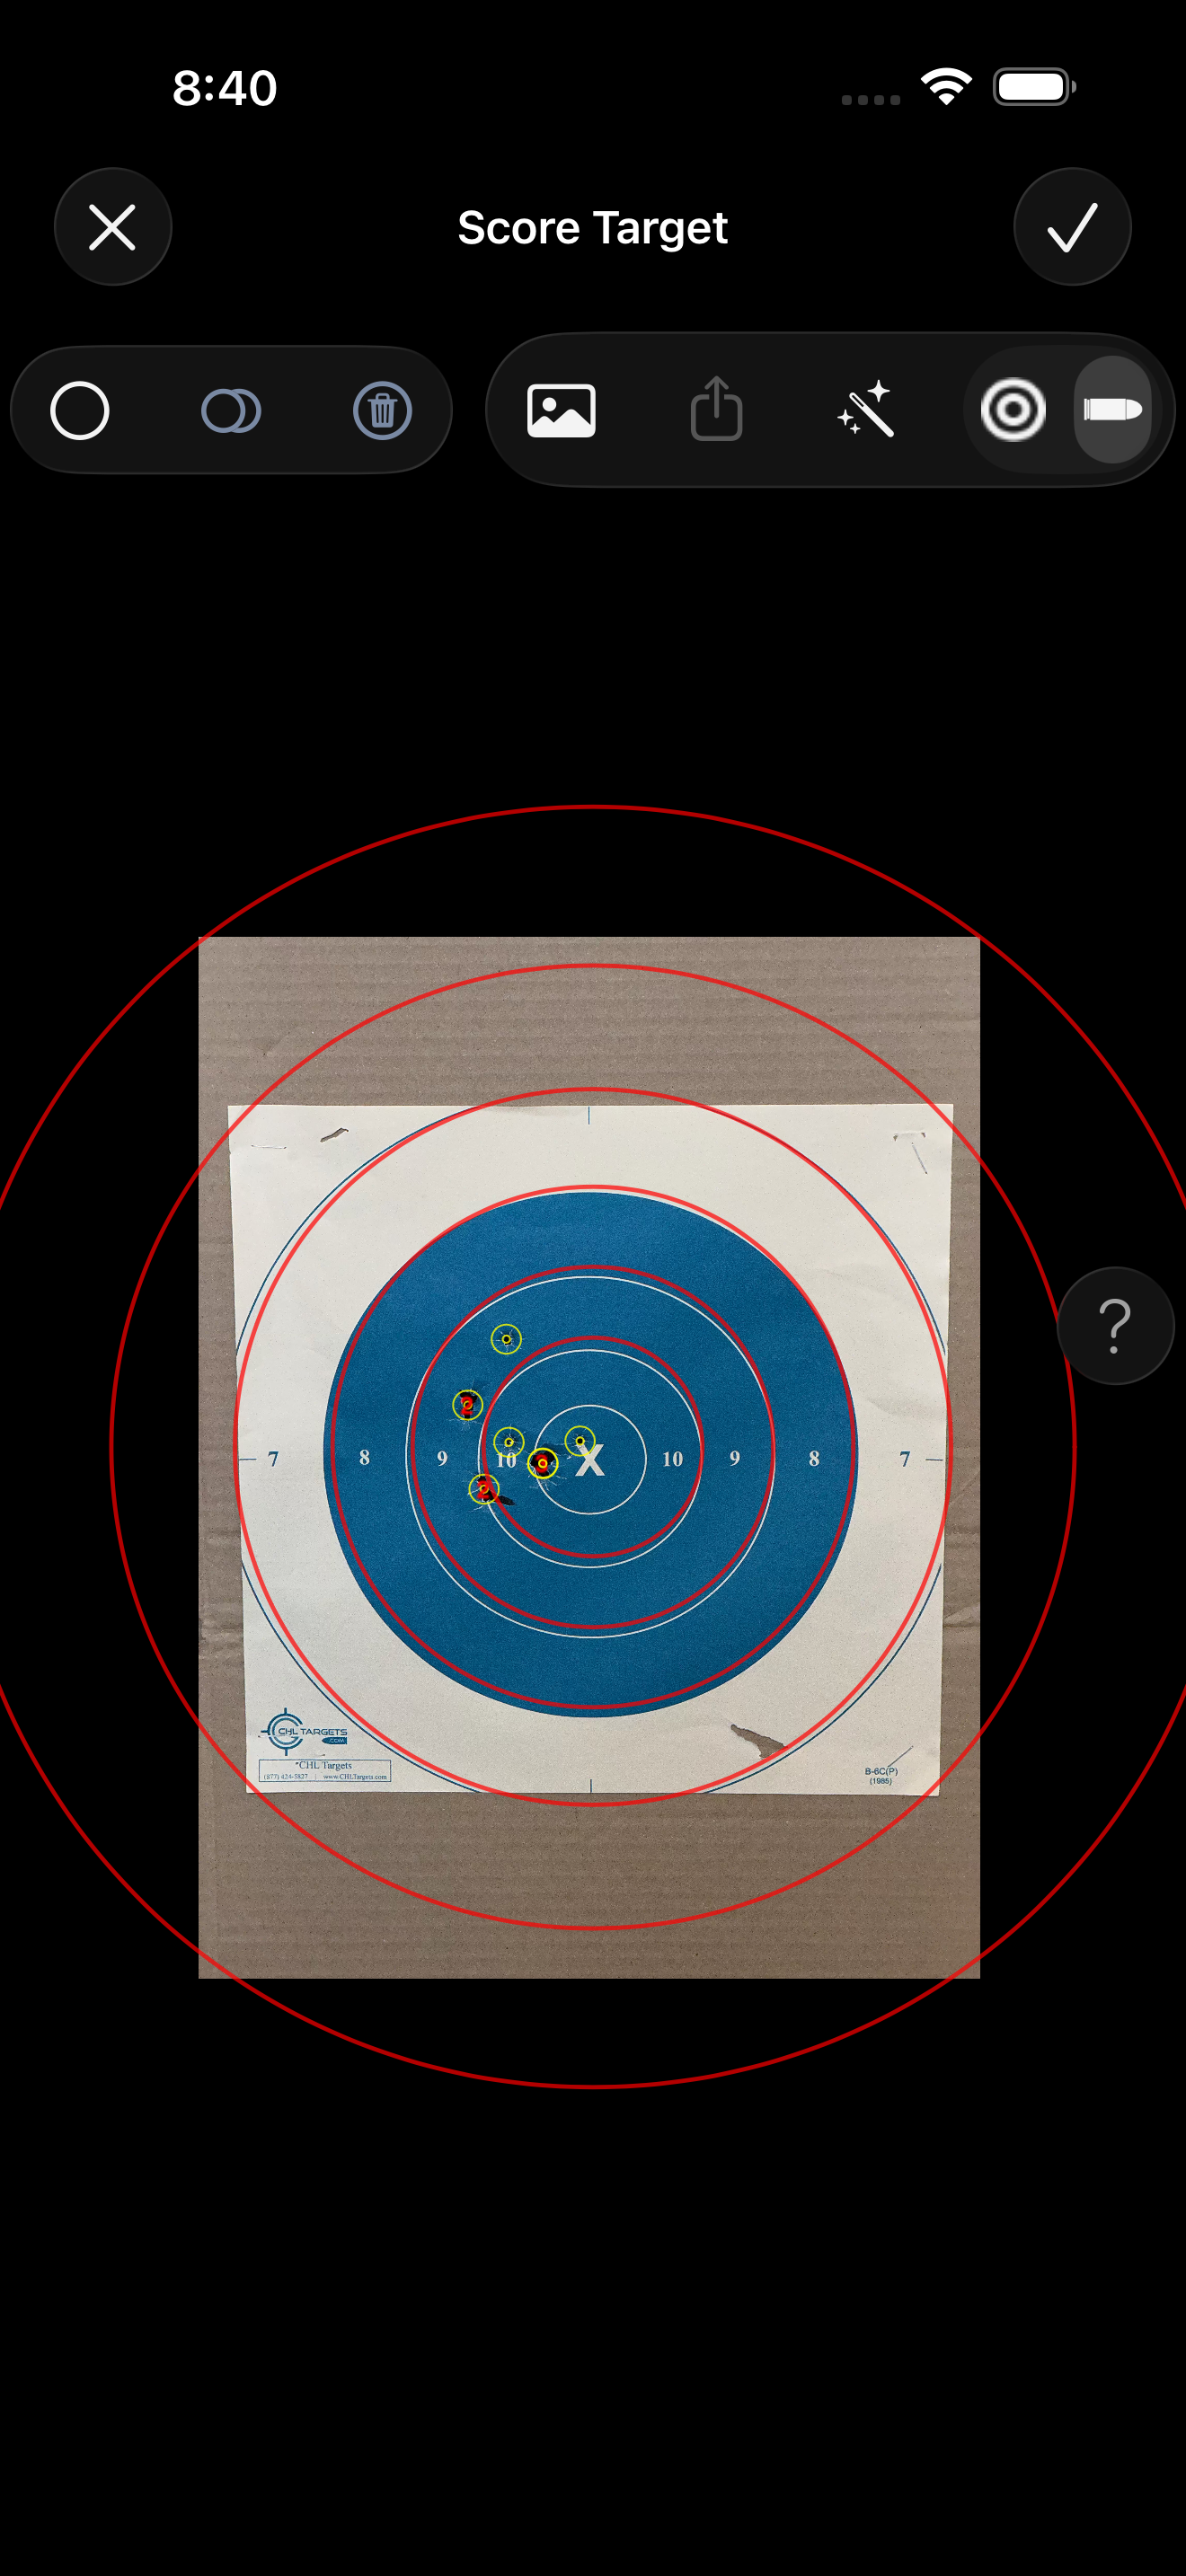
Target Mode vs Bullet Mode
A segmented control switches between two modes:
 Target Mode — Size and position the target overlay over the printed target in your photo. Drag and resize so the scoring rings line up.
 Bullet Mode — Place, move, or delete individual bullet holes on the target.
Auto-detection
Tap ![]() Auto-Detect Bullet Holes to run shot detection on the current target image. The model finds holes and places markers — adjust them manually in Bullet Mode if you need to.
Auto-Detect Bullet Holes to run shot detection on the current target image. The model finds holes and places markers — adjust them manually in Bullet Mode if you need to.
Detection works better when the session's firearm has a caliber assigned — the model uses the expected hole size to find shots more reliably and display them at the correct visual scale. See Settings → Guns if you haven't set up your firearms yet.
Manual hole placement (in Bullet Mode)
 Place Single Bullet Hole — Tap a spot to place one shot. Tap an existing shot to select it for moving.
 Place Multiple Bullet Holes — Specify a count in the field, then tap to place that many shots at once (useful for clusters where individual holes are hard to distinguish).
 Delete Bullet Hole — Tap an existing shot to remove it.
Target type
Tap ![]() Select Target Type to change which target pattern is overlaid. Picking the right target type matters — scoring rings, the X-ring, and the bullseye center are all read from it.
Select Target Type to change which target pattern is overlaid. Picking the right target type matters — scoring rings, the X-ring, and the bullseye center are all read from it.
Other toolbar buttons
- Edit Image — Open the Edit Image screen for rotation, perspective correction, and filters (see next section)
 Upload Image for Analysis — (if enabled in Options) Send the image for remote analysis support
When you're satisfied with the target alignment and shot placement, tap Save (checkmark) to commit.
5. Editing a Target Image
The Edit Image screen is reached from the Score Target screen's ![]() Edit Image button. Use it to clean up target photos that didn't come out perfectly straight — perspective correction, rotation, scaling, and filters. The toolbar:
Edit Image button. Use it to clean up target photos that didn't come out perfectly straight — perspective correction, rotation, scaling, and filters. The toolbar:
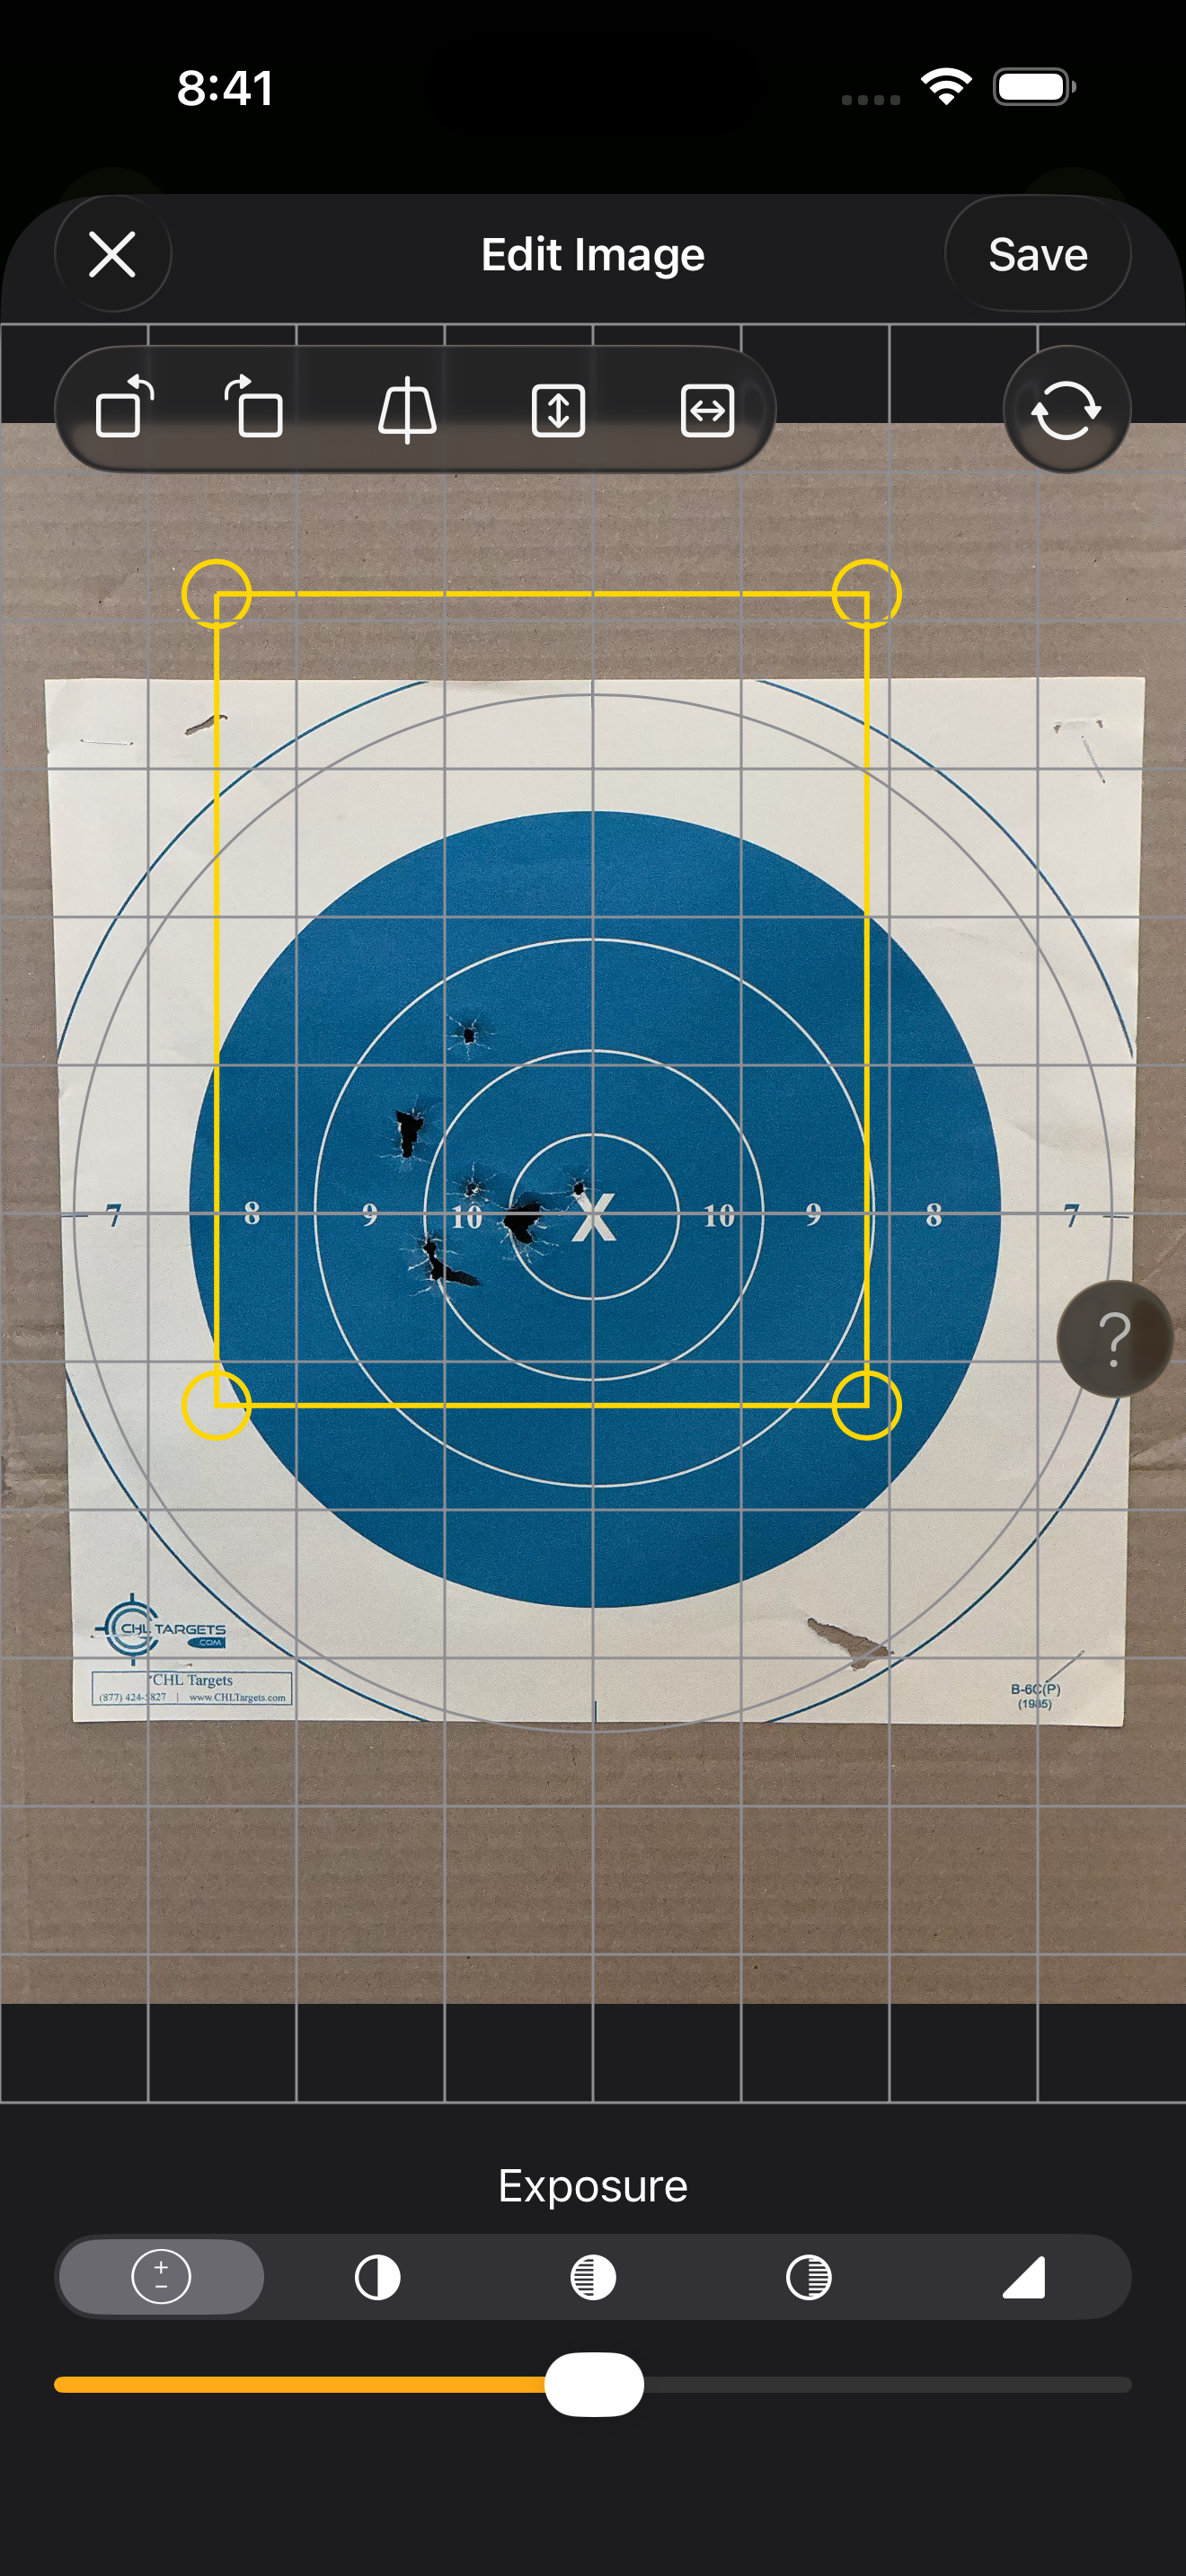
 Rotate Left — Rotate the image 90° counter-clockwise
 Rotate Right — Rotate the image 90° clockwise
 Perspective Correction — Correct keystone distortion if you shot at an angle
 Vertical Scale — Adjust the image's vertical dimension
 Horizontal Scale — Adjust the image's horizontal dimension
 Revert Changes — Restore the original image
Use the filter controls at the bottom to adjust exposure, contrast, highlights, shadows, and sharpness.
Most targets shot straight-on at eye height won't need any of this. The tools are there for the cases that do.
6. The Shot Timer
The Shot Timer listens with the microphone and detects the timing of each shot during a drill. Tap Shot Timer — Press to Begin on the Shoot screen to open it.
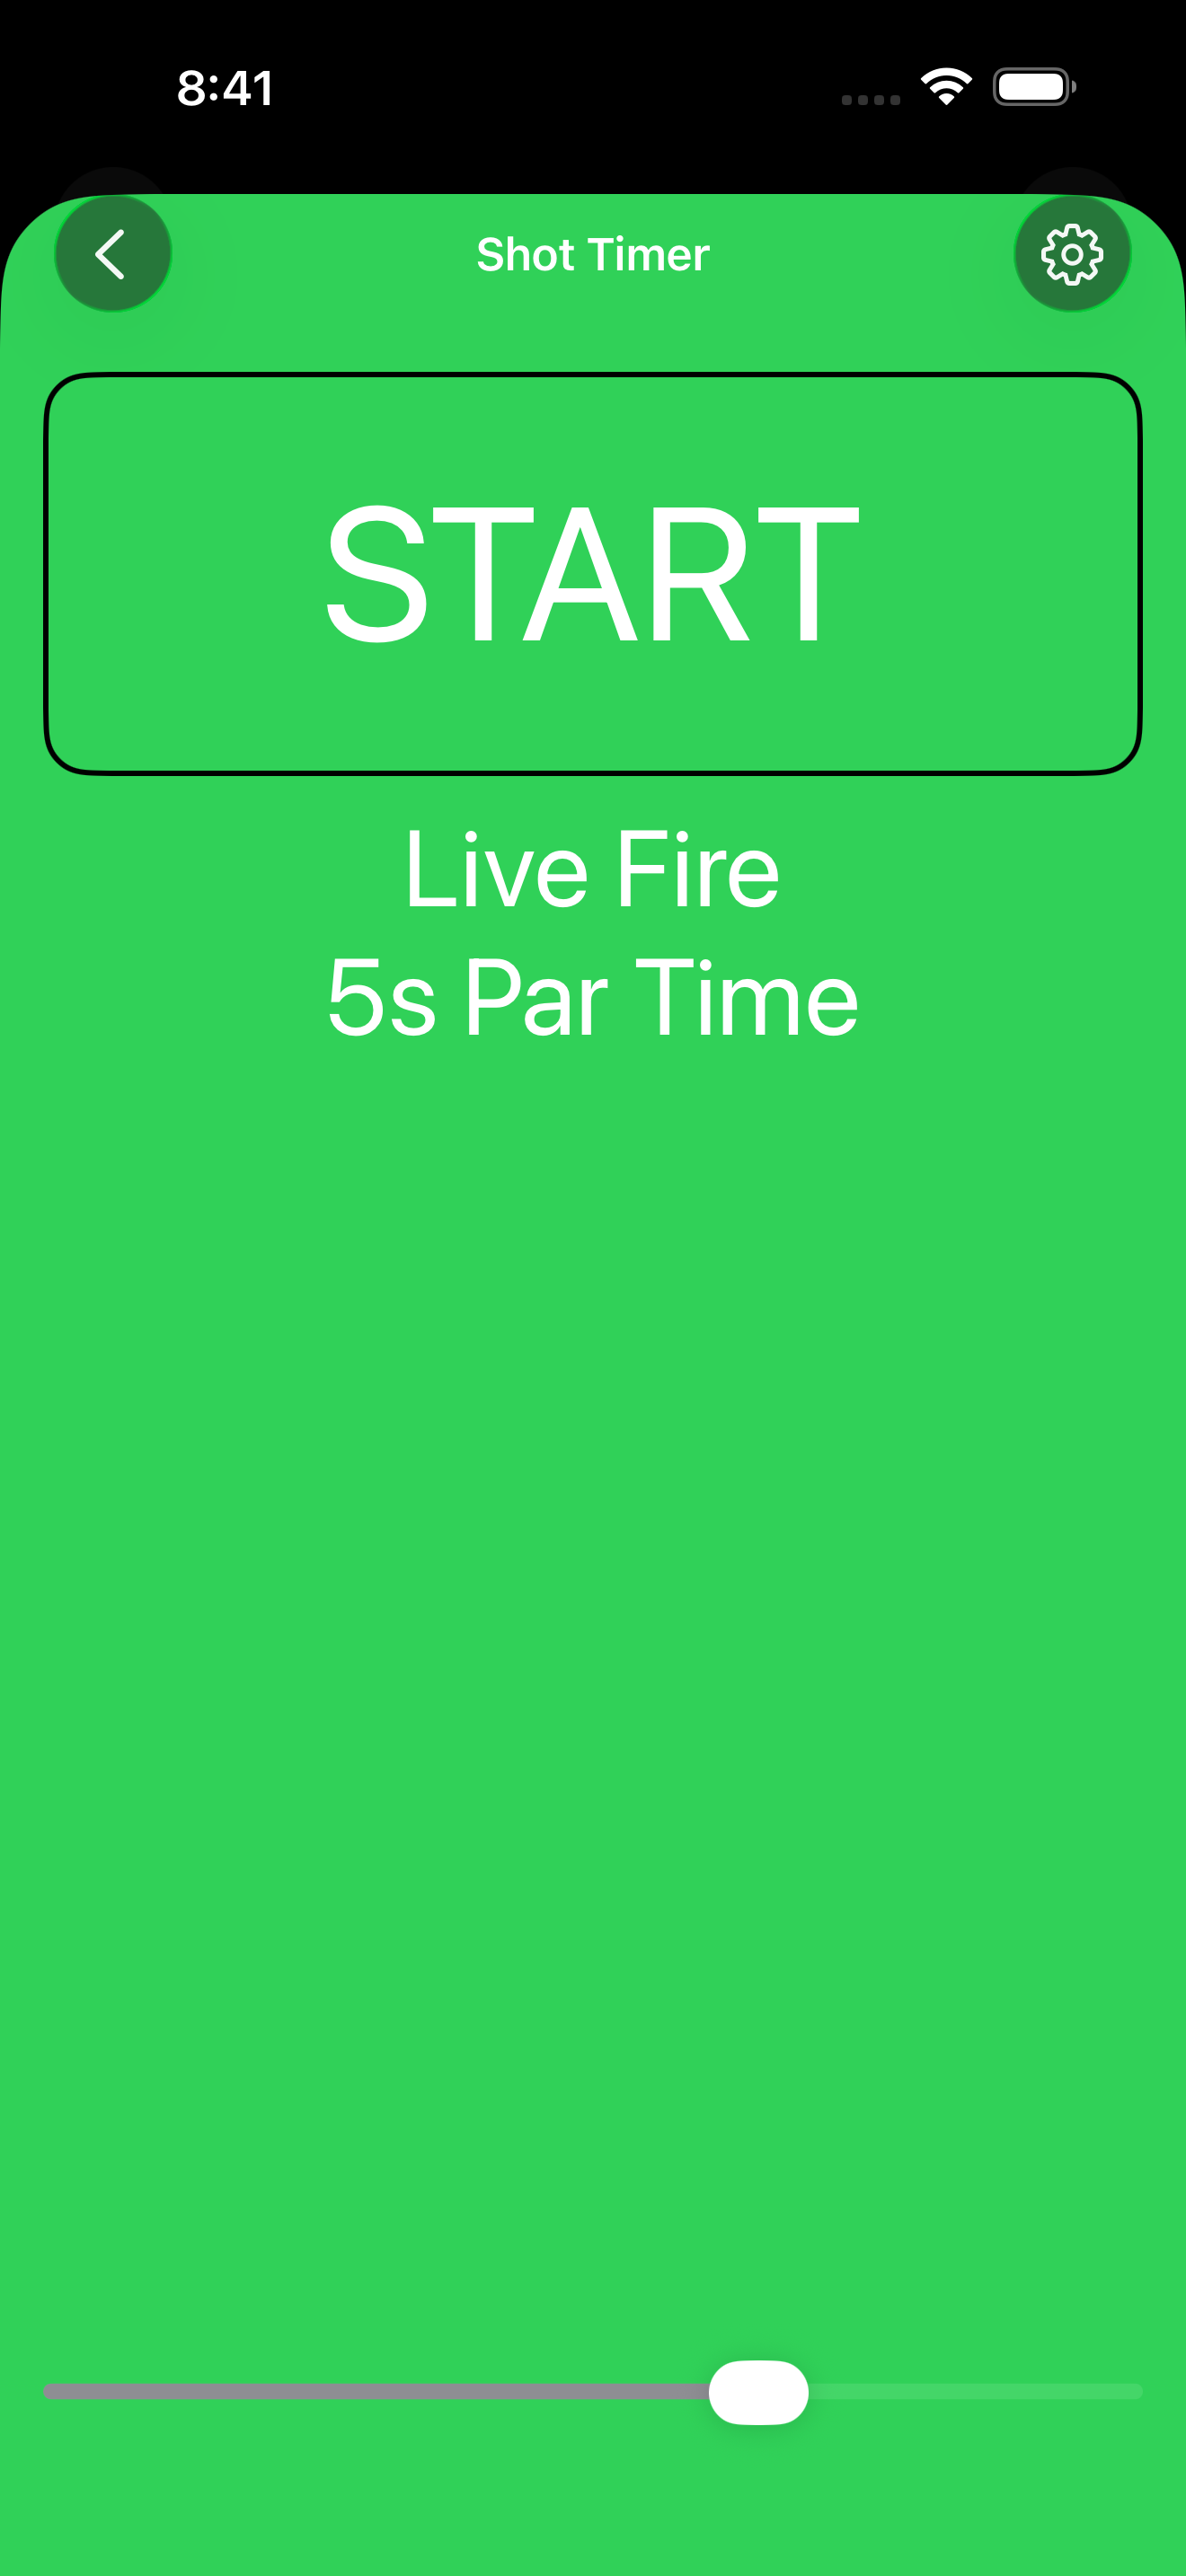
The main timer screen
- Spectrograph — Real-time visualization of detected sounds
- Sensitivity slider — Adjust how loud something must be to count as a shot
- Start / Stop — Begin or pause recording
- Results table — Each detected shot with timestamps and splits
Configuration
Tap Configure to open the timer settings:
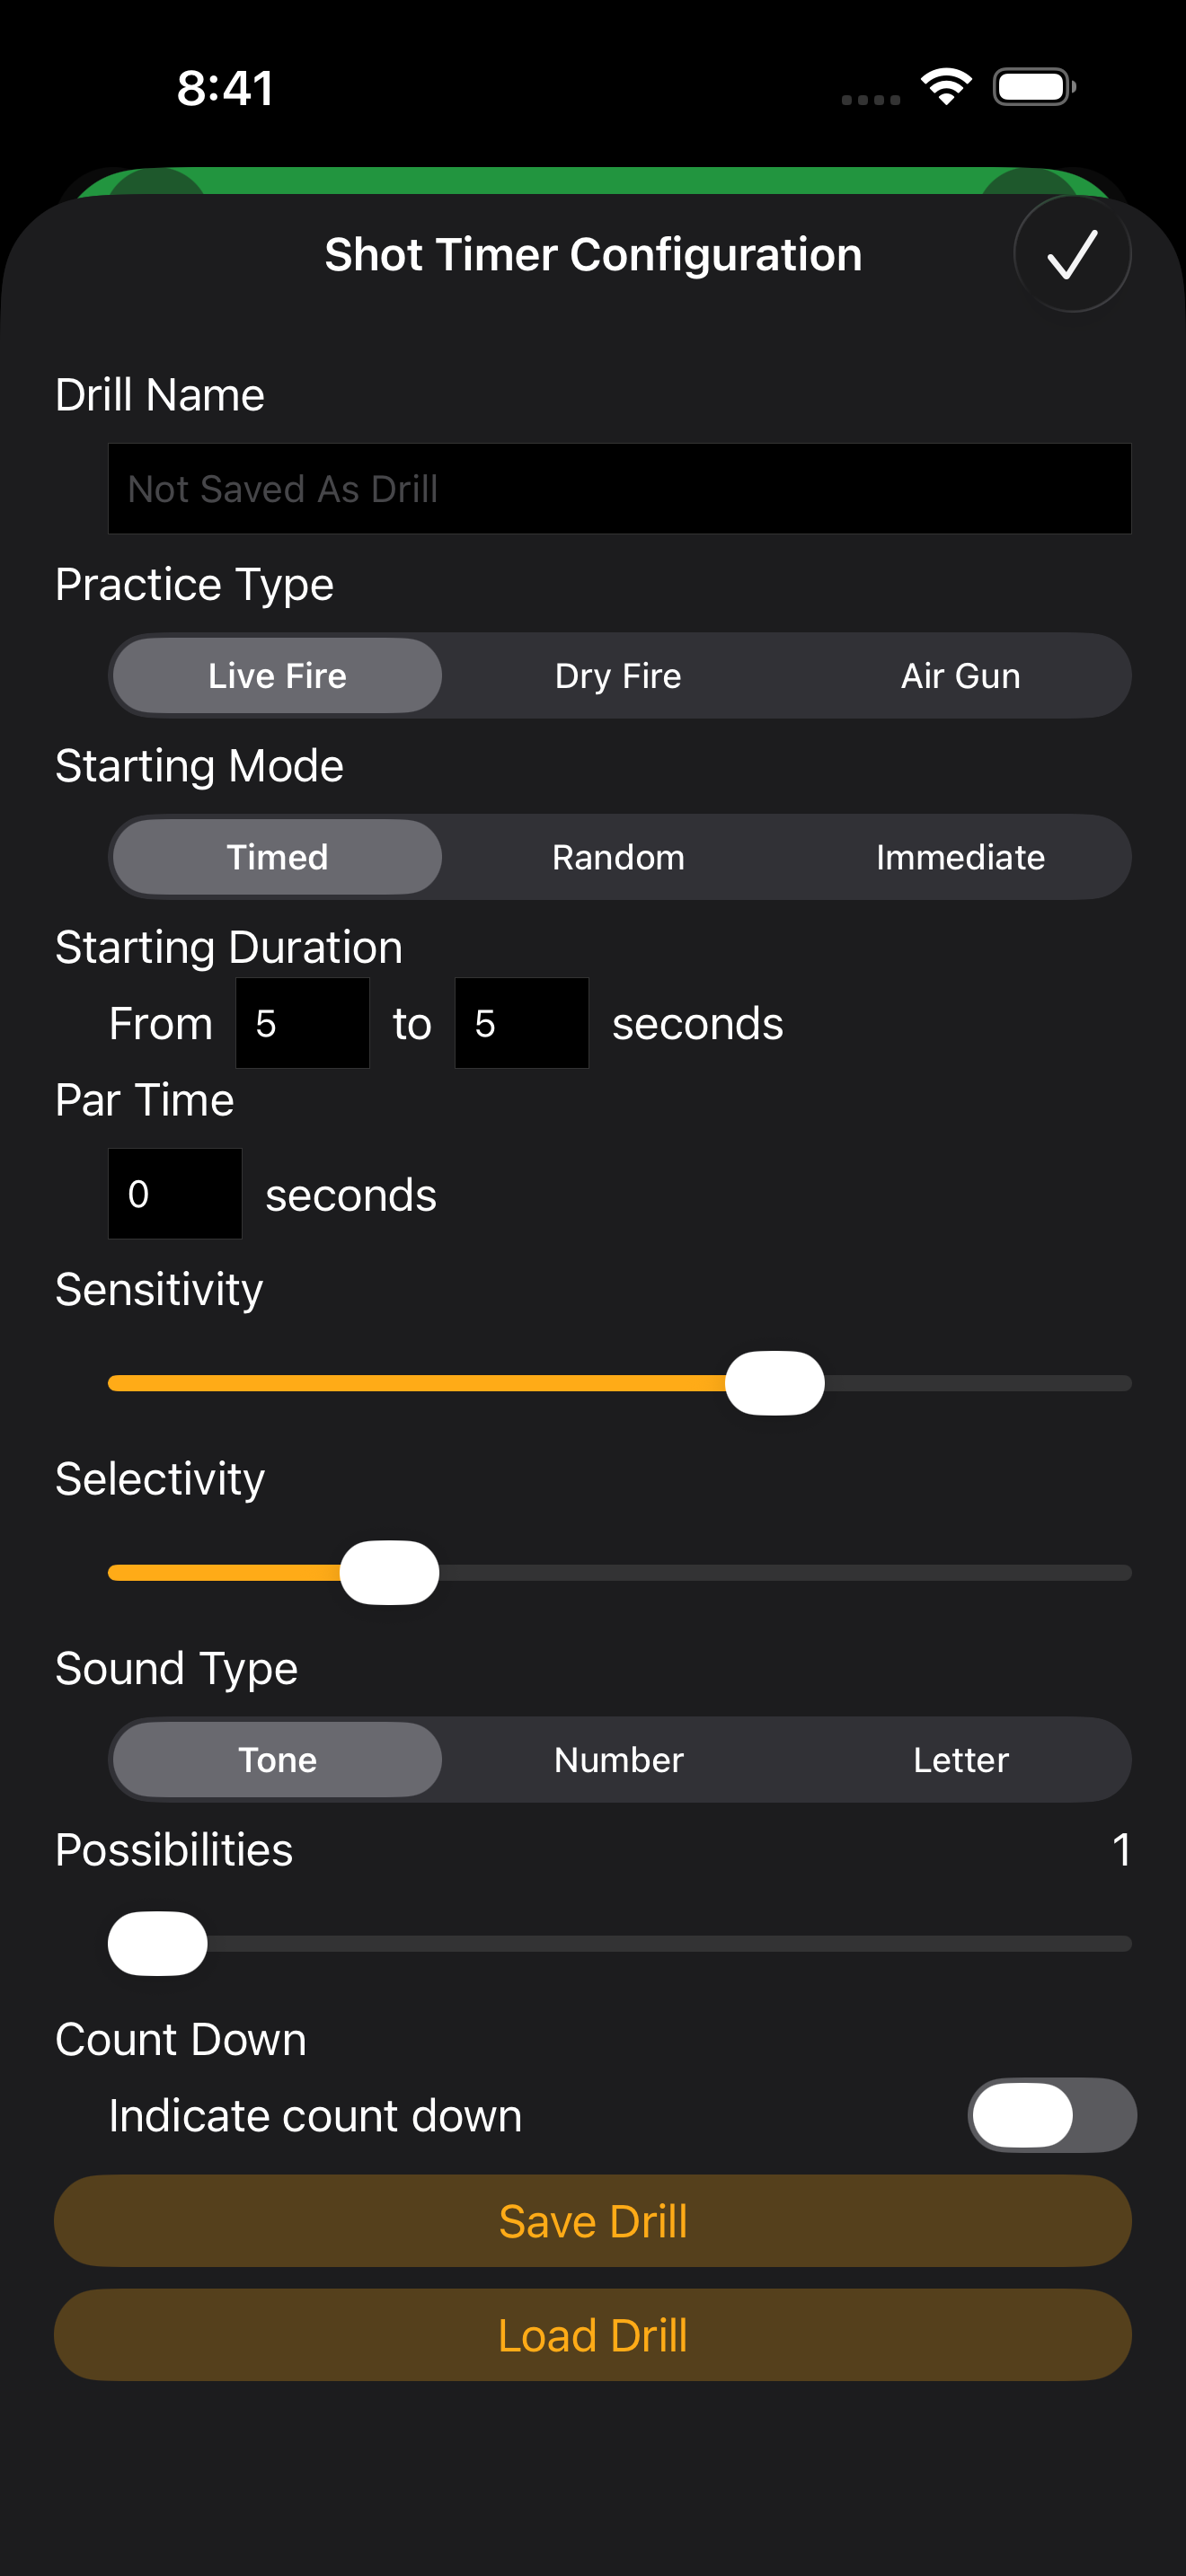
- Timer Mode
- Timed — Start the drill with a fixed par time
- Random — Start the drill after a random delay
- Immediate — Start firing as soon as the timer activates
- Par Time — The target completion time (for Timed mode)
- From / To Time — Lower and upper bounds for the random start delay
- Sensitivity — Volume threshold for detection
- Selectivity — How strictly the app matches sound patterns to "shot" vs. ambient noise
- Possibilities — How many shots the app anticipates (helps with disambiguation)
- Sound Type — Audio cue style: Tone (beep), Number (spoken count), or Letter (spoken letter)
- Count Down — Enable a beep countdown before the drill starts
- Drill Name — Save the current configuration as a named preset for re-use
- Load — Pull up a previously saved drill preset
Tuning tips
Outdoor environments with wind or other shooters benefit from higher Selectivity. Indoor ranges with clear acoustics can usually run lower. Sensitivity is what to tune if the timer misses shots (raise it) or false-triggers on ambient noise (lower it).
7. Reports & Analysis
The Reports screen organizes everything into three categories.
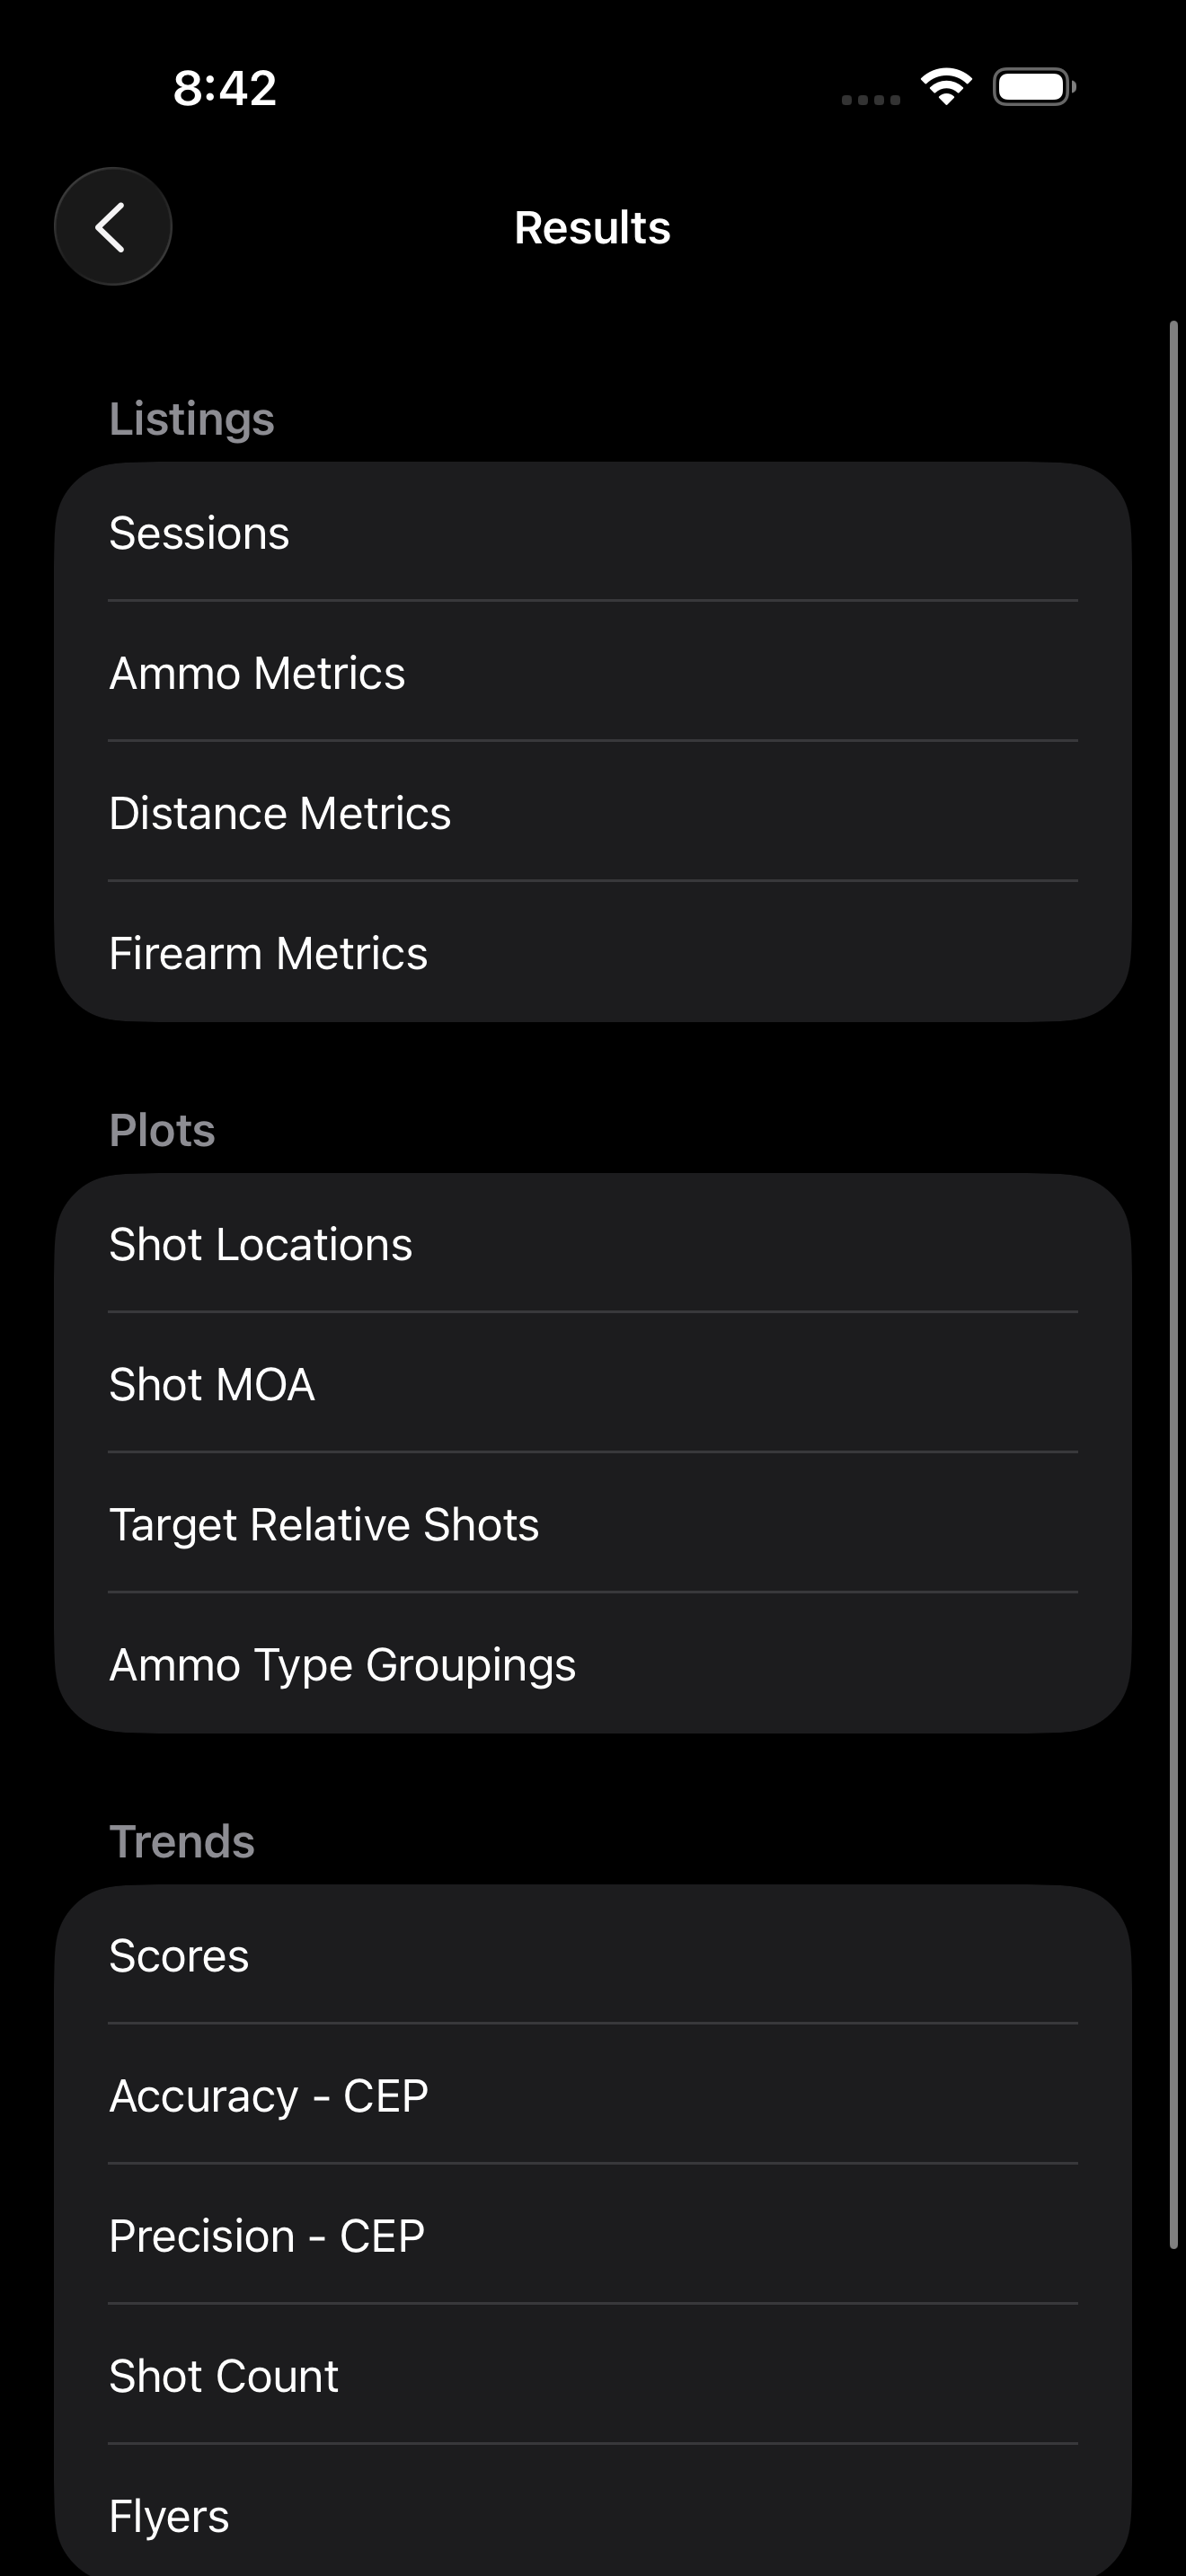
Listings
Tables that break down performance by gear or conditions.
- Sessions — All your past shooting sessions in chronological order, with score, group, and CEP at a glance
- Ammo Metrics — Performance by ammunition. Use this to compare loads — which one shoots tightest?
- Distance Metrics — Performance by distance. Useful for seeing how your accuracy scales with range
- Firearm Metrics — Performance by gun. Use to track which firearm has improved (or regressed)

Plots
Visual and spatial reports.
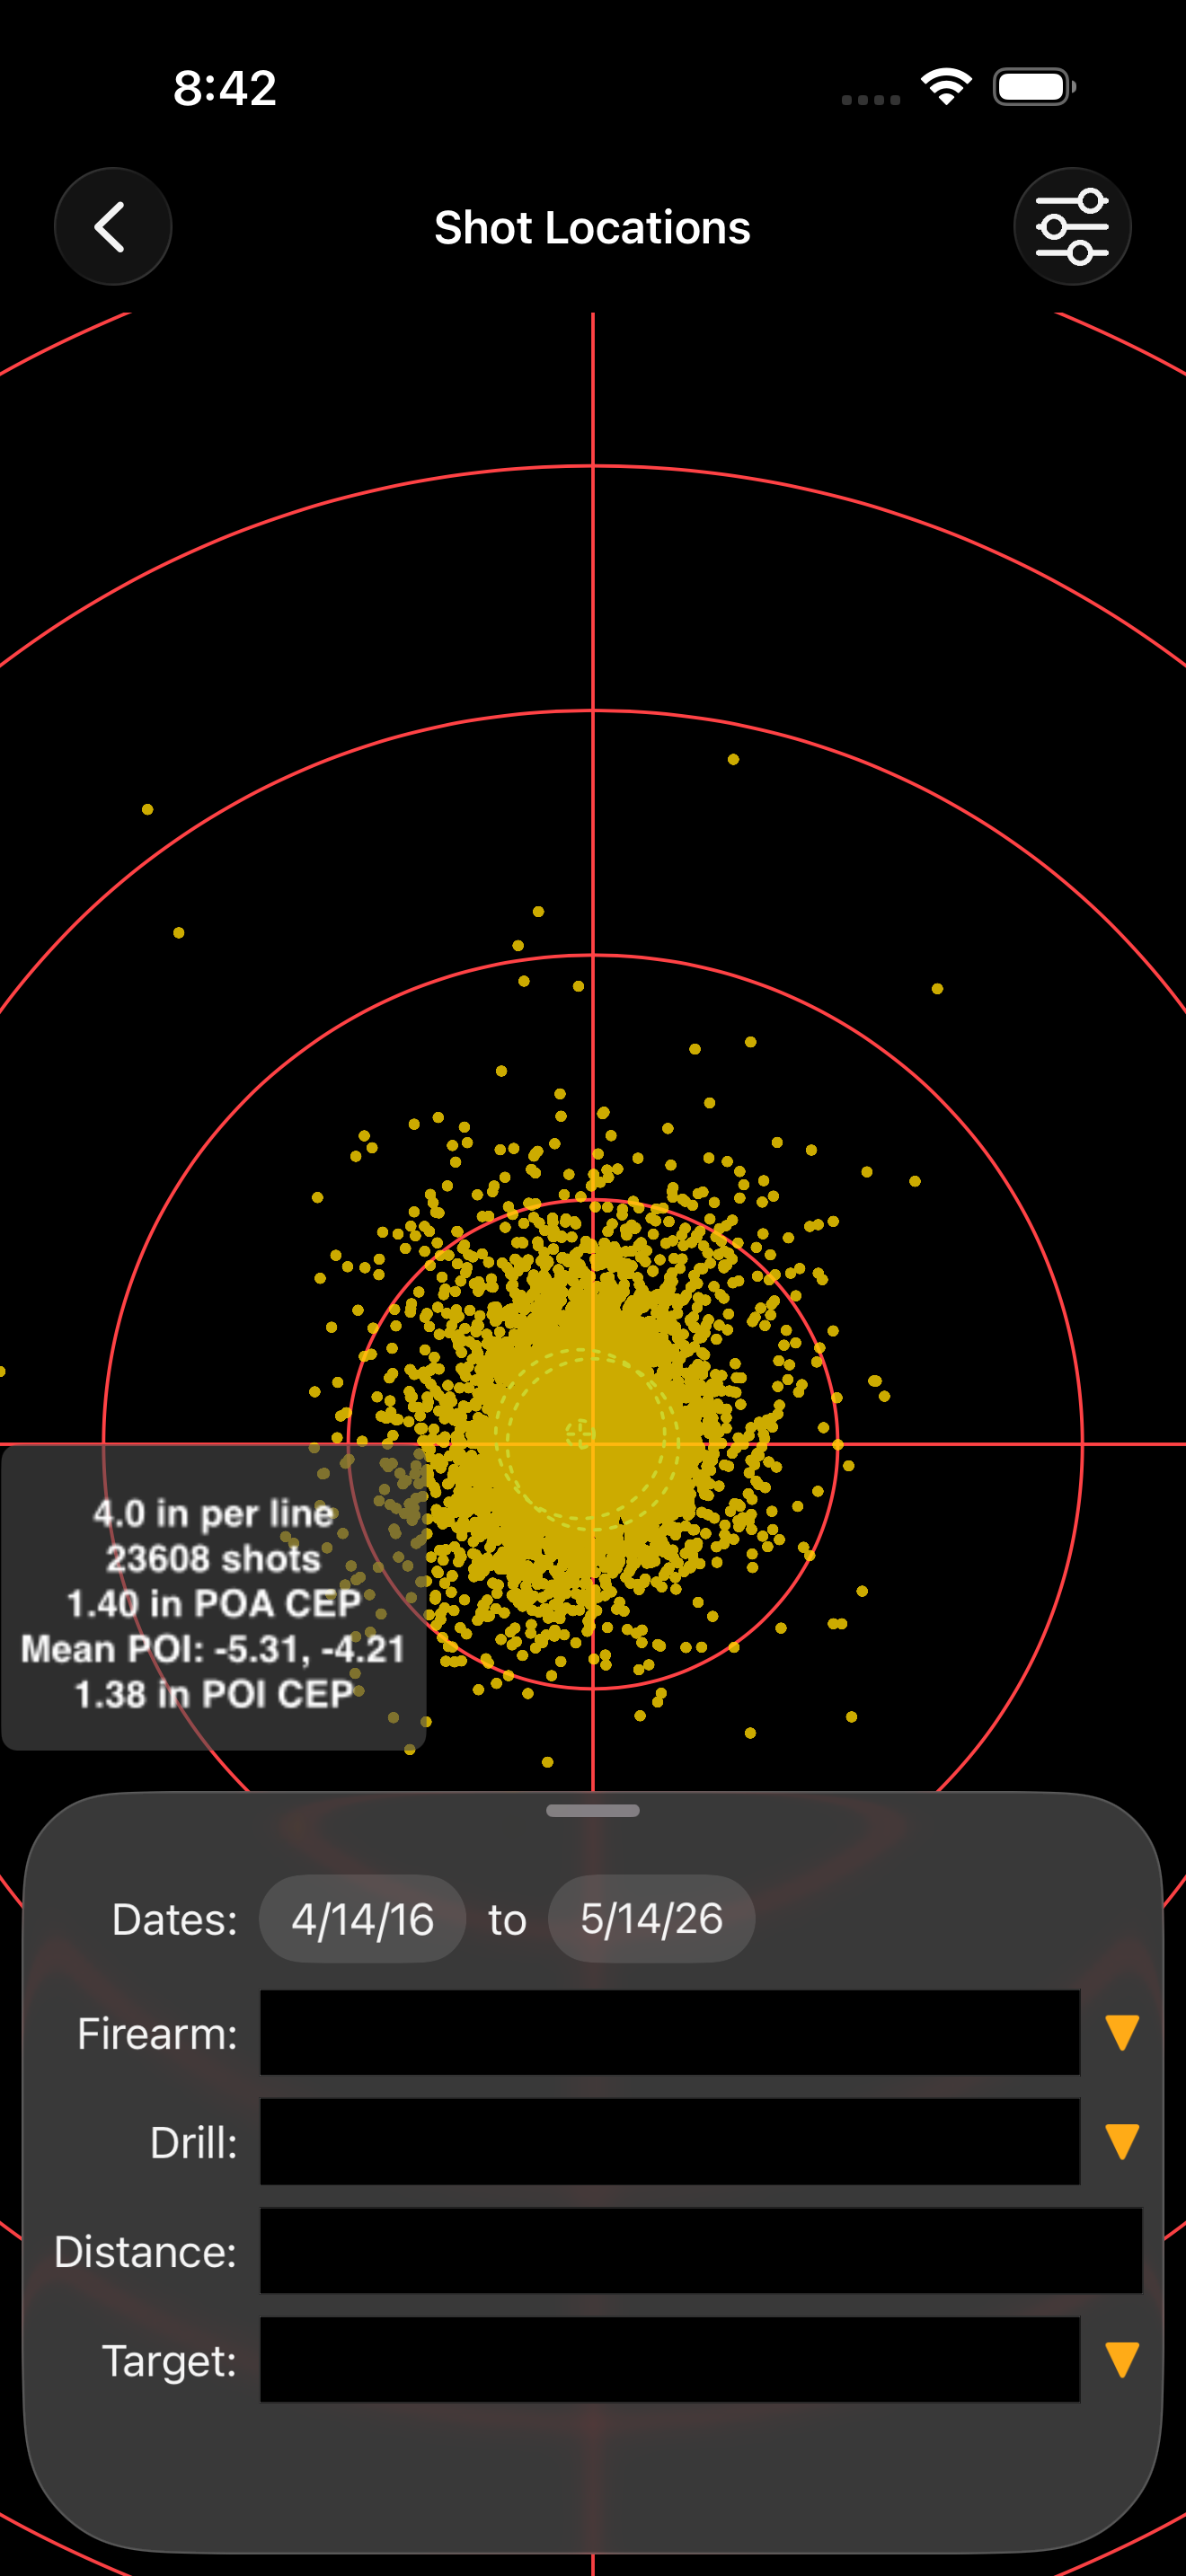
- Shot Locations — Every shot ever taken, plotted relative to point of aim
- Shot MOA — Group distribution in minutes of angle
- Target Relative Shots — Shot positions normalized to the target center, so they're comparable across distances and target types
- Ammo Type Groupings — Multiple ammunition types overlaid on a common target for side-by-side comparison
Trends
Time-series reports — how your shooting has changed over time.
- Scores — Score per session over time
- Accuracy — CEP — Circular Error Probable measured from your point of aim (the X-ring, where you're actually pointing)
- Precision — CEP — Circular Error Probable measured from your point of impact (your actual cluster center). The difference between this and Accuracy CEP is how much you'd benefit from sight adjustments.
- Shot Count — Volume of practice over time
- Flyers — How often outlier shots show up. Uses a robust-statistics method (modified Z-score with MAD) so the baseline isn't biased by the very outliers it's identifying.
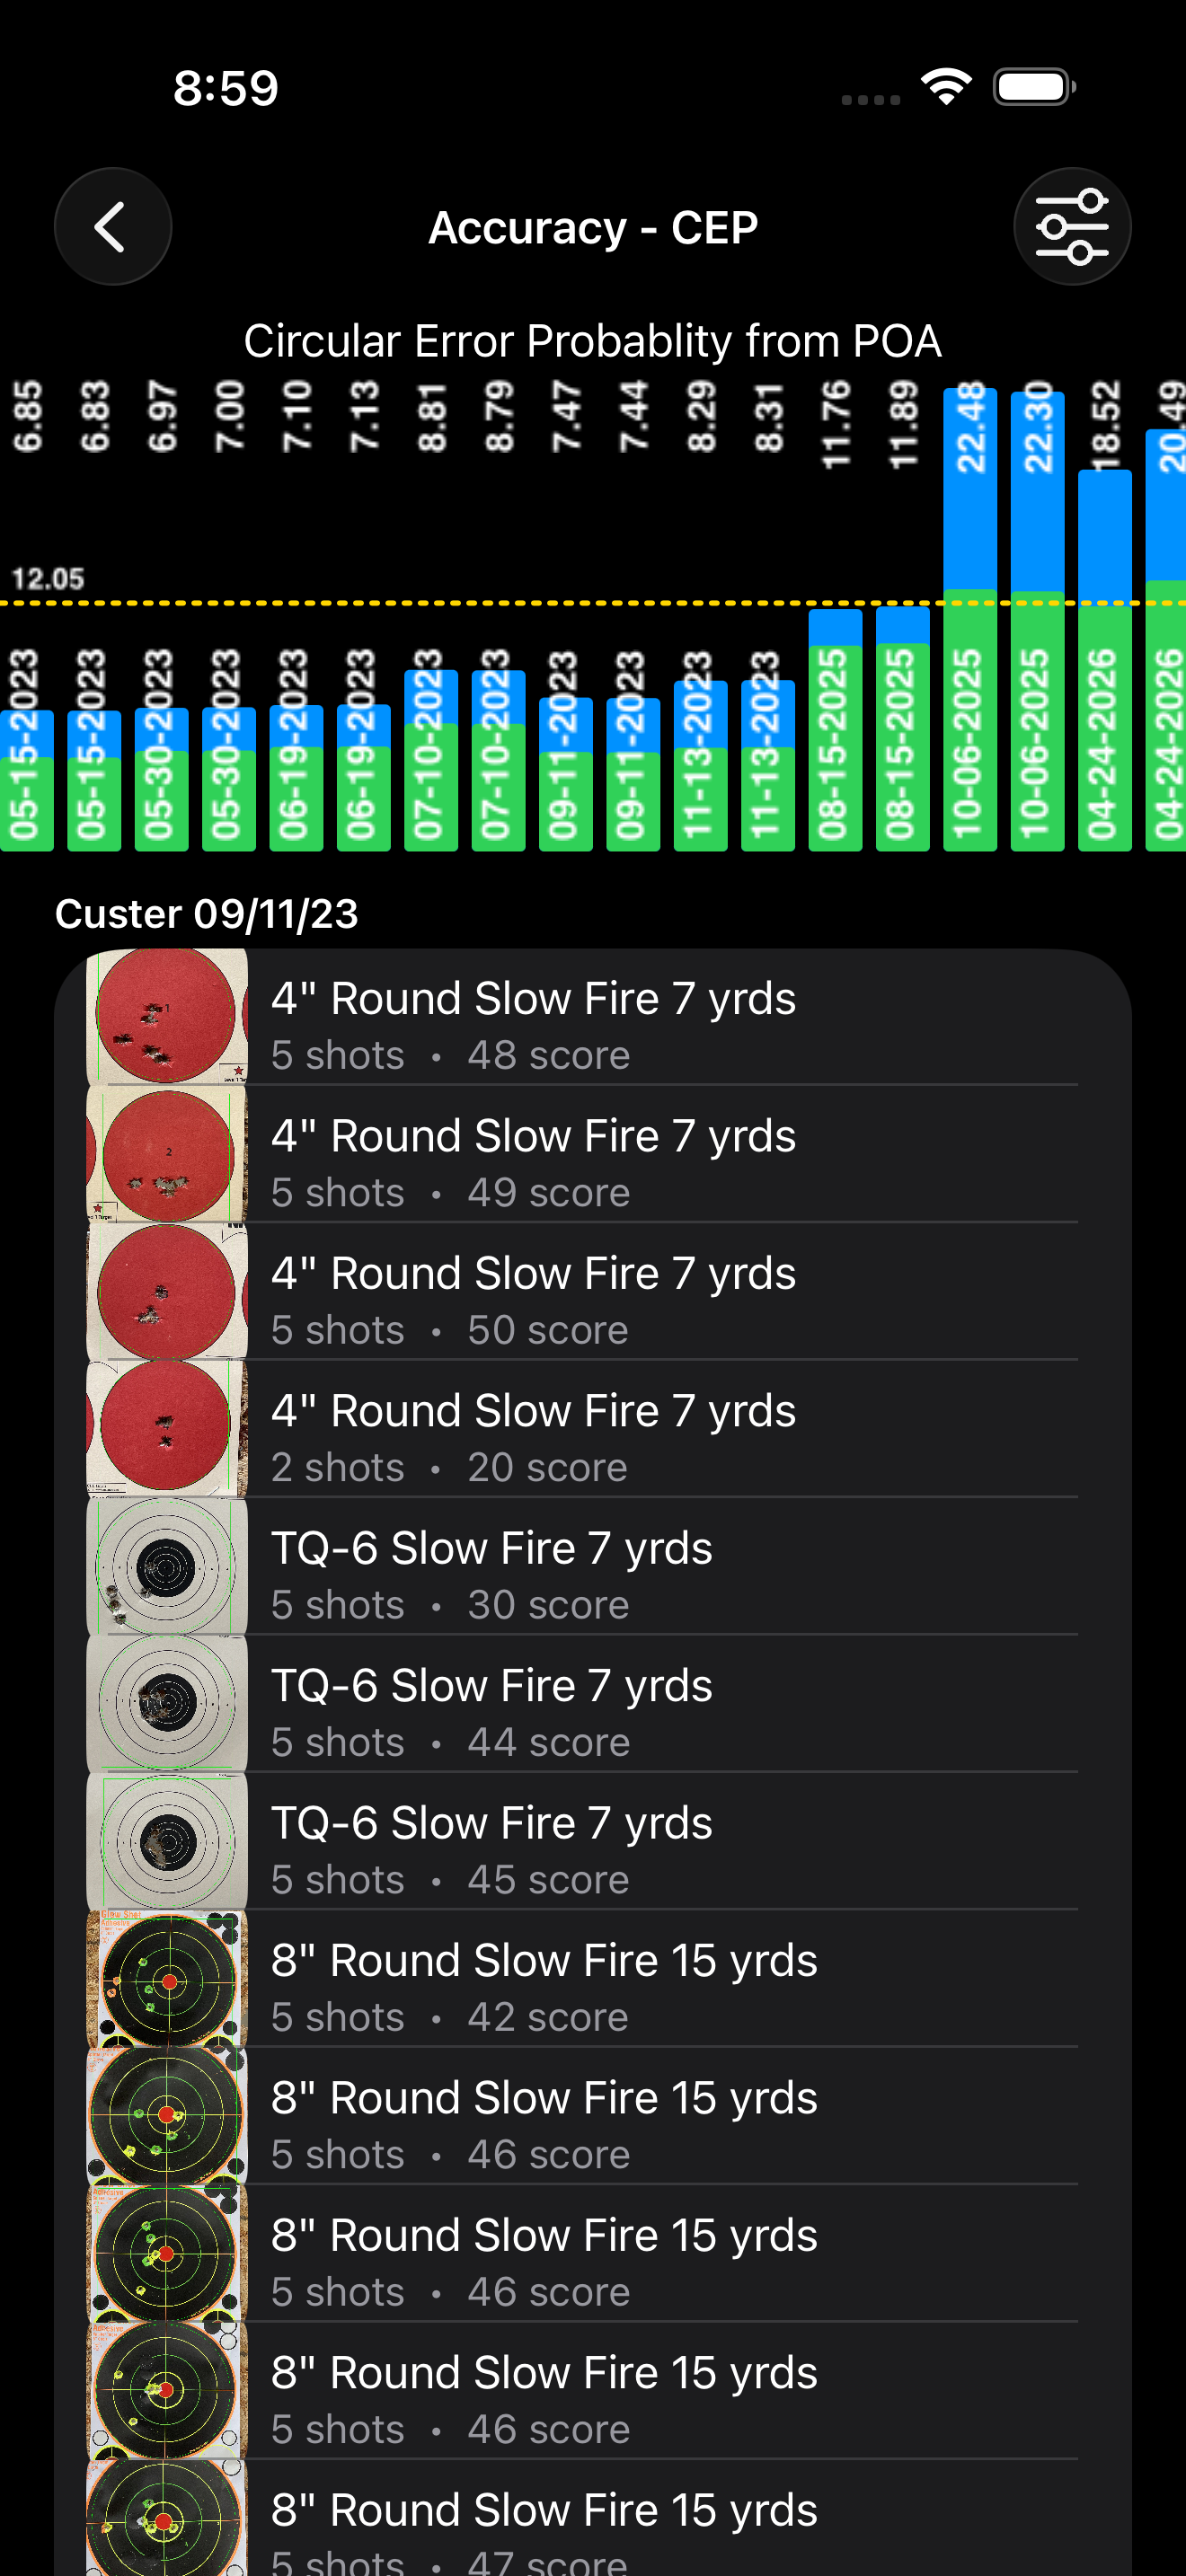
Filtering
Any report can be filtered. Above the report data:
- Start Date / Stop Date — Limit to a date range
- Drill — Show only sessions matching a specific drill (e.g., Slow Fire)
- Firearm — Show only sessions with one gun
- Range — One location
- Target Type — One target pattern
Tap Filter to apply your selections — the report refreshes with the new filtered data.
8. Reading a Session Analysis
The Session Analysis screen shows you the math for a single target. Tap a target on any session in History or Results to get there.
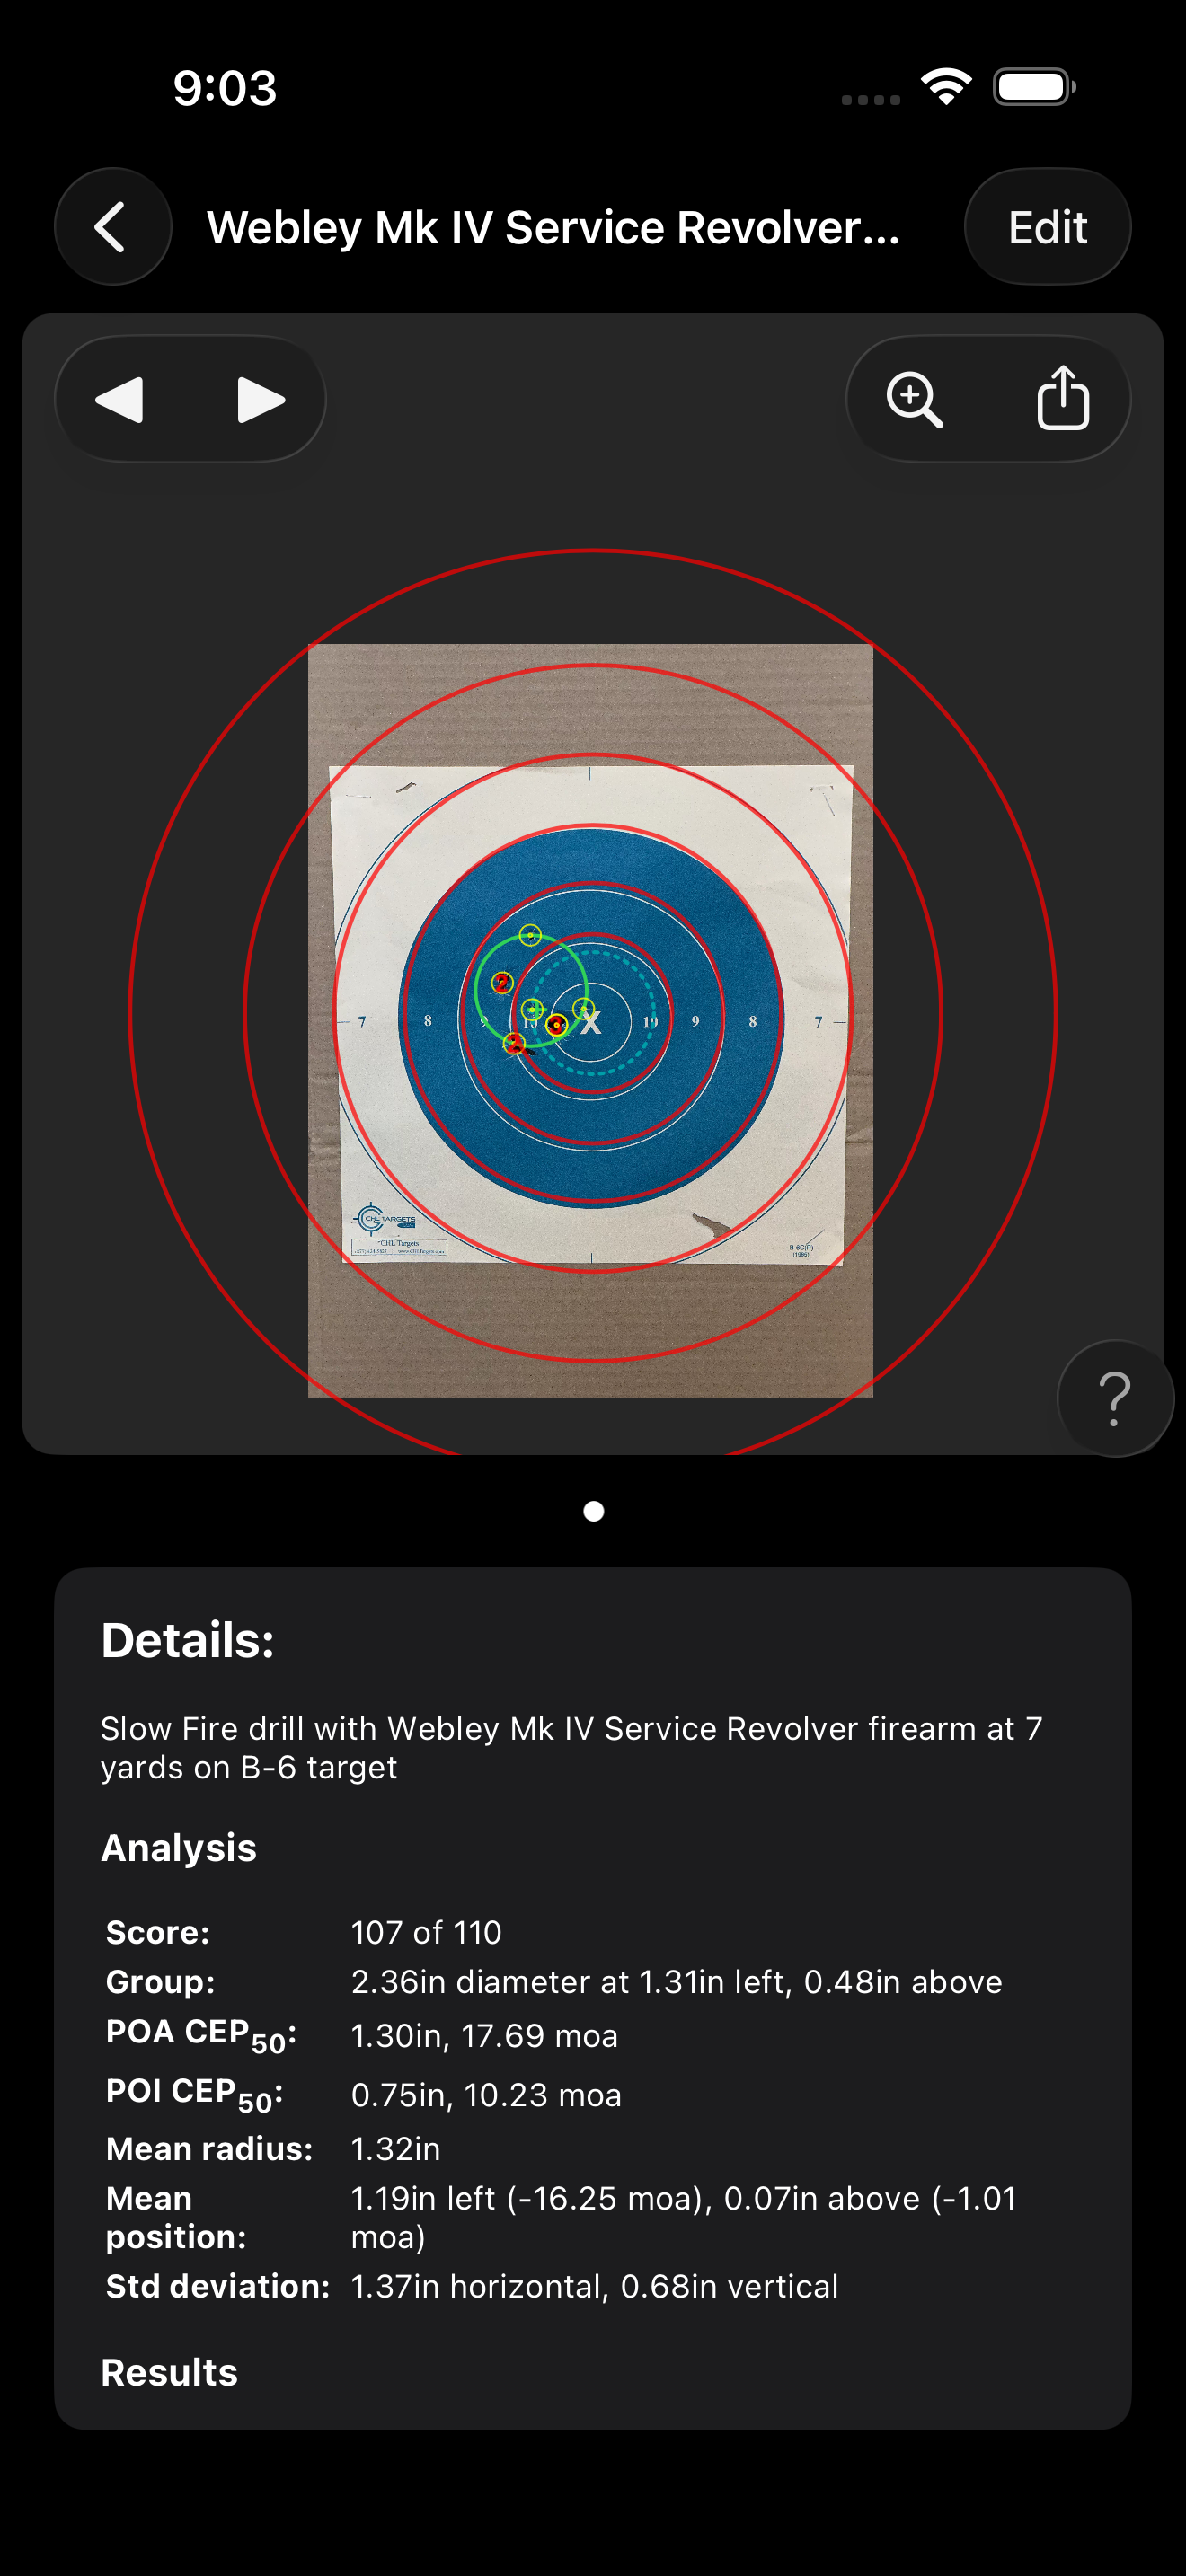
The toolbar
 Previous Target / Next Target — Step through the targets in this session
 Zoom Target Image — Open the target photo full-screen for detailed inspection (pinch to zoom, drag to pan)
- Share Analysis — Export the target image and statistics for sharing or printing
 Edit Session — Open the session for edits (firearm, distance, ammo, drill, notes, etc.)
What each statistic means
Here's what each line in the Analysis panel reports.
Score
Total scoring rings hit. Out of the maximum possible (e.g., 107 of 110 for a 10-shot Slow Fire on B-6).
Group
The diameter of the smallest circle that contains all your shots, with the offset of the group center from your point of aim (e.g., "2.36in diameter at 1.31in left, 0.48in above").
POA CEP₅₀
Circular Error Probable, point-of-aim. The radius of the smallest circle, centered on your point of aim, that contains 50% of your shots. This is your accuracy — how close you got to where you were aiming.
POI CEP₅₀
Circular Error Probable, point-of-impact. The radius of the smallest circle, centered on your actual cluster center, that contains 50% of your shots. This is your precision — how tight your shots cluster regardless of where they're aimed.
If POI CEP is much smaller than POA CEP, you're shooting tight but something is consistently pulling your shots away from your aim point. The cause might be the sights, but it could just as easily be your trigger pull, grip, stance, eye dominance, or any number of other systematic biases that move every shot in the same direction. The gap is your cue to look for what's biasing every shot the same way.
If POI CEP and POA CEP are close, your group itself is the limiting factor. The group has two contributors: shooter consistency, which technique can improve, and the firearm-and-ammunition combination's mechanical precision — every pairing has a floor group size, the minimum CEP that even perfect technique can't beat.
The practical way to measure mechanical precision is from a proper bench rest, which removes as much shooter variability as possible — though even there, technique still matters; a wobbly setup or poor trigger control will inflate the measured floor. Comparing the same drill across different loads, or against a known-good firearm, is how you separate shooter from gear over time.
Mean Radius
Average distance from the group center to each shot. A complementary measure to group size that's less distorted by a single outlier.
Mean Position
Where your shots are centered relative to the target. Negative values are left or below the center; positive values are right or above.
MOA
Minute of angle — an angular measurement that's independent of distance. At 100 yards, 1 MOA ≈ 1.047 inches. The app reports MOA conversions for accuracy and precision so you can compare across distances.
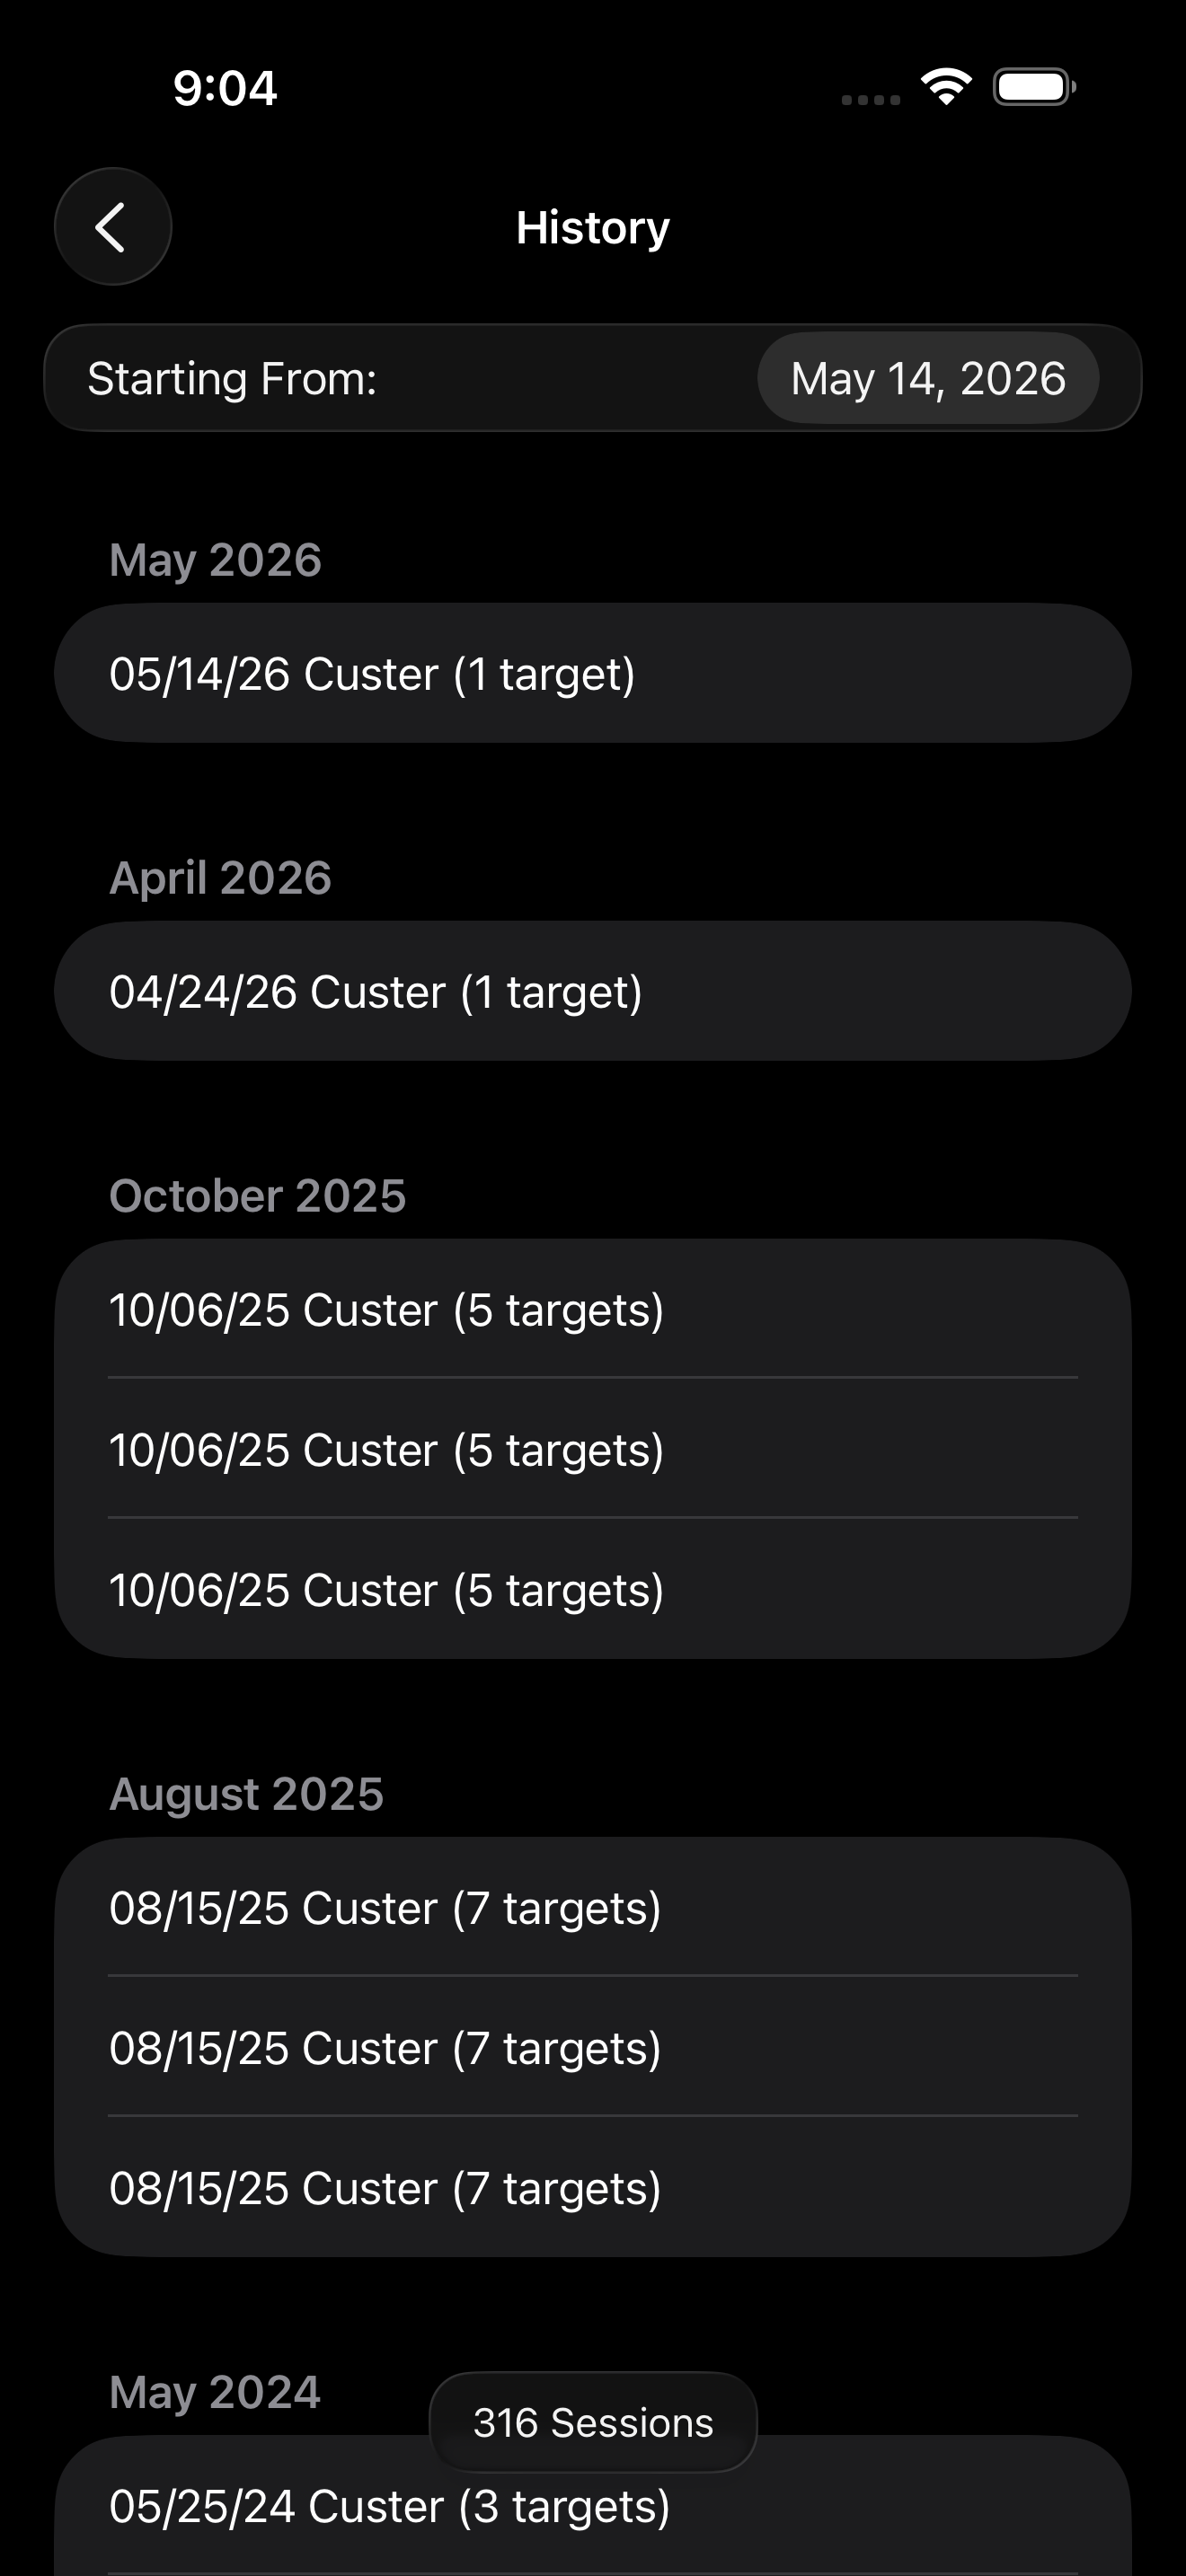
9. History
Tap History on the home screen for a chronological list of every session you've ever recorded. Tap a session to open it — you'll see the targets, the form data, and the analysis. You can edit or delete a session from the detail view if you need to clean something up.
10. Settings
The Settings screen has five tabs across the top.
Guns
Your firearm collection. Each entry tracks:
- Name — Nickname or short label
- Model, Manufacturer, Serial, Caliber — Standard identification
- Round Count — Total rounds tracked through the gun (auto-updated as sessions are saved)
- Notes — Maintenance, modifications, anything you want to remember
Add a gun with the + button. Swipe a row to delete.
Tip — assign a caliber for better detection. You can run sessions without choosing a firearm at all (a "null gun"), but giving the firearm a caliber tells the machine learning model how big a bullet hole should look on the target. Both detection accuracy and the on-screen display improve noticeably when caliber is set.
Ammo
Your ammunition lots and types. Each entry has:
- Name — Brand and load description
- Caliber, Grain, Lot — Specs
- Enabled — Toggle off to hide from selection lists without deleting
Range
The shooting locations you frequent. Just Name and Details (address or description). If you've enabled "Use Location to determine range" in Options, the app recognizes ranges you've shot at and auto-fills the field for new sessions.
Data
Reference lists for the dropdowns elsewhere in the app:
- Manufacturer — Firearm makers
- Drill — Slow Fire, Rapid Fire, IDPA Course, etc.
- Target Type — All available target patterns (with previews and enable/disable toggles)
- Caliber — Cartridge designations
- Location — (Same list as the Range tab)
Use this tab to clean up duplicates or add custom entries.
There's also an Image Storage section that converts your stored target images to HEIC format to save space. This runs in the background once started.
Options
Display, functionality, privacy, and data settings.
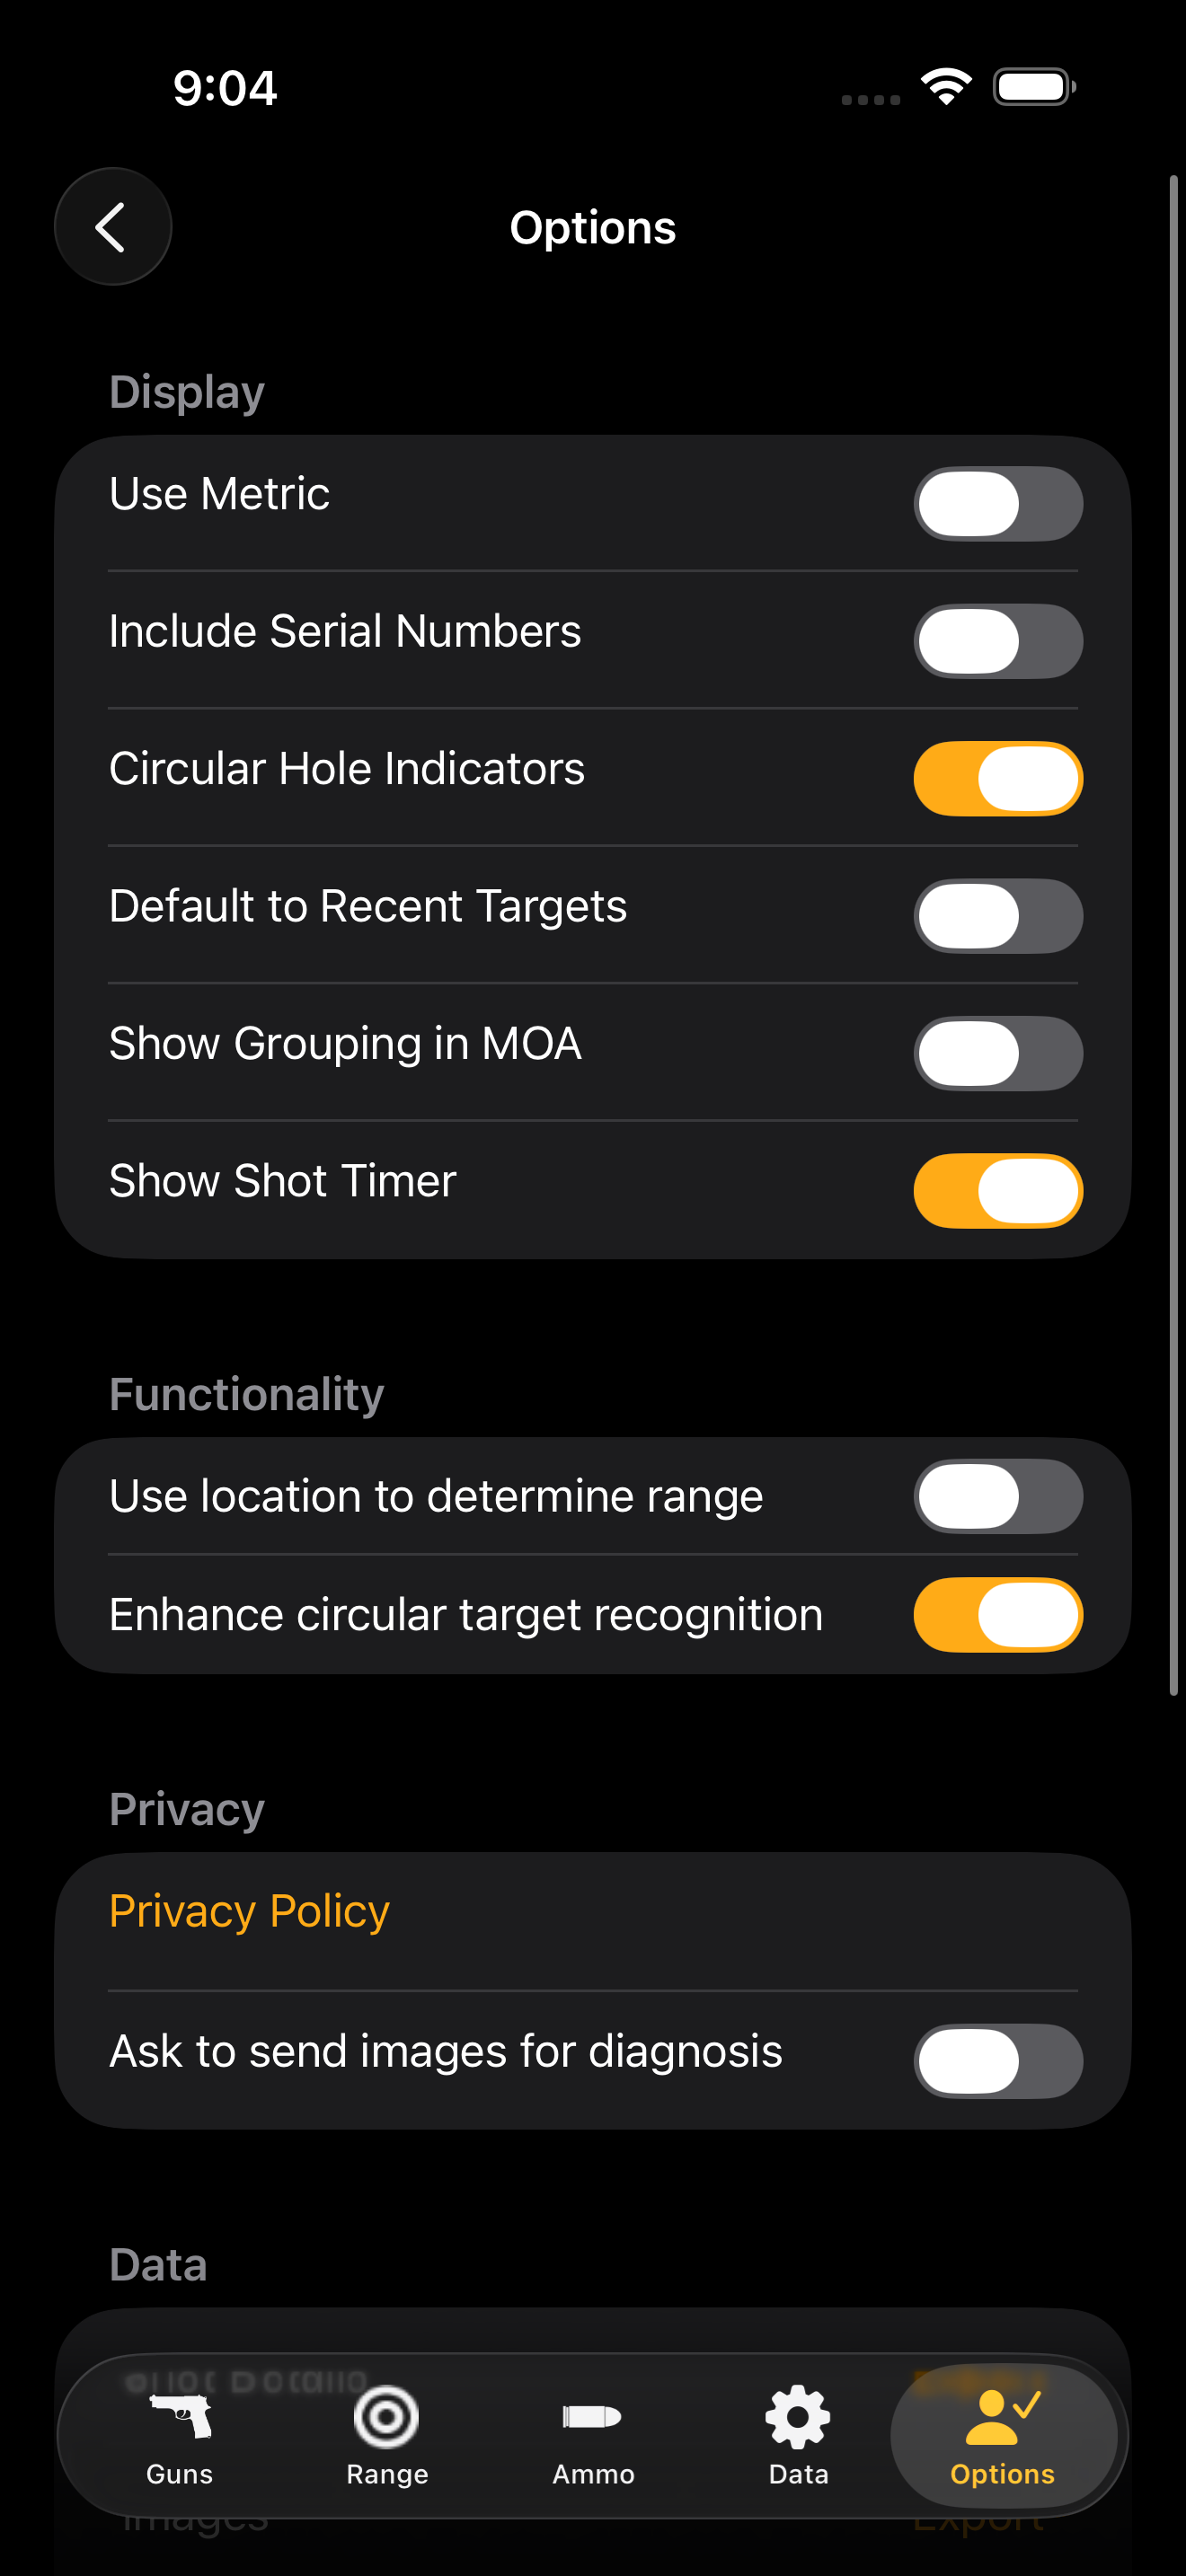
Display
- Use Metric — Display distances in cm and meters and MOA in metric units (vs. inches and yards)
- Include Serial Numbers — Show firearm serial numbers in reports (off by default for privacy)
- Circular Hole Indicators — Mark detected shots as circles instead of crosshairs
- Default to Recent Targets — Pre-populate new sessions with your most-used target types
- Show Grouping in MOA — Display group sizes in MOA rather than raw distance
- Show Shot Timer — Show the Shot Timer button on the Shoot screen
Functionality
- Use Location to determine range — Recognize the range you're at via GPS and auto-fill (location is on-device only, never transmitted)
- Enhance circular target recognition — Enable extra ML processing for circular bullseye patterns
Privacy
- Privacy Policy — Opens the privacy policy in your browser
- Ask to send images for diagnosis — Prompt before any image is uploaded (off entirely if you never want this)
Data
- Shot Details / Export — Export shot data as CSV
- Images / Export — Export target images as PNG
- Targets / Rescore — Re-run ML detection on every saved target with the current model
- Common Lists / DeDupe — Consolidate duplicate entries across reference lists
- Backup / Run — Create a full JSON backup of your scorebook
- Restore / Run — Restore from a previously saved JSON backup
Help
- App version number
- Link to this help page
11. Backup, Restore & Export
Target Detect gives you four different ways to get your data out of the app, each for a different purpose.
Backup (Options → Data → Backup)
Produces a single JSON archive containing your entire scorebook — sessions, shots, targets, photos, and all reference data. Use this for archiving offline, moving between Apple IDs, or seeding a fresh install. For ordinary use, iCloud already syncs everything automatically across your devices — backup is for the cases iCloud doesn't cover.
Restore (Options → Data → Restore)
Reads a JSON archive produced by Backup and reconstructs your scorebook. Existing data is wiped before the restore runs. Use this when:
- You're moving to a new Apple ID (iCloud can't sync across IDs)
- You're recovering from a corrupted iCloud state
- You want to roll back to an earlier known-good archive
Export — Shot Details (Options → Data → Shot Details → Export)
Produces CSV files with shot-level data — coordinates, scores, timestamps, session info. Use this for analysis in Excel, R, Python, or wherever you want to slice the data outside the app.
Export — Images (Options → Data → Images → Export)
Exports all your target photos as PNG files. Use this for printing, sharing, or archiving the visuals separately from the data.
The difference at a glance: Backup is for restoring the app's state. Export is for getting your data into other tools.
12. Privacy & iCloud
Target Detect runs entirely on your device. Your scorebook stays in your own iCloud account — there's no server we operate, no analytics, no third-party services. We have zero access to what you store.
Full details: Privacy Policy.
13. Contact & Support
Email questions, feedback, or bug reports to support@targetdetect.com. If you're emailing about a specific target or score, attaching a screenshot or photo makes troubleshooting much faster.