Help
Overview
TargetDetect is an iOS application that allows you to record and analyze your target shooting. It uses machine learning
(a.k.a. artifical intelligence) to determine where your shots hit on the target, and then determines the score and shot placement.
Each target is classified by firearm, ammunition, distance, date, what range you're at, etc. You are then able to review your data
by any of those parameters.
Start Screen
When the app starts, you are presented with a set of four possible choices. Those choices are:
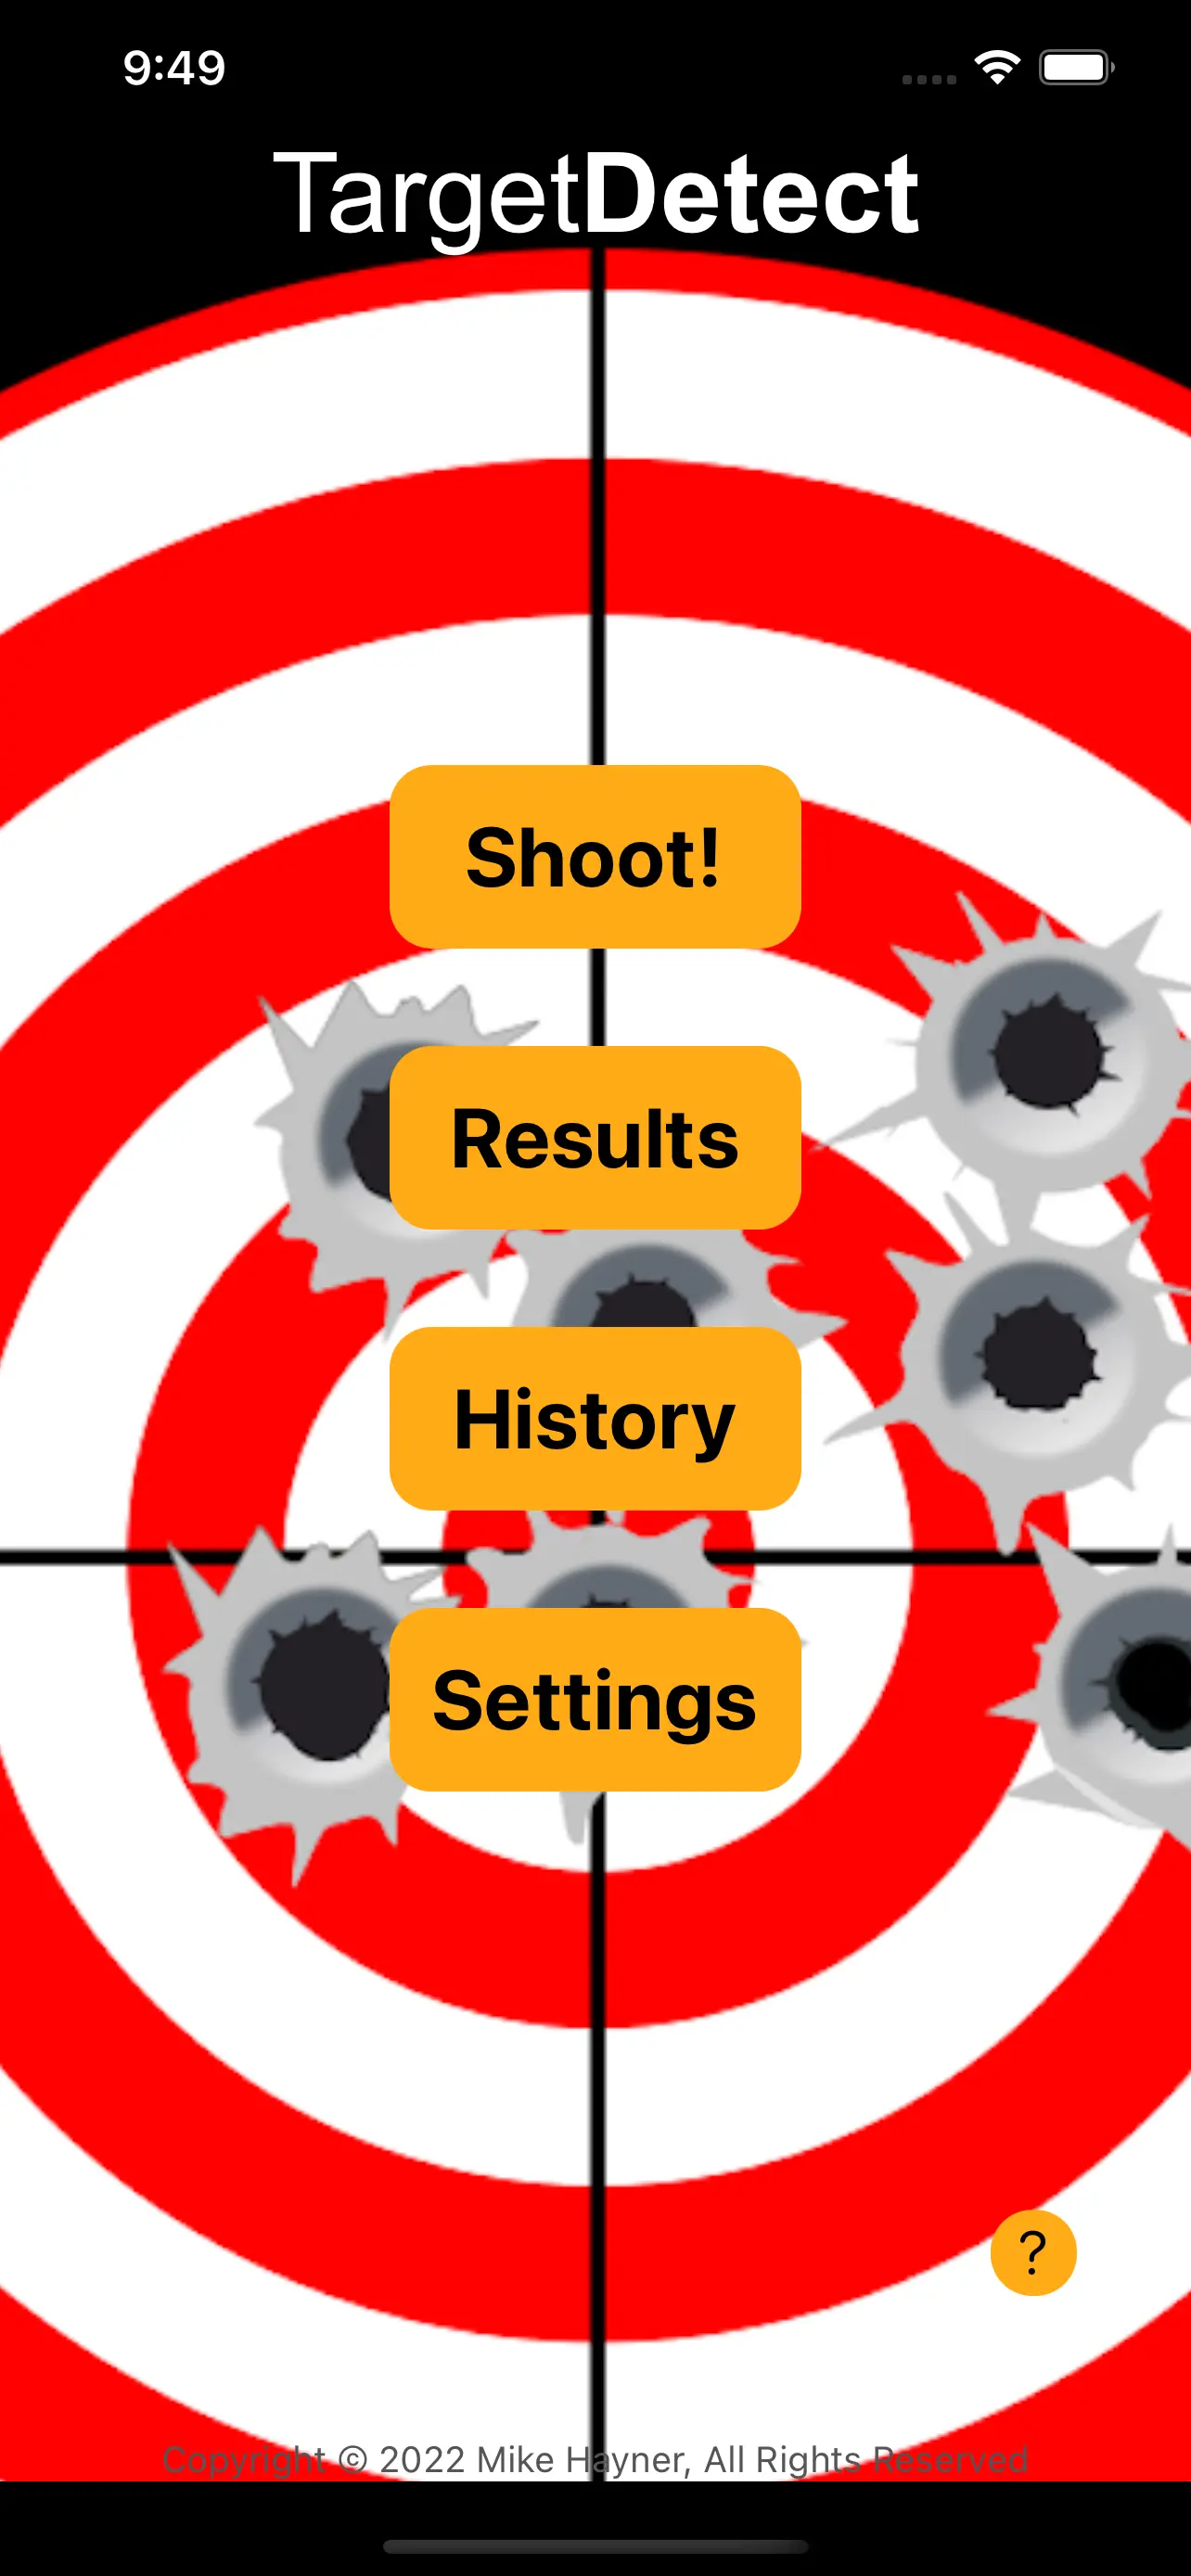
The question mark icon will open this page.
This screen allows you to start a shooting session. You can enter in basic info about the session, and once you've shot a target,
you take a picture of that target so that it can be analyzed.
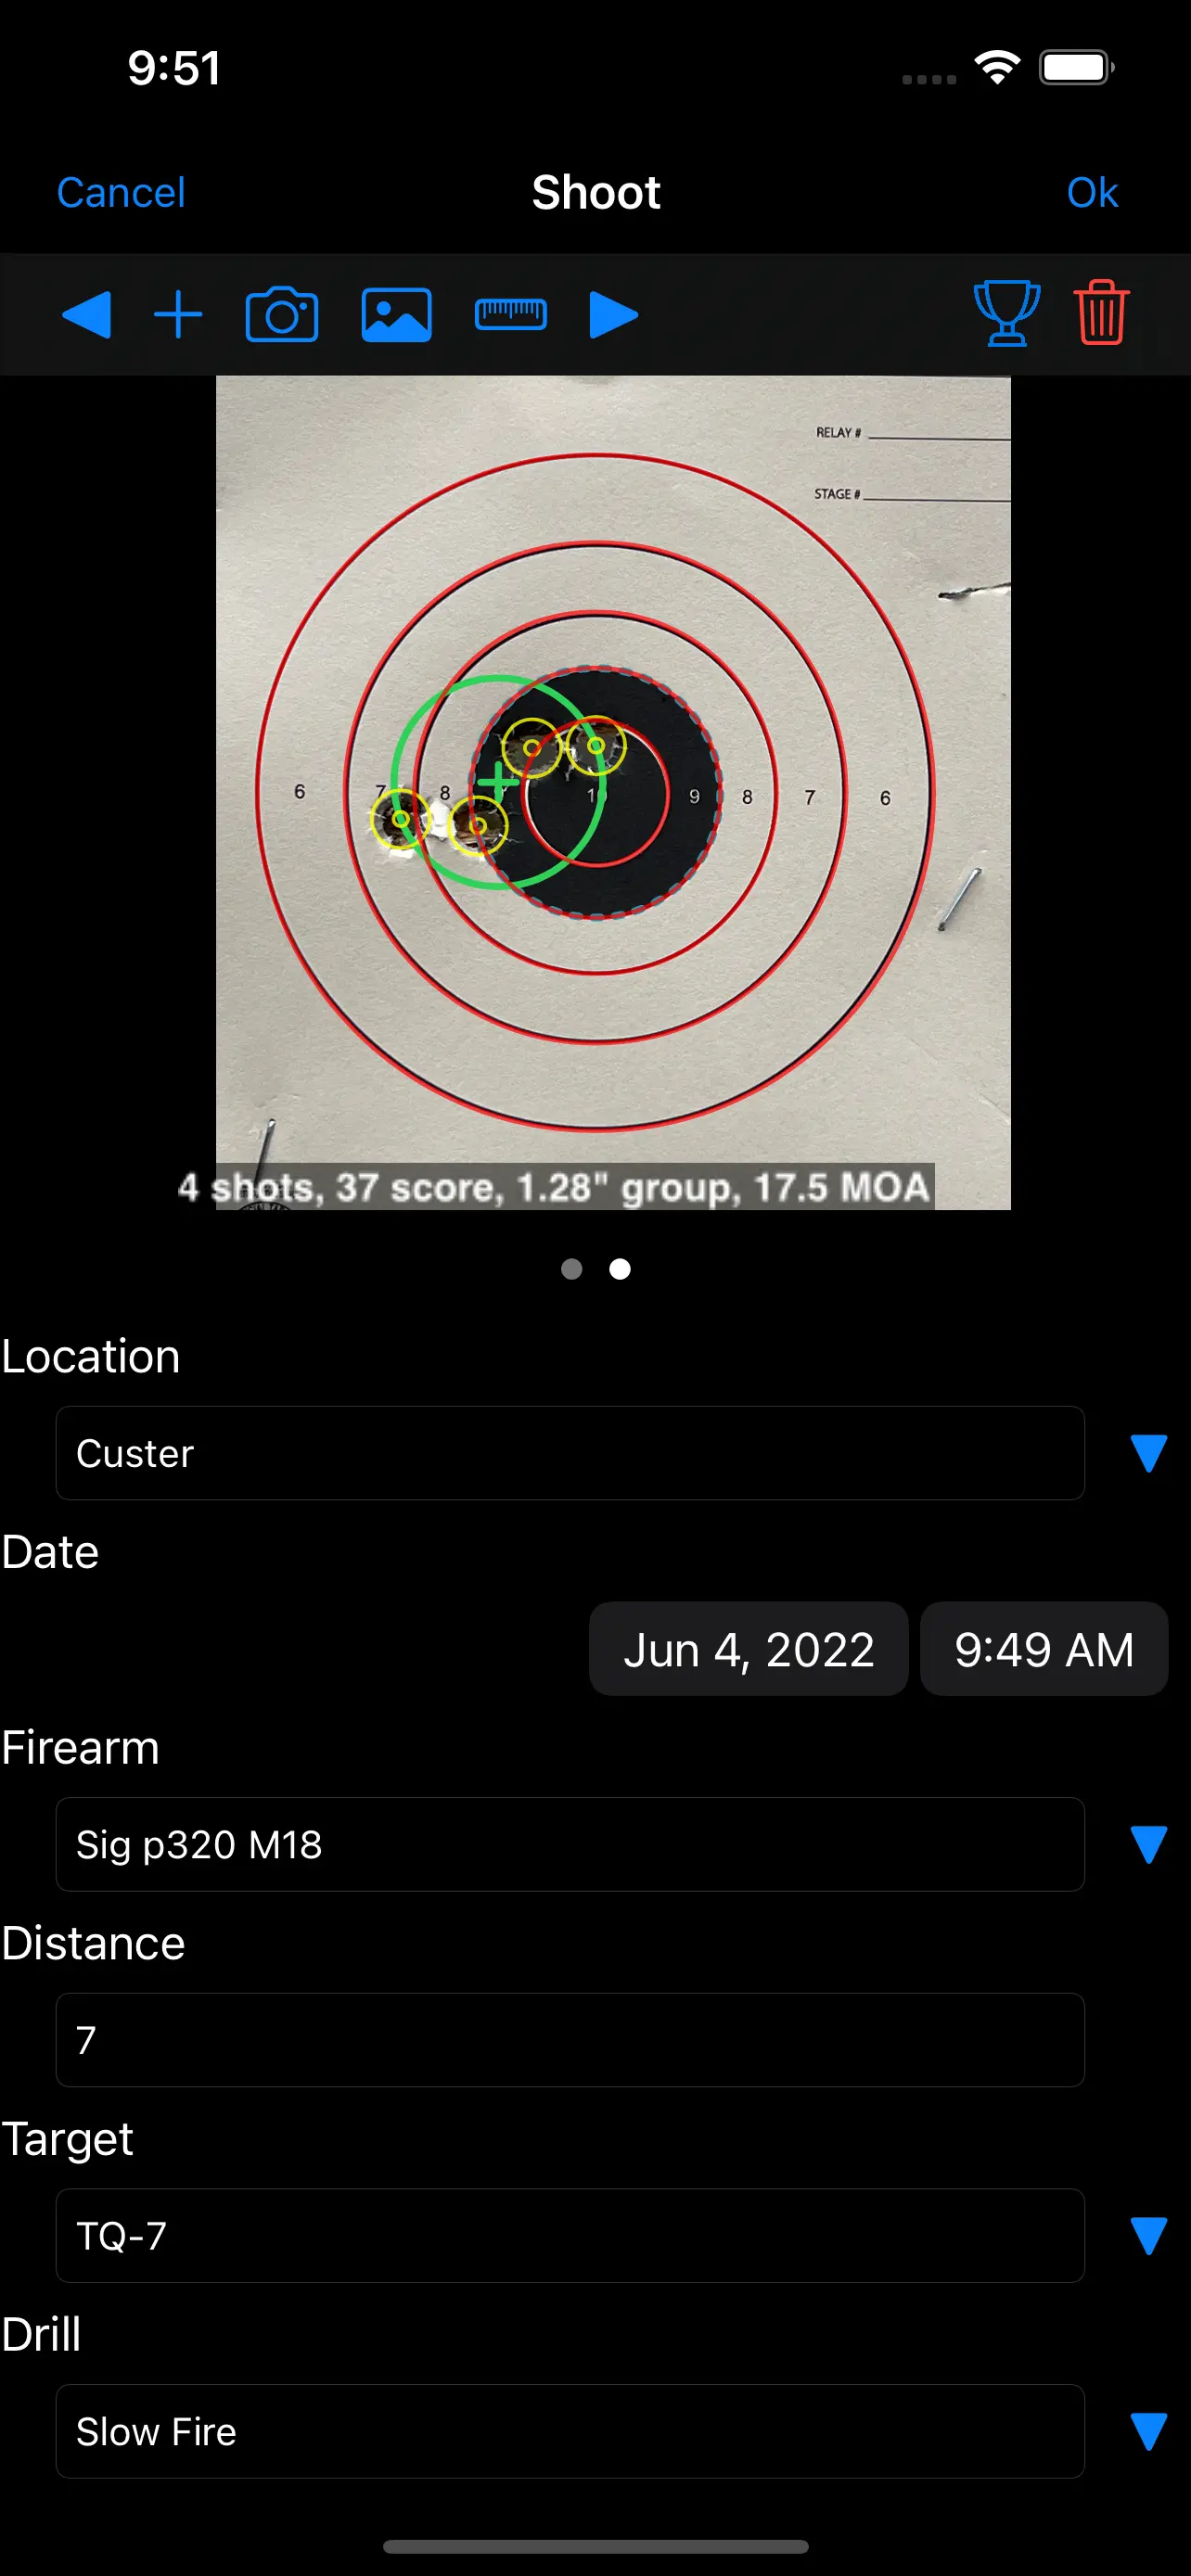
The top button bar consists of the following buttons:
- Previous Target - switches to the previous target image, if one exists.
- Add Target - allows you to take an image of a new target.
- Update Photo - replaces the current photo with a new one.
- Add Image - adds an image from the photo library.
- Measure - allows you to view and edit the shot placement on the target.
- Next Target - switches to the next target image, if one exists.
- Results - allows you to view the results and analysis for the target.
- Delete - deletes the current target image.
Various properties are associated with the target. Beneath the target image, those properties are shown.
- Location - the shooting range where you are shooting from.
- Date - the date and time that you shot the target.
- Firearm - the firearm that you used.
- Distance - the distance at which you were shooting the target in yards.
- Ammo - the ammuntion that you were using.
- Notes - any notes that you care to add. Allows you to document any extra information.
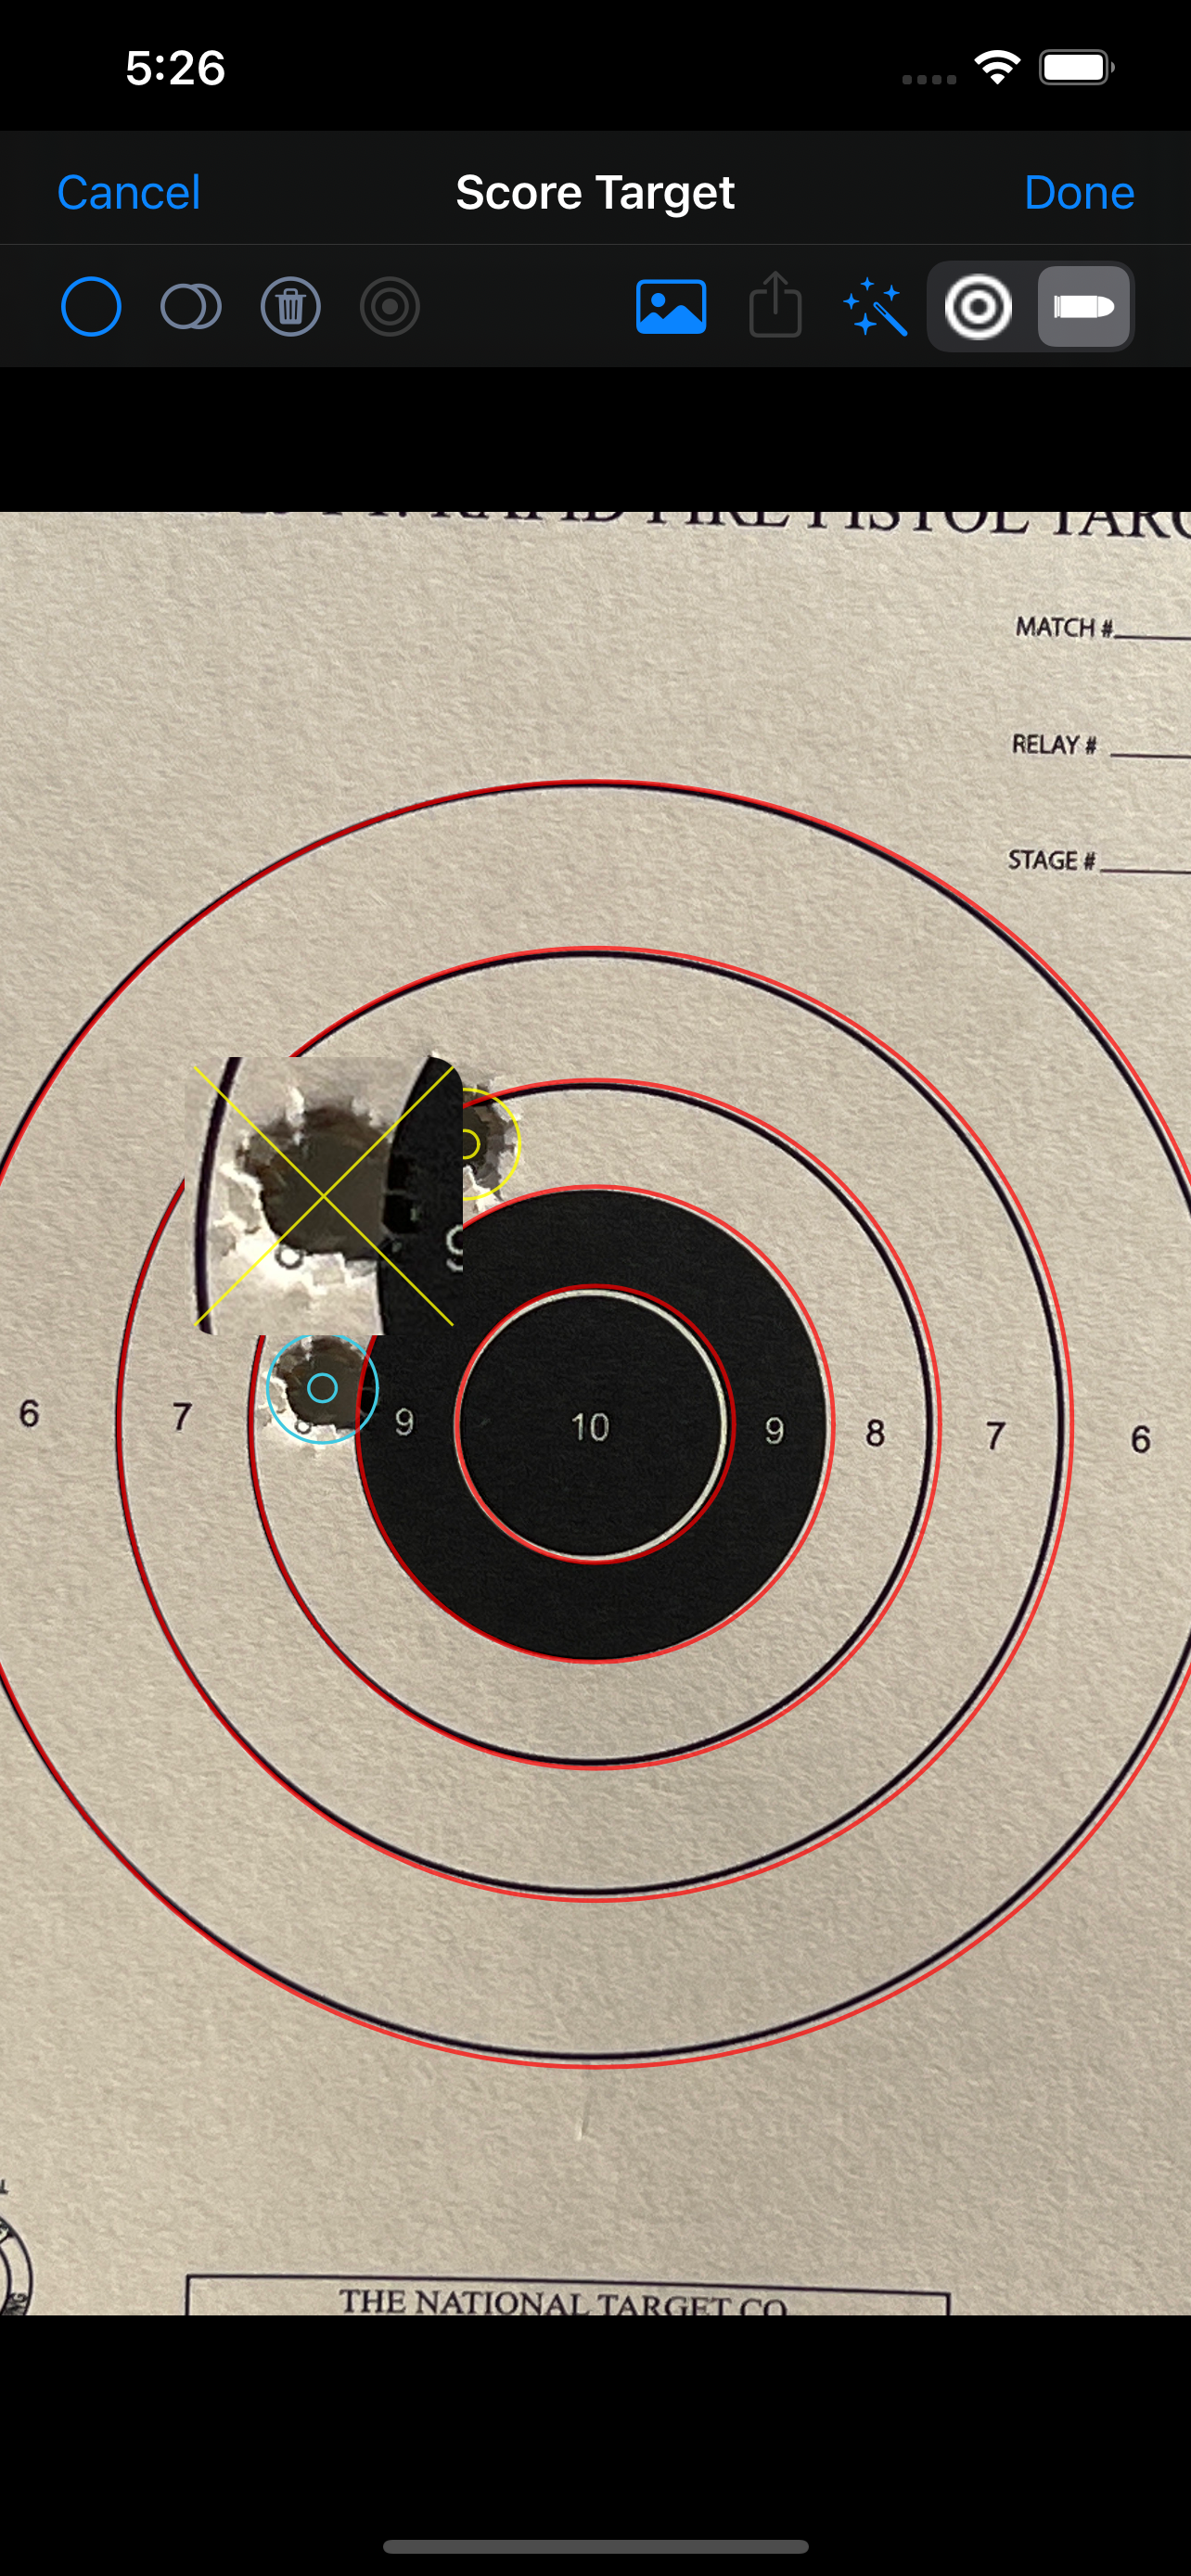
Shows the target along with controls to mark shots. There are two modes to this screen. Bullseye (or target) mode
allows you to adjust the image so that the image of the target coincides with the outline of the target. Bullet
(or hit) mode allows you to place or edit the shots that have hit the target. The selector on the right side of the toolbar controls this mode.

The controls are postion in a button bar at the top of the screen. The controls on the left are:
- Single Hit - marks the location of a single shot
- Multiple Hit - marks the location of multiple shots close enough together that they cannot be differentiated.
- Delete Hit - deletes a hit on the target
- Bullseye - allows you to choose the target type
The controls on the right are:
- Image Modify - opens a new screen with image modification functionality including keystone correction.
- Send - if you believe that the recognition was not good, you can send the image to us for analysis.
- Machine Learning - reruns the artifical intelligence recognition.
- Mode - selects the mode that the screen operates in. Either "target" for adjusting the target, or "bullet" to adjust the bullet holes.
If you are in bullet mode, and press on a bullet hole for a moment, a context menu will pop up. This menu contains the following options:
- Move - Allows you to drag the hole to a new location.
- Shots - Opens a submenu to select the number of hits that a hole represents.
- Delete - Deletes the hole.
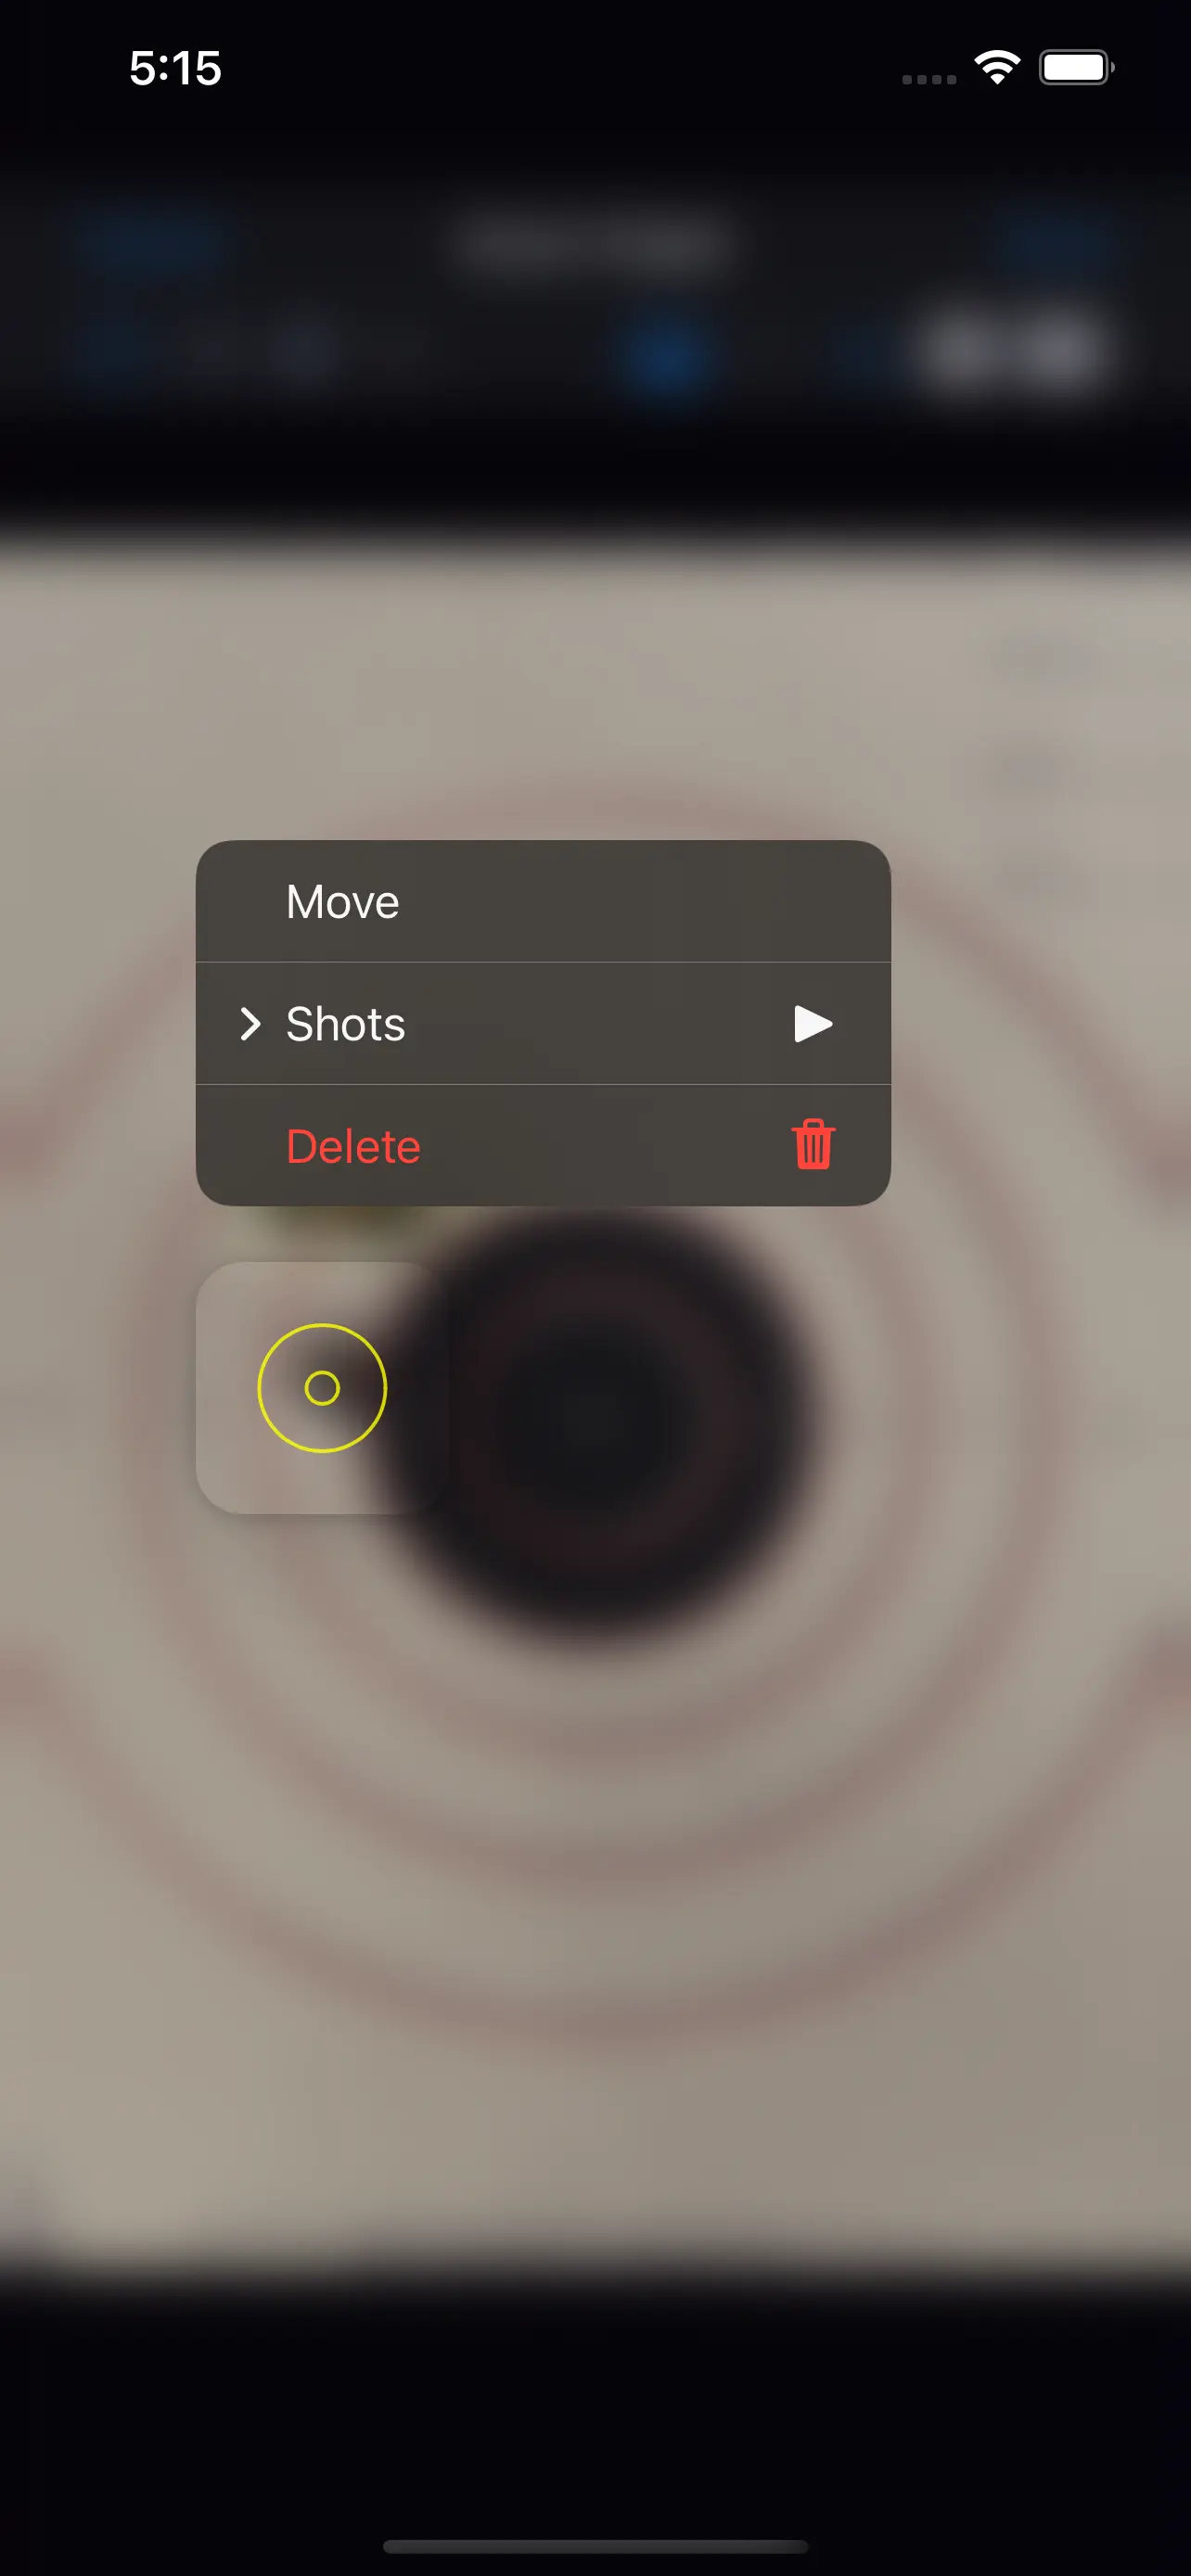
If you choose to move a hole, the hole will be rendered in blue, and a magnified popup window will show the part of the target that is underneath your finger. This allows you to precisely place the bullet hole.
If you have an image that was not photographed straight-on, you can use the Image Modify screen to correct it. Note that if you have the option to re-photograph the target, that is likely the best option.
This screen has the following buttons:
- Rotate Left - rotates the image counter-clockwise.
- Rotate Right - rotates the image clockwise.
- Keystone Adjust - after you've dragged the four yellow points to the four corners of the target, this will run a keystone correction on the image.
- Scale Image Vertically - increases the vertical aspect of the image, while keeping the horizontal aspect the same.
- Scale Image Horizontally - increases the horizontal aspect of the image, while keeping the vertical aspect the same.
This screen shows a list of reports that you can generate about your target shooting.
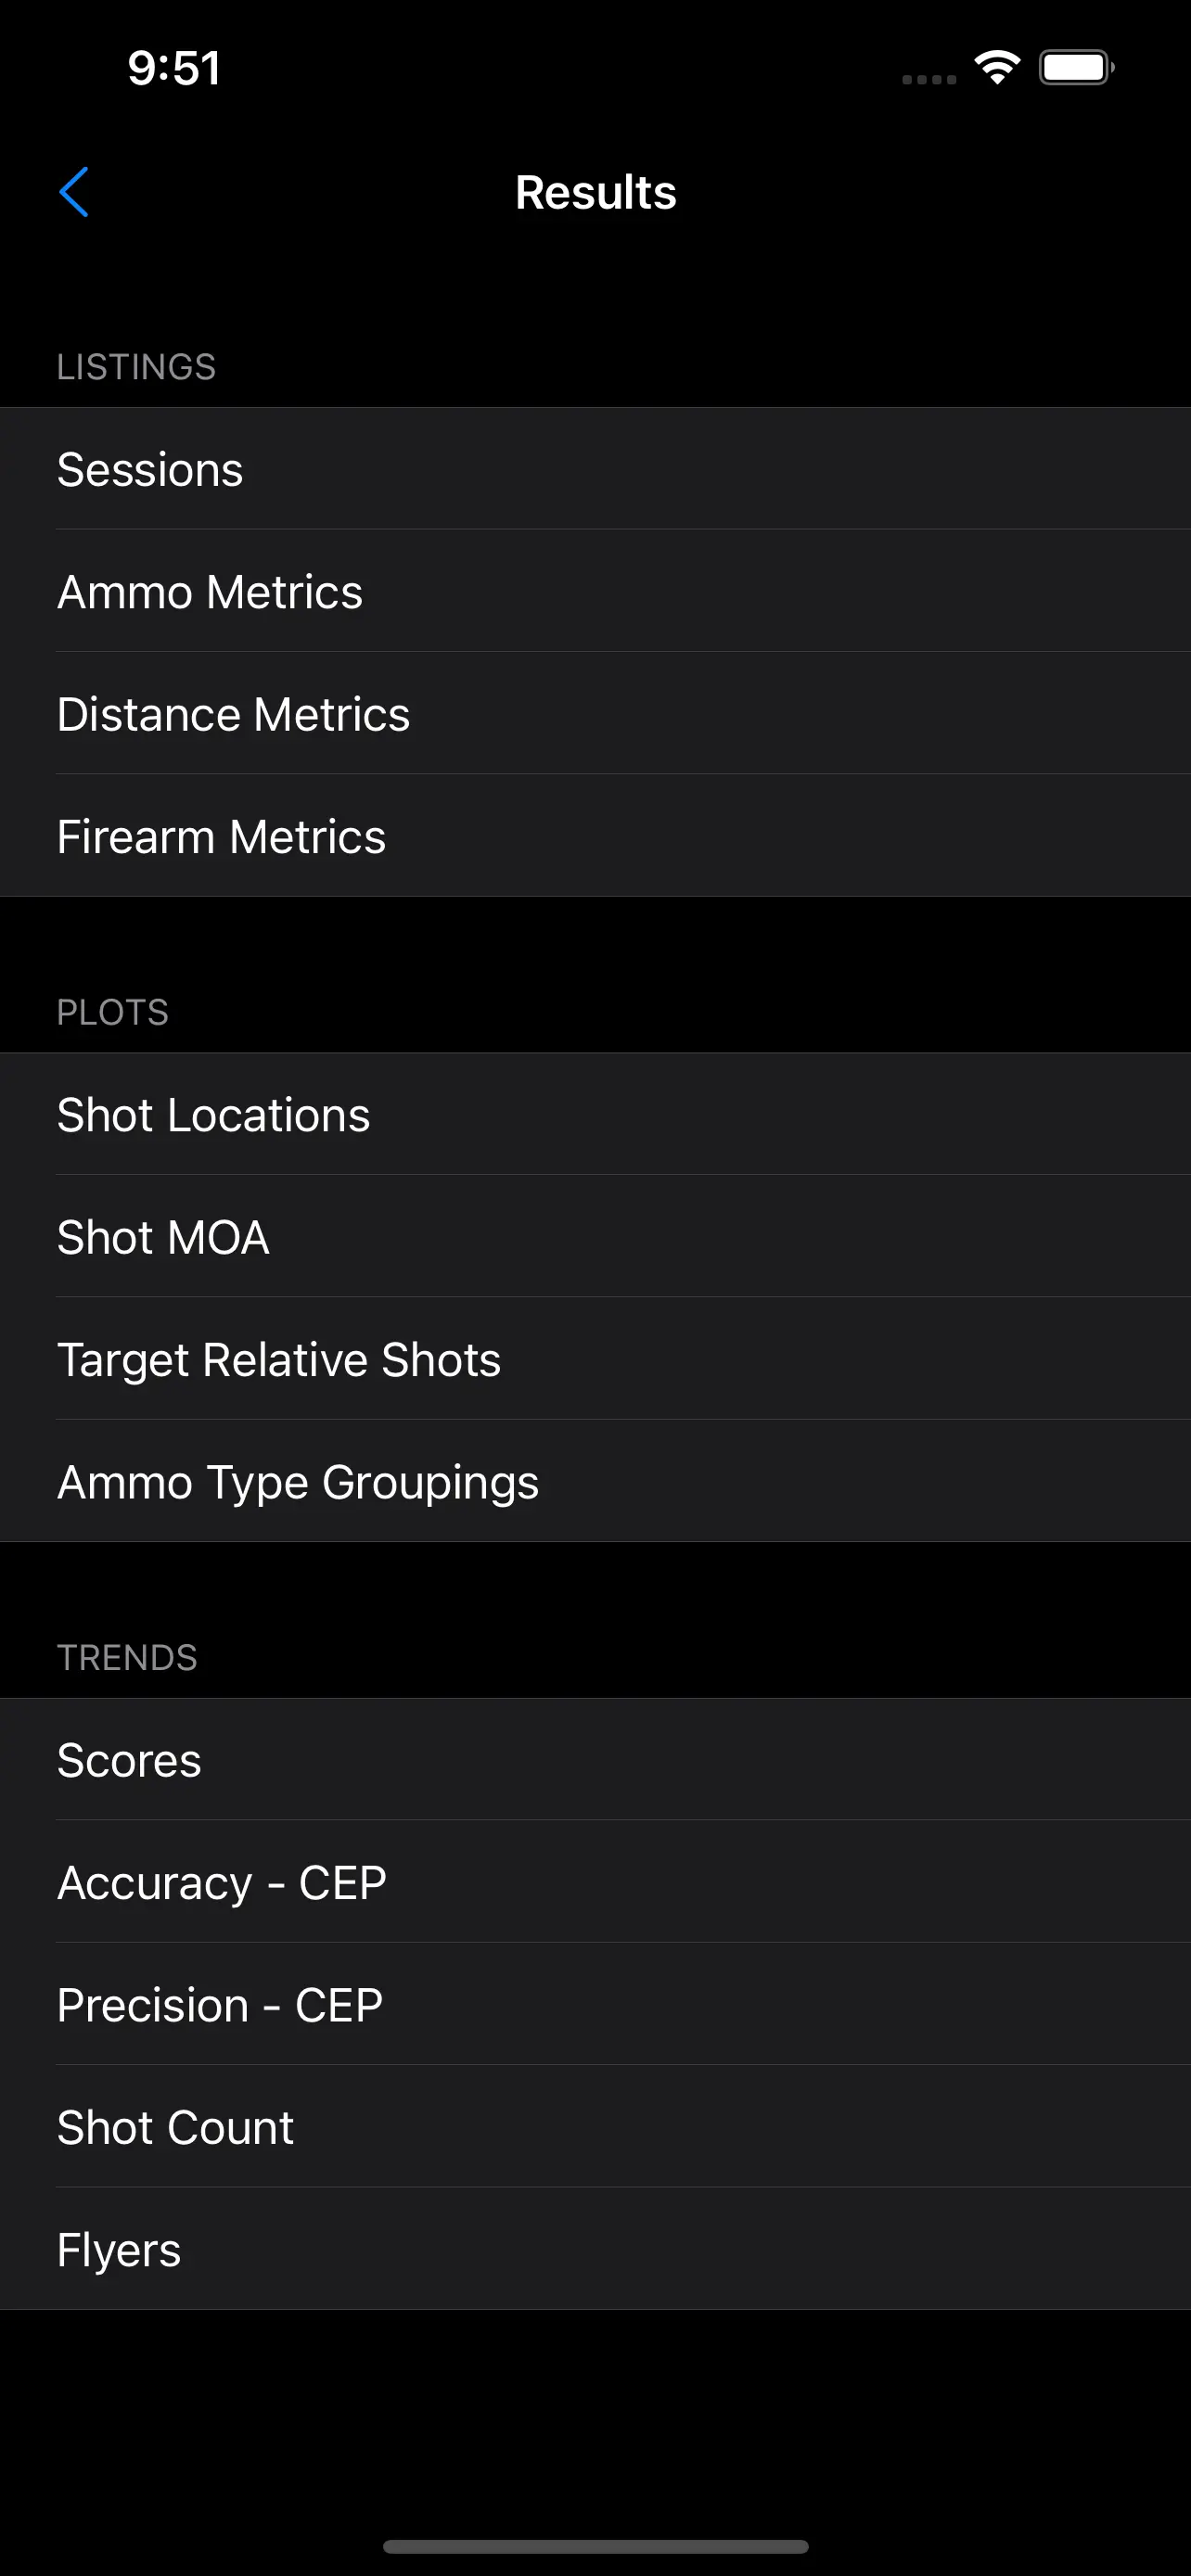
The reports that you can view are:
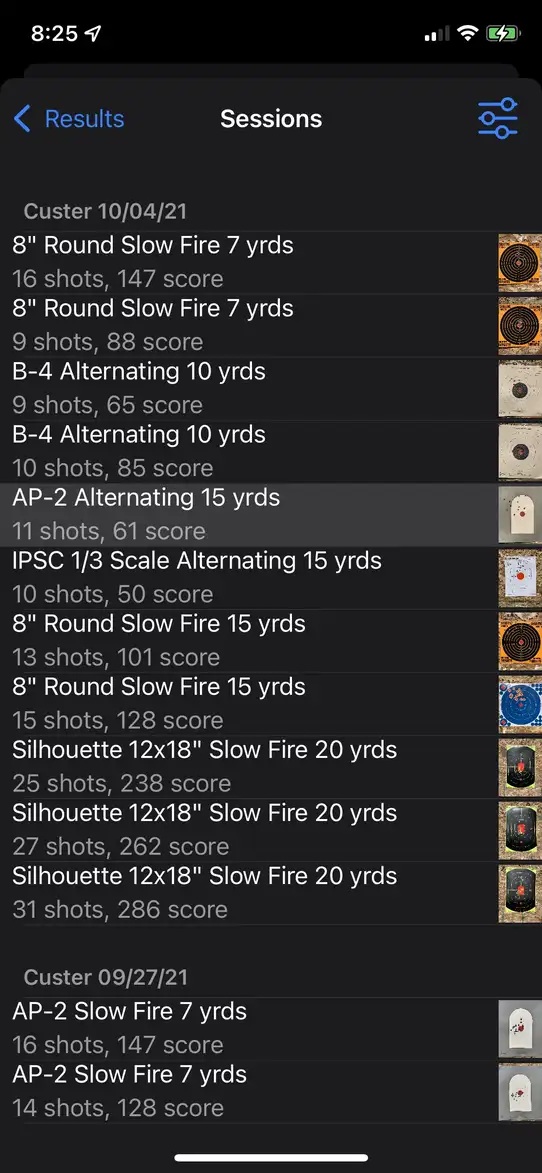
- Sessions - A list of sessions, showing details of each target shot.
- Ammo Metrics - A breakdown of accuracy and precision by ammunition type.
- Distance Metrics - A breakdown of accuracy and precision by distance to target.
- Firearm Metrics - A breakdown of accuracy and precision by firearm.
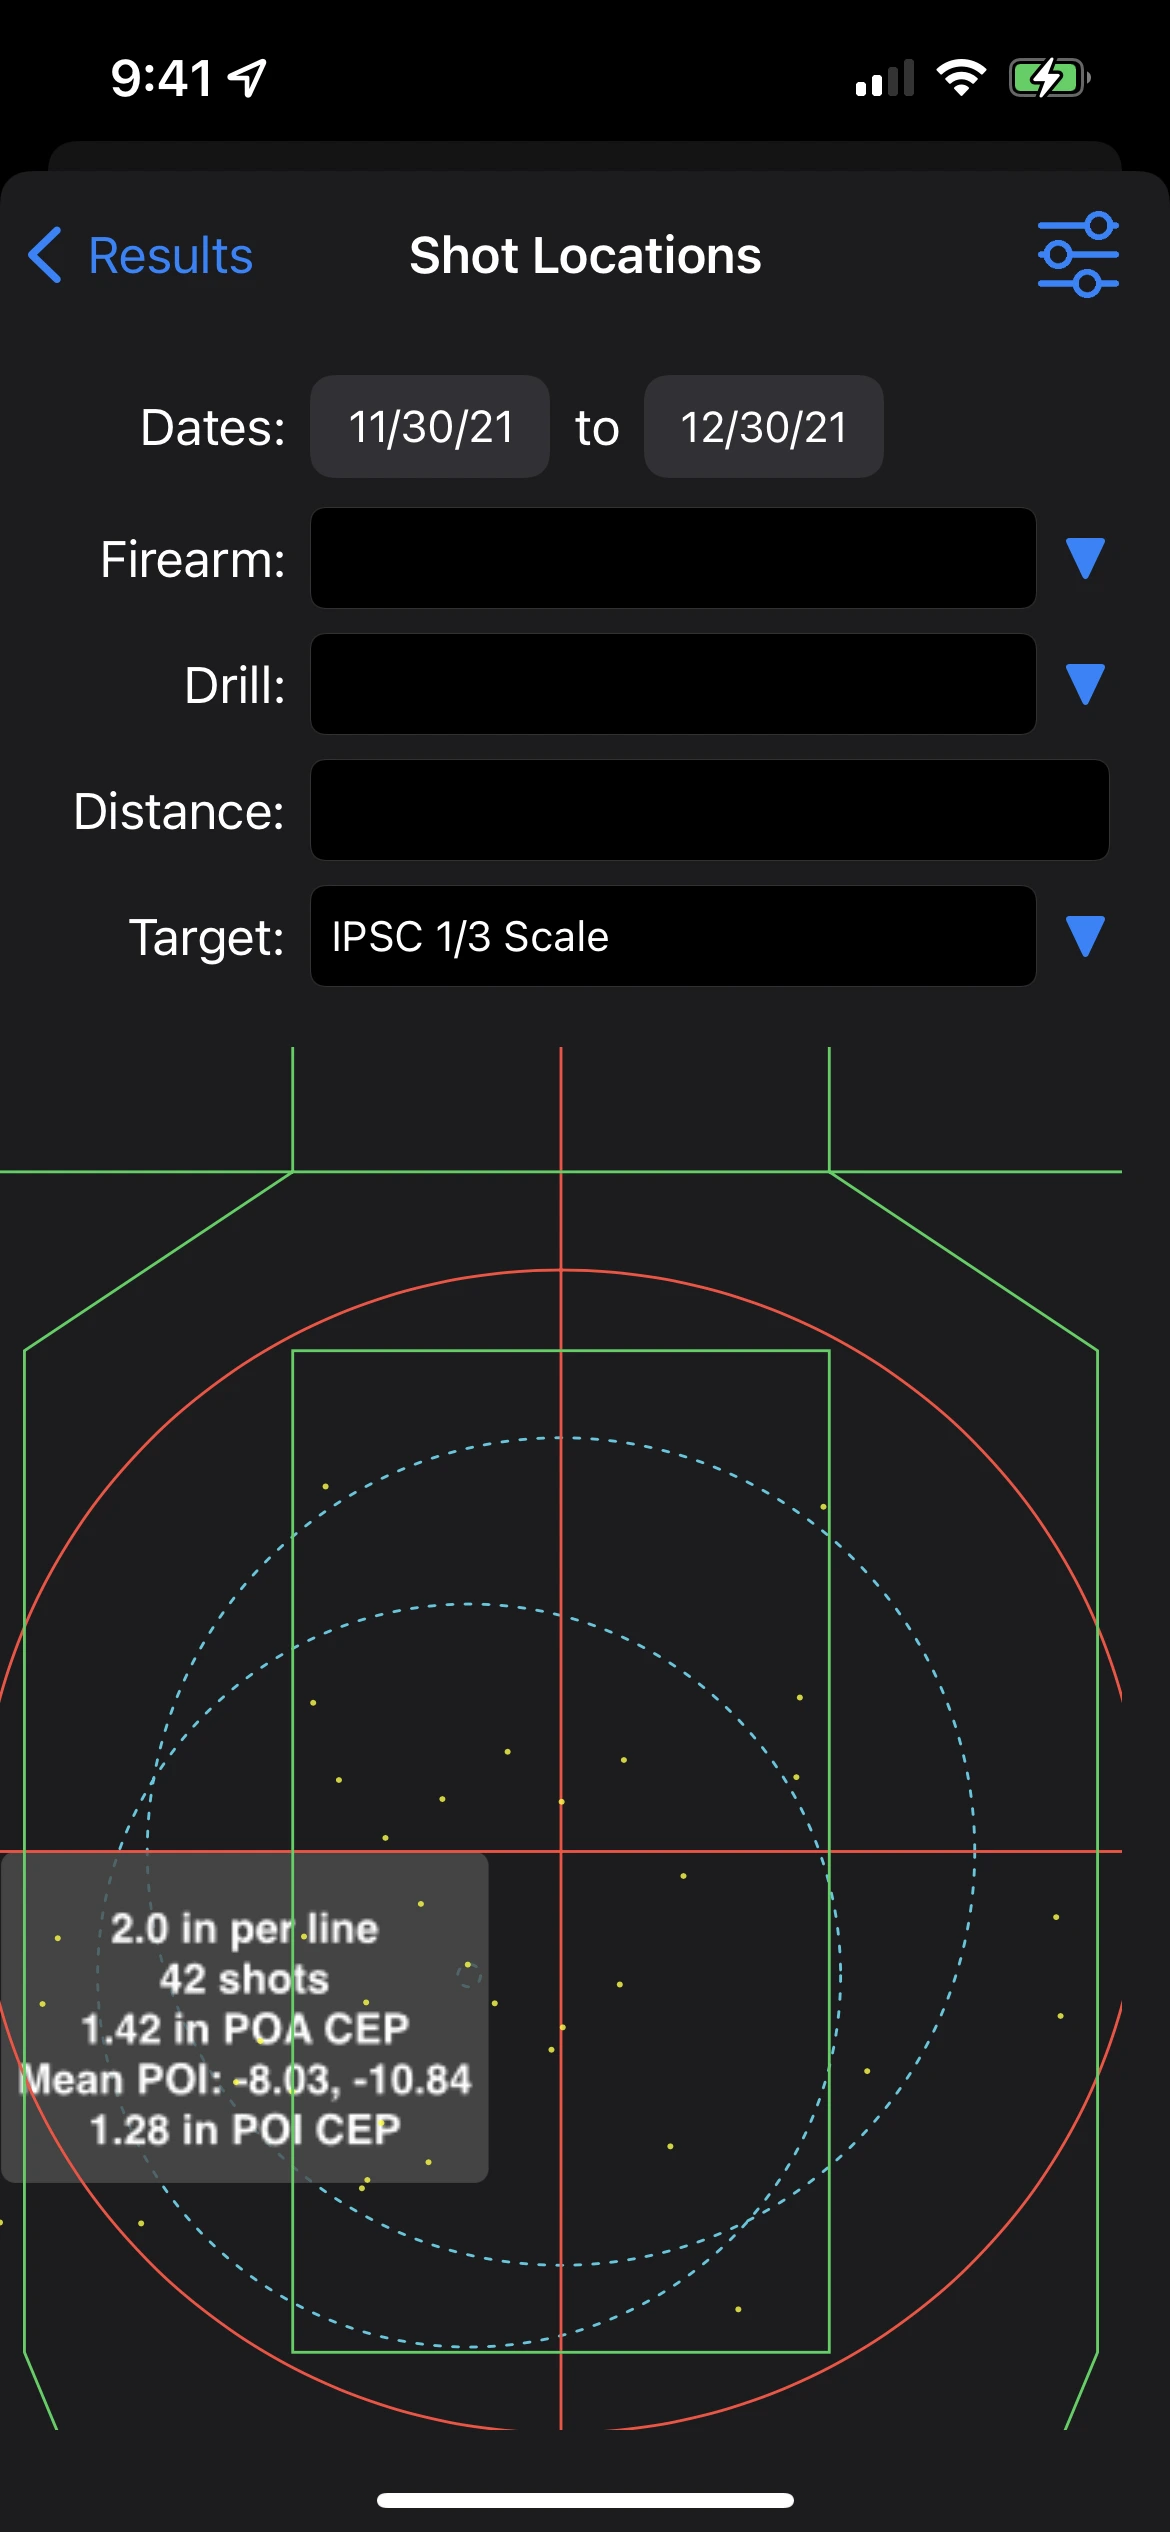
- Shot Locations - the location of the shots measured in distance (e.g. inches or mm).
- Shot MOA - the location of the shots measured in minutes of angle (MOA).
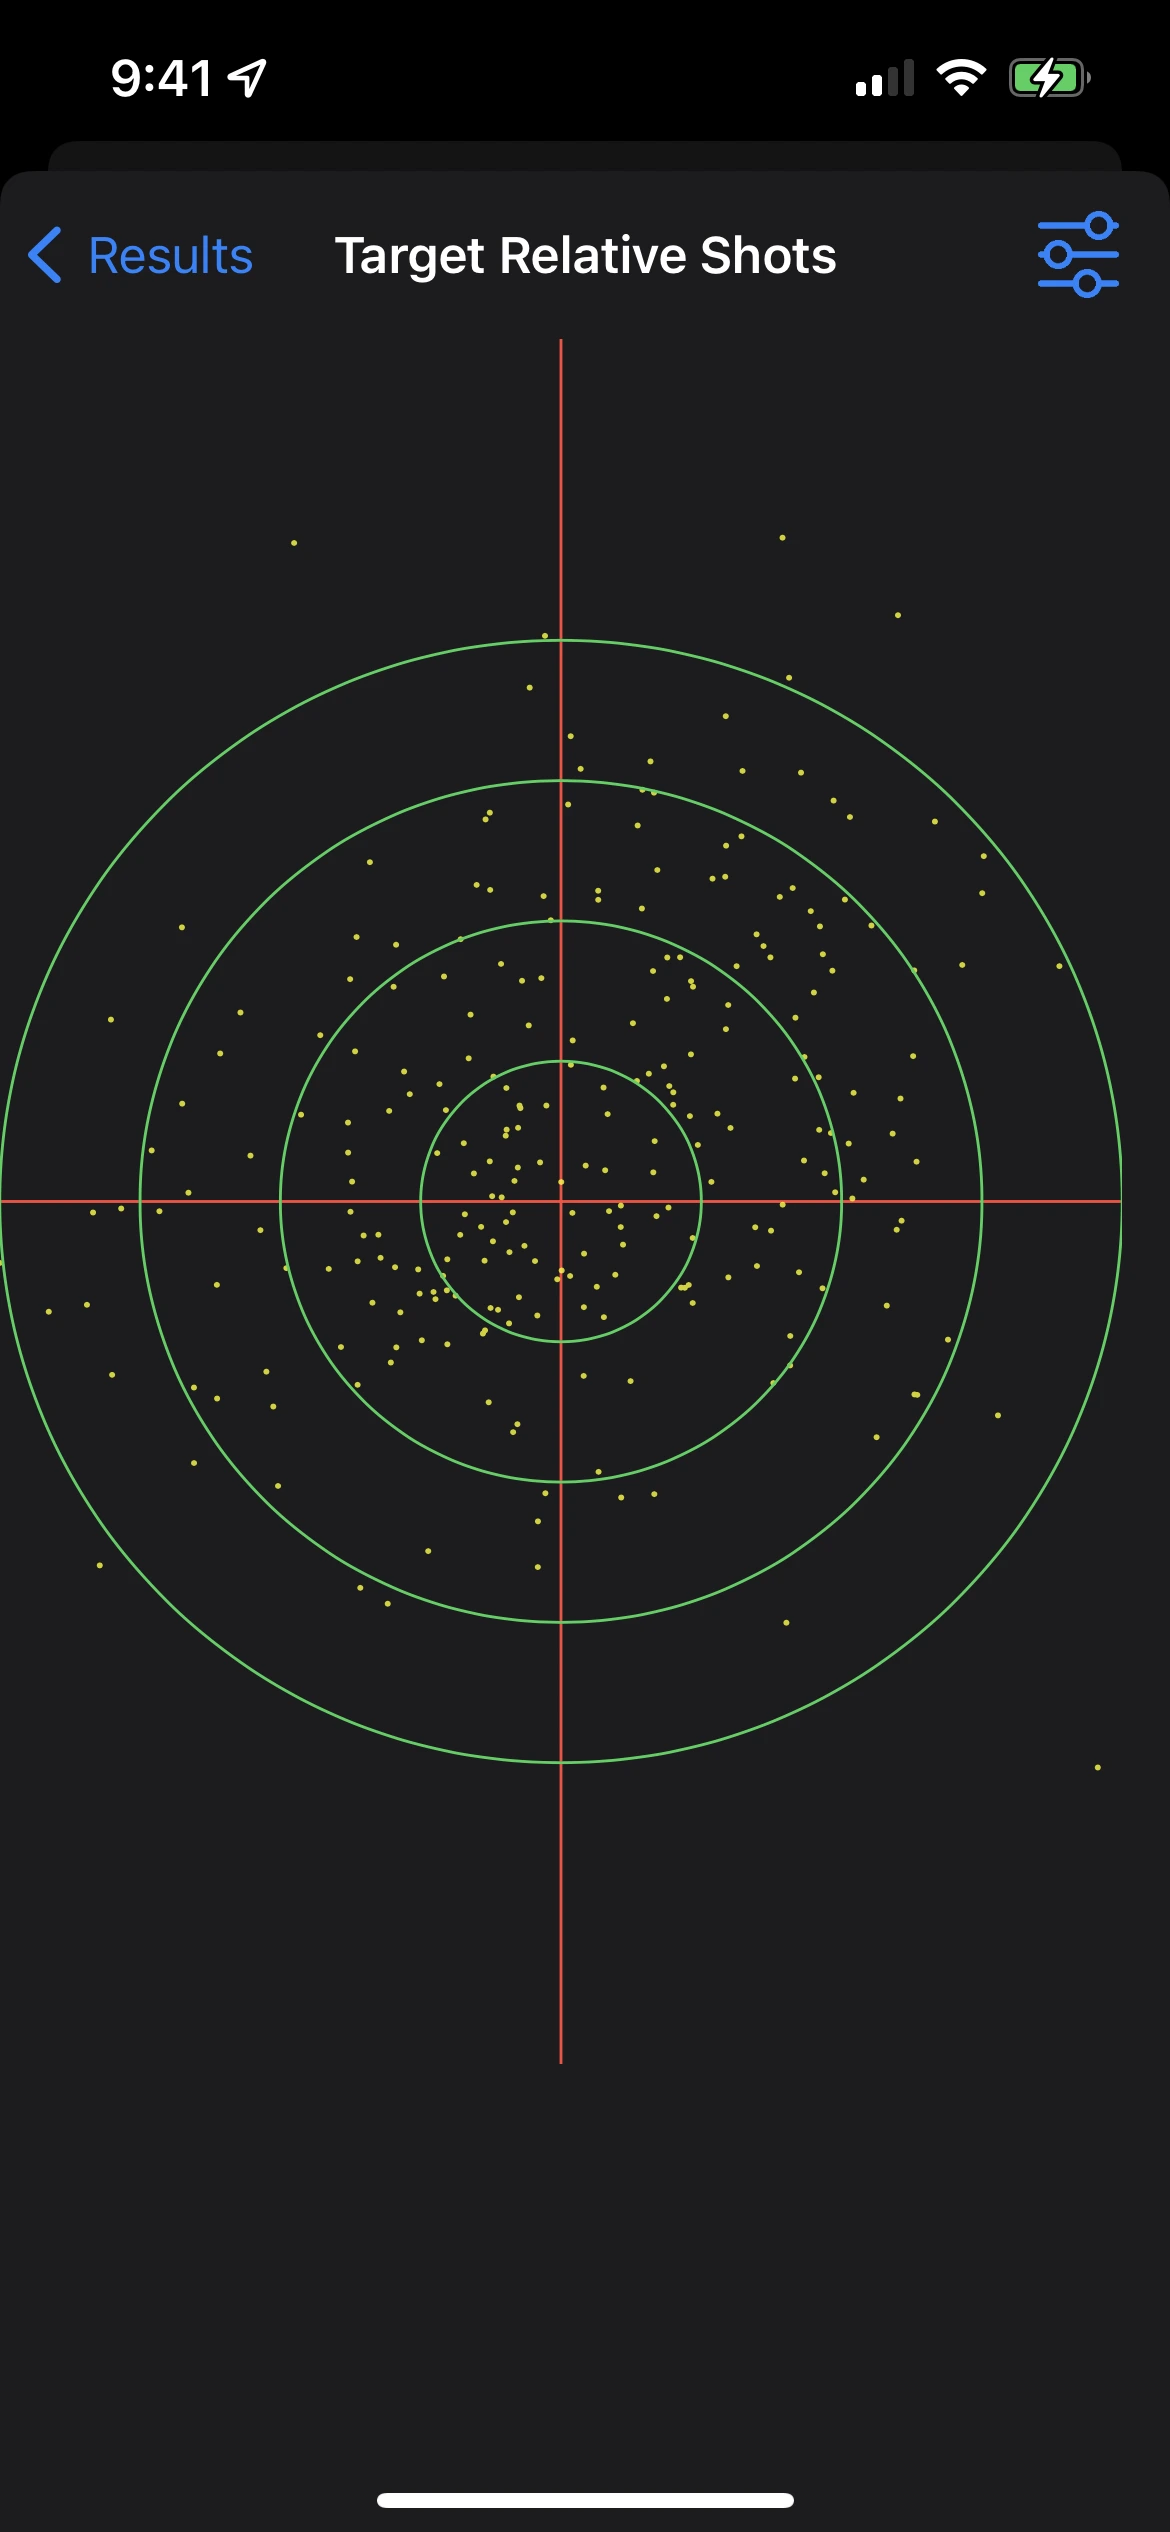
- Target Relative Shots - the location of shots relative to the size of the target.
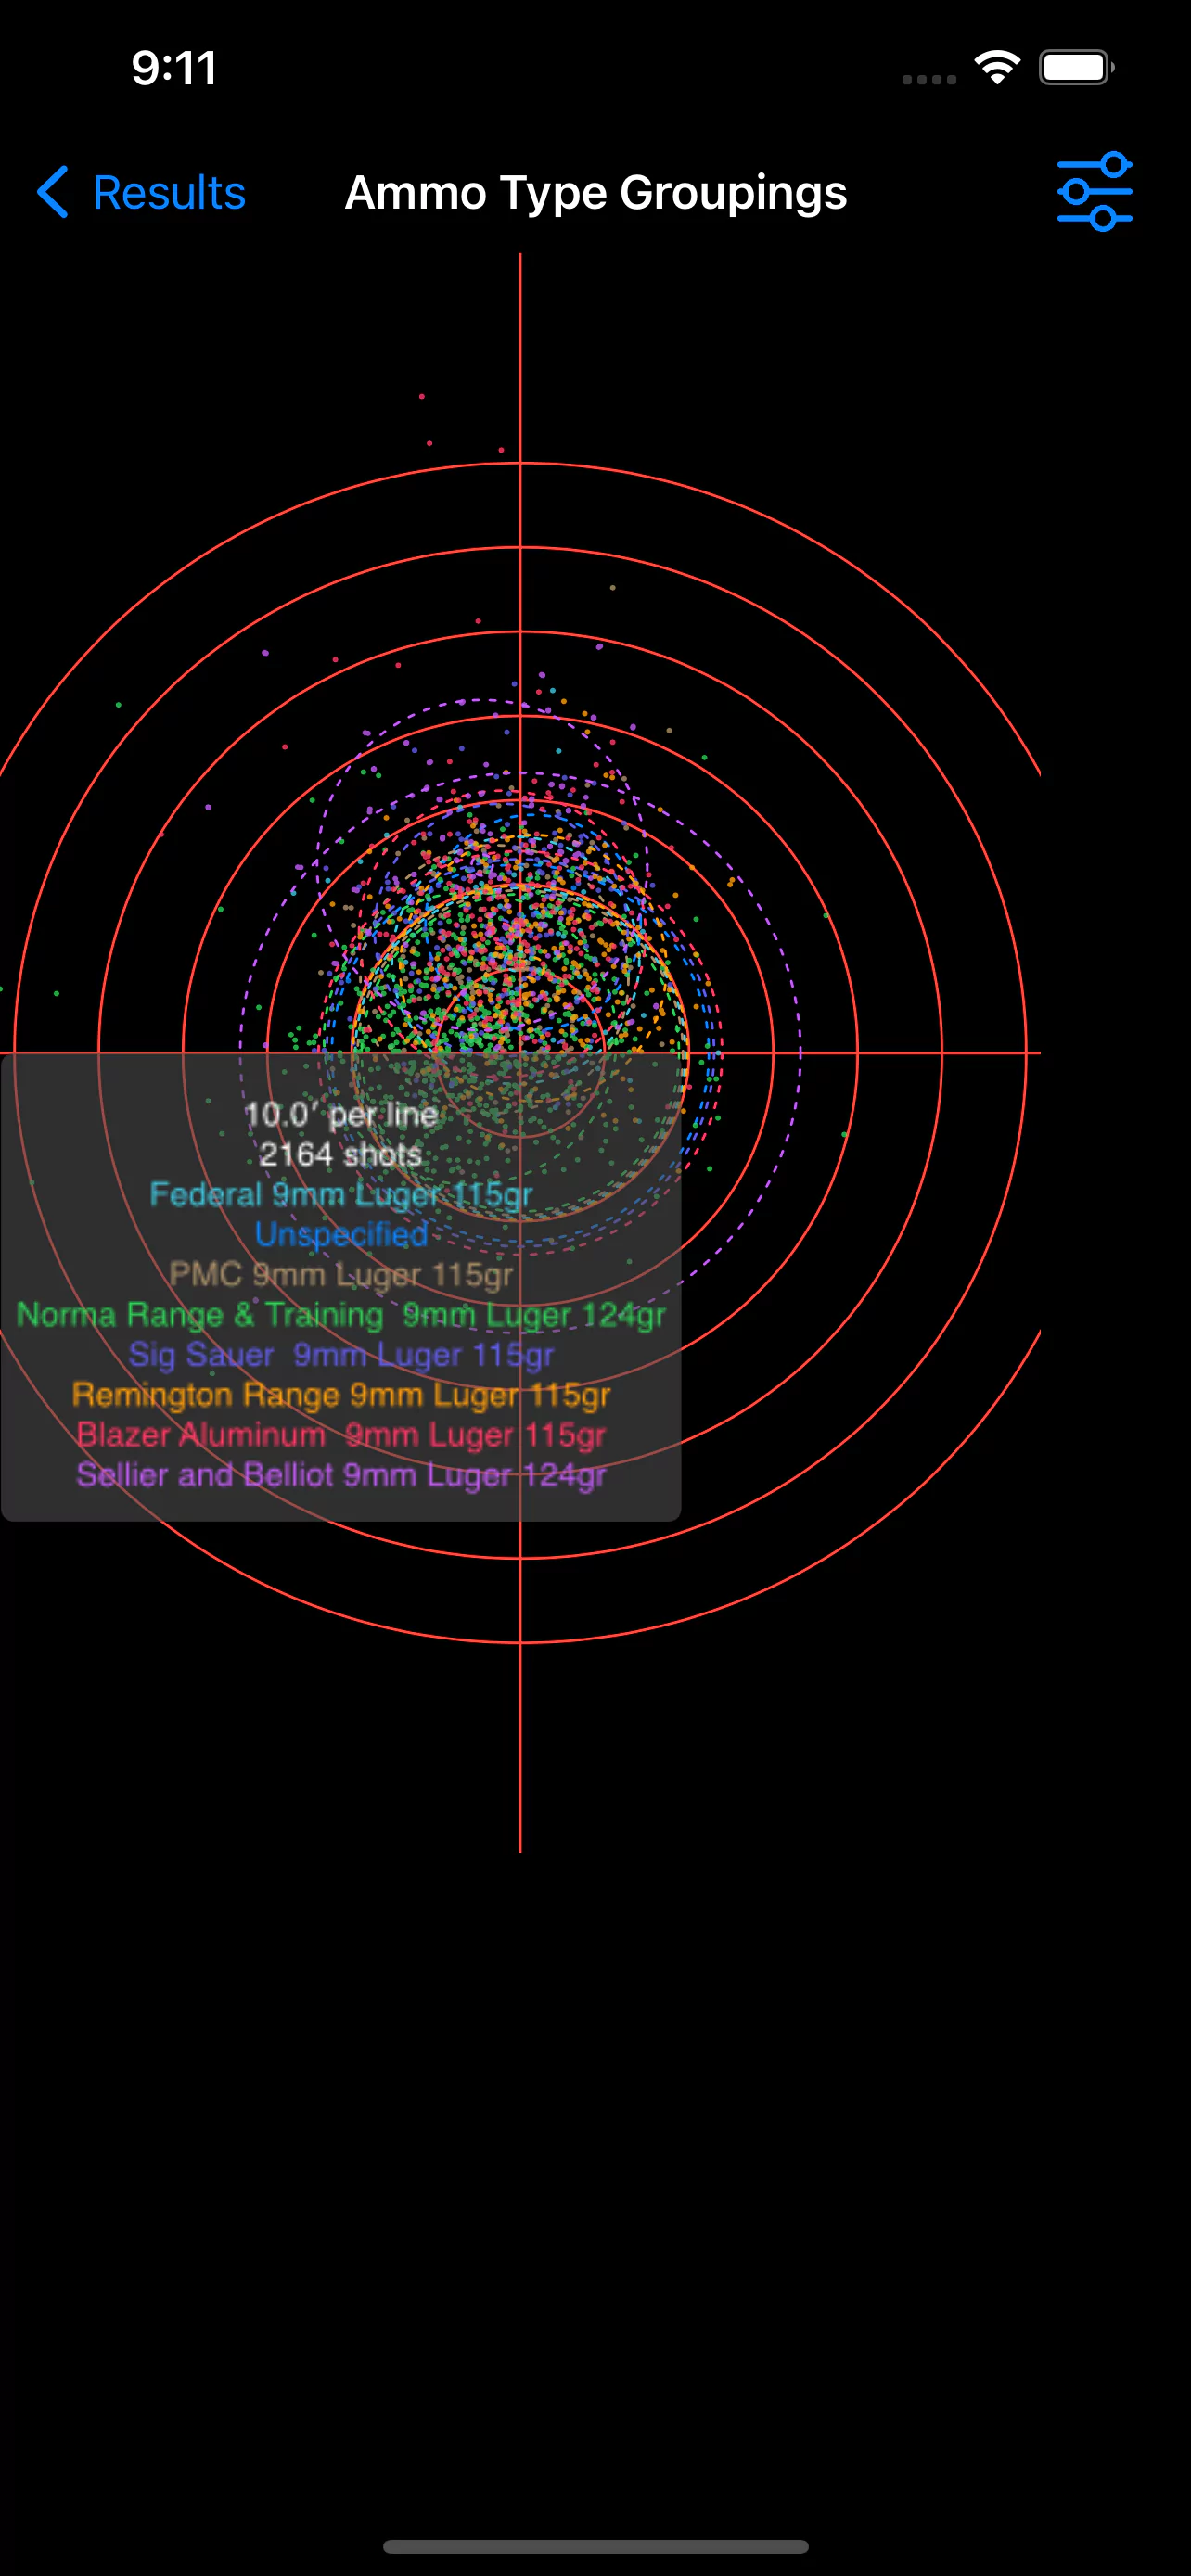
- Ammo Type Groupings - a comparative scatter plot of various ammo types with regard to POI.
- Scores - A bar graph of the number of shots in each scoring value/ring.
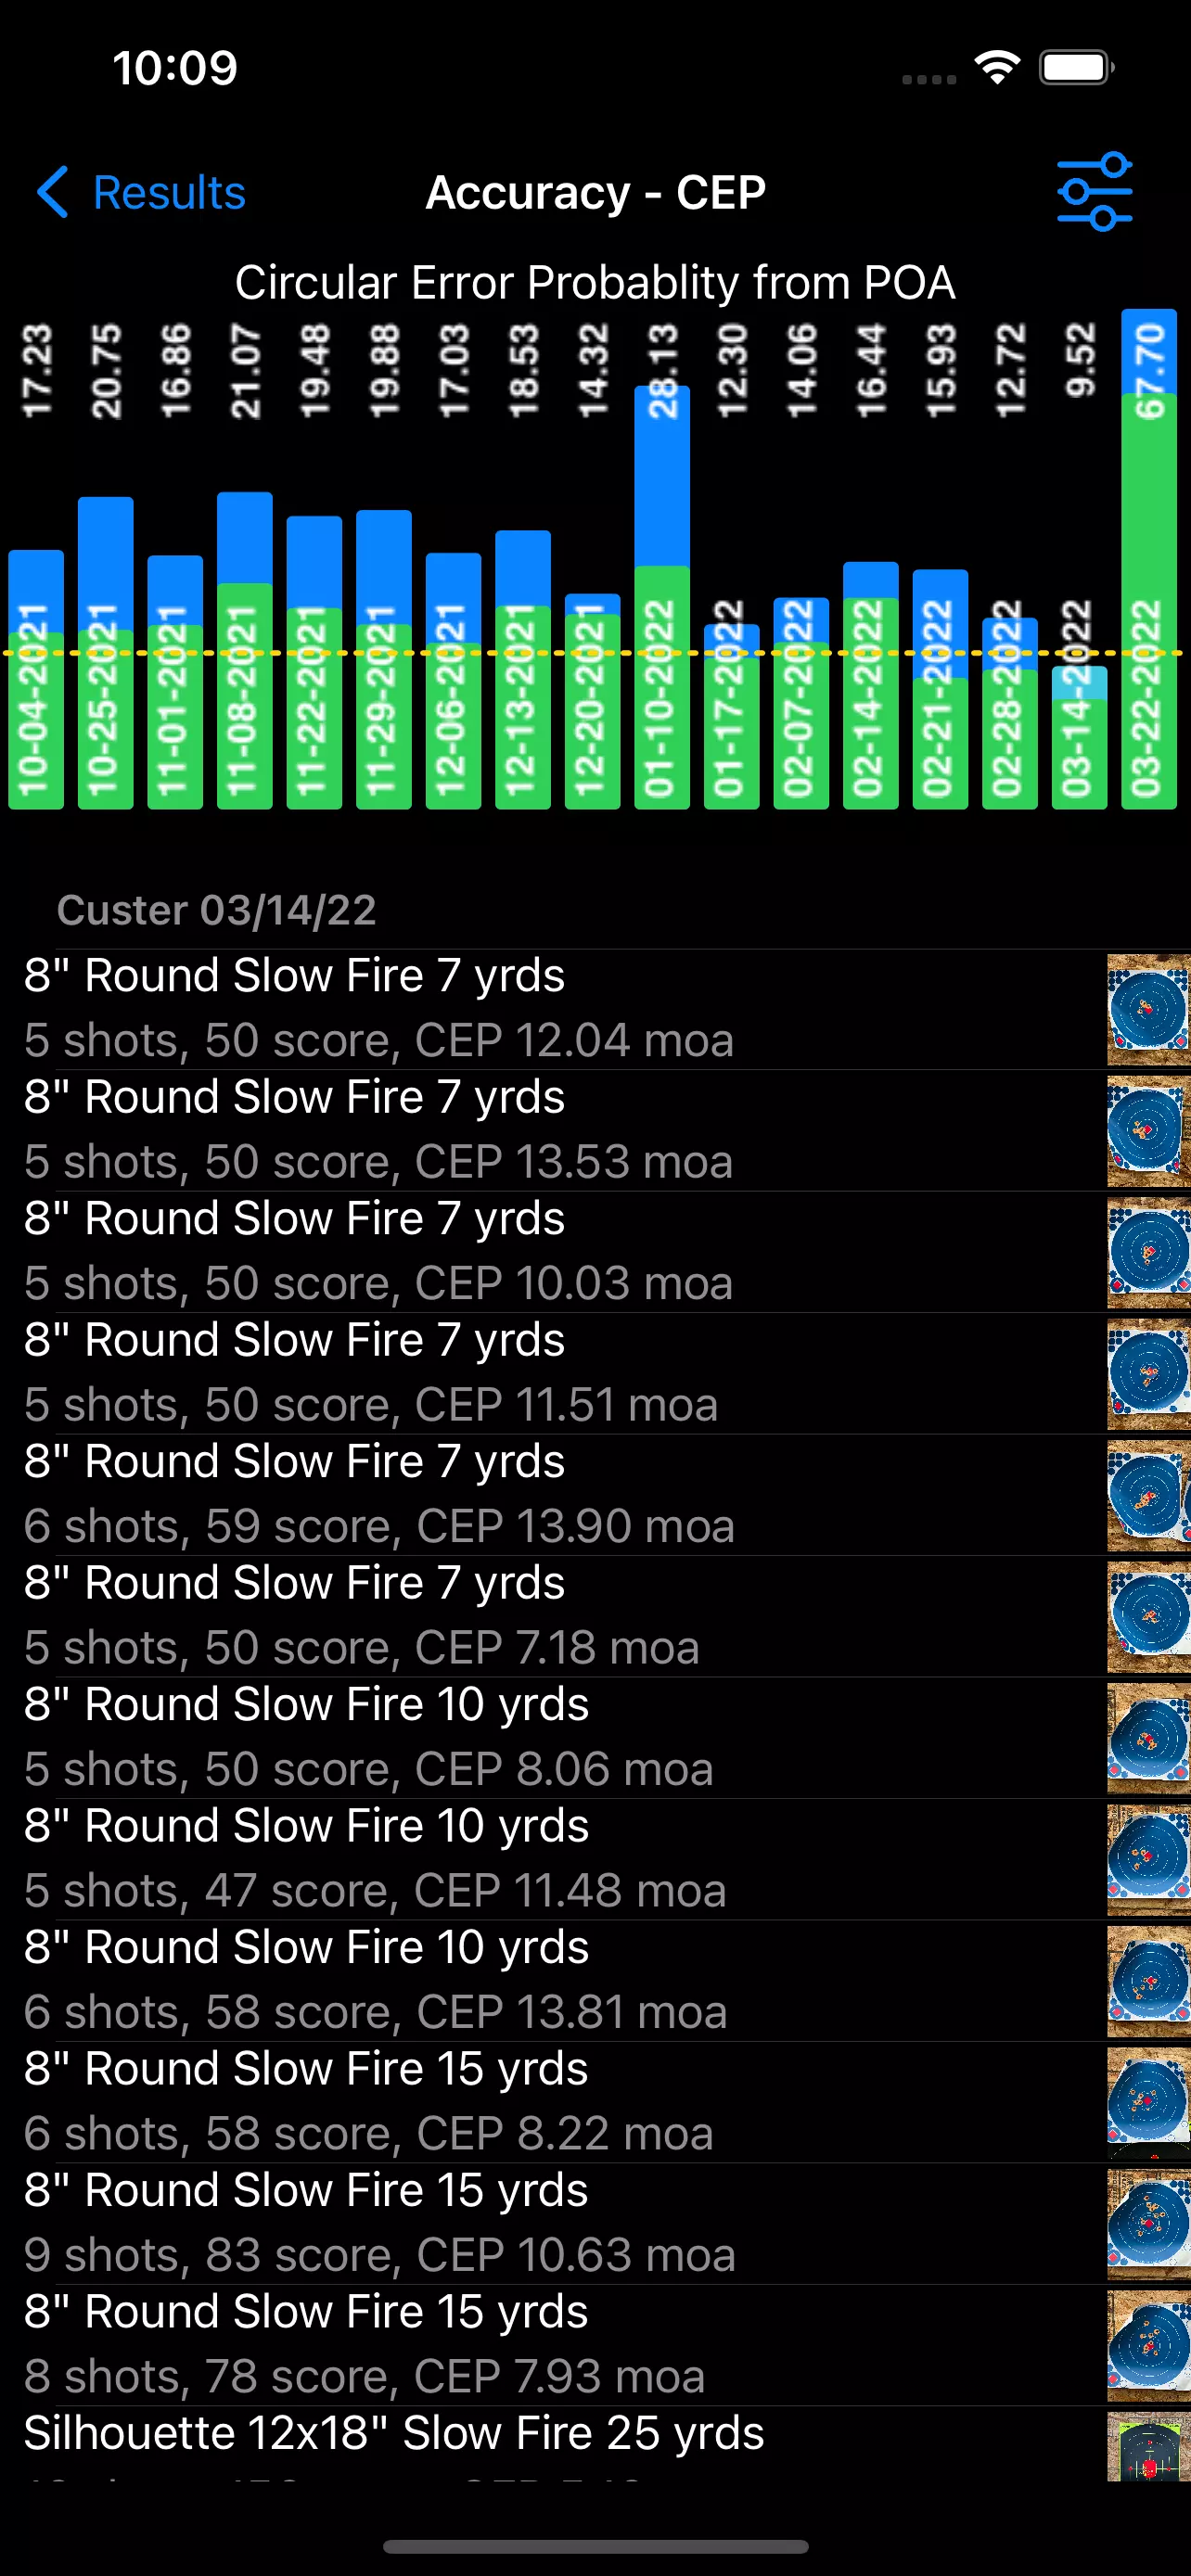
- Accuracy-CEP - A bar graph showing the trend of accuracy (and precision) in circular error probability (CEP). This metric shows the size (in moa) of a circle that based on probability, that 50% of future shots would fall within with respect to the POA..
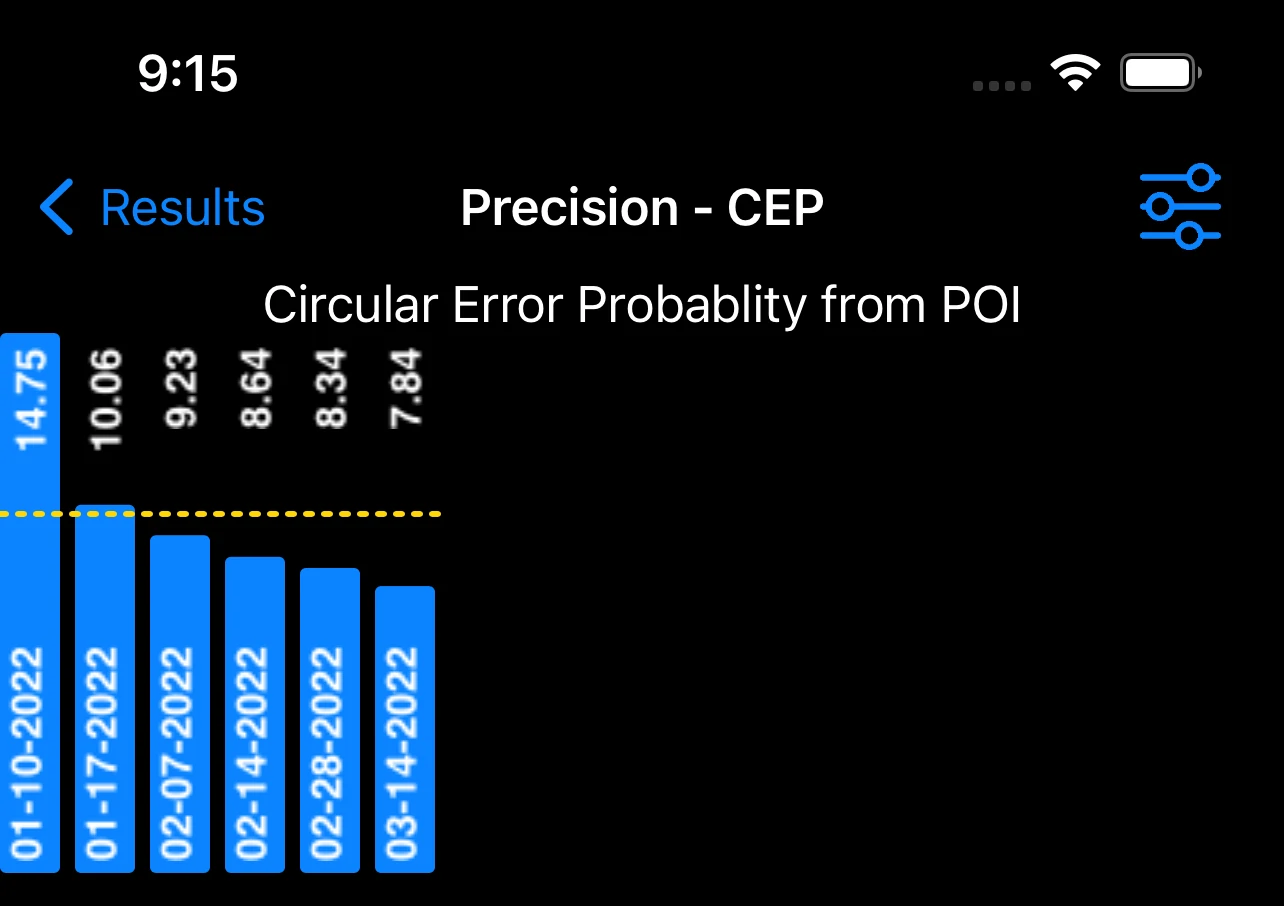
- Precision-CEP - A bar group show the trend of precision in circular error probability (CEP). The CEP is calculated from the POI for this metric.
- Shot Count - A bar graph showing the number of shots fired in each month.
- Flyers - Identifies shots that were statistically outside the typical grouping.
The filter icon is in the upper right corner, and clicking it will toggle the filter display. All of the reports can be filtered by the following parameters:
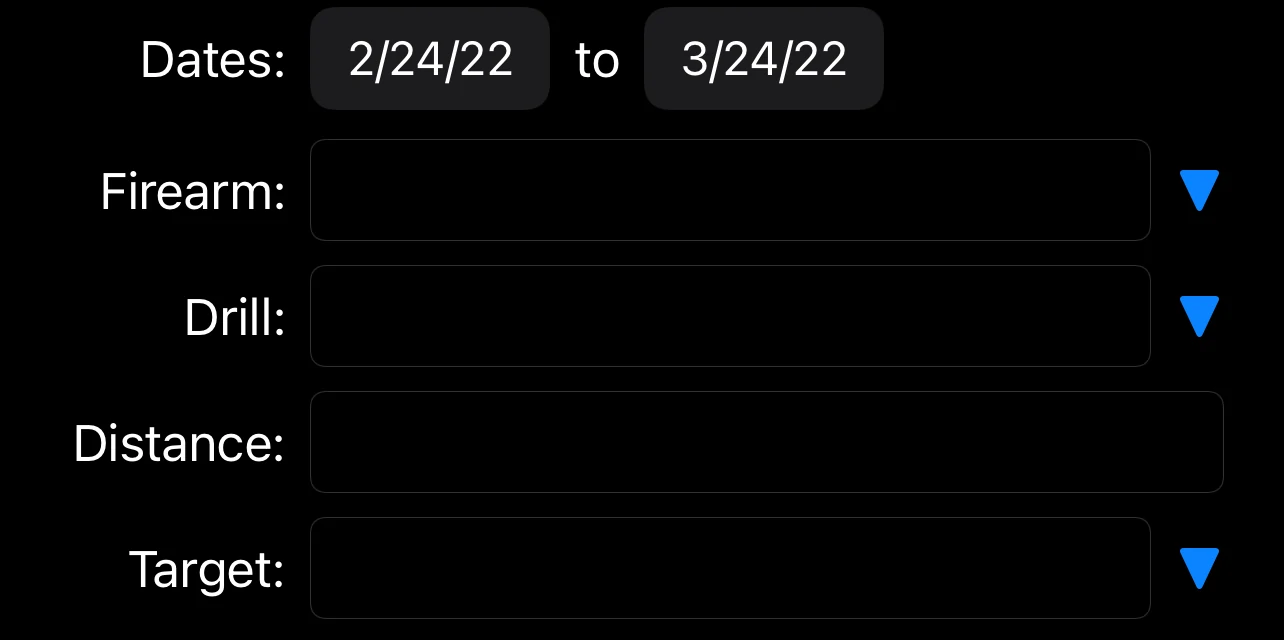
- Date Range - the date range to include in the report.
- Firearm - the firearm used.
- Drill - the particular drill or skill being practiced.
- Distance - the range to the target.
- Target - the type of the target (e.g. B-6).
Shows a list of all of the targets in all of sessions that meet the filter criteria. Each target is shown as a thumbnail
with the target type, drill, distance, score, and shot count shown. You can select a target and view its details.
Shows the details of a specific target.

The following information is shown:
- Details - the basics of the drill that you were practicing.
- Analysis - the score (if available) and grouping that you shot.
- Individual Shots - the center point of the various shots on the target.
- Overall Averages - the mean averages of the shot placements.
You may also press the magnifying glass (in the upper right corner) to view an enlargement of the target. Pressing "Edit" will
take you to the session screen.
Shows accuracy and precision metrics for each type of ammunition that was shot, grouped by caliber.
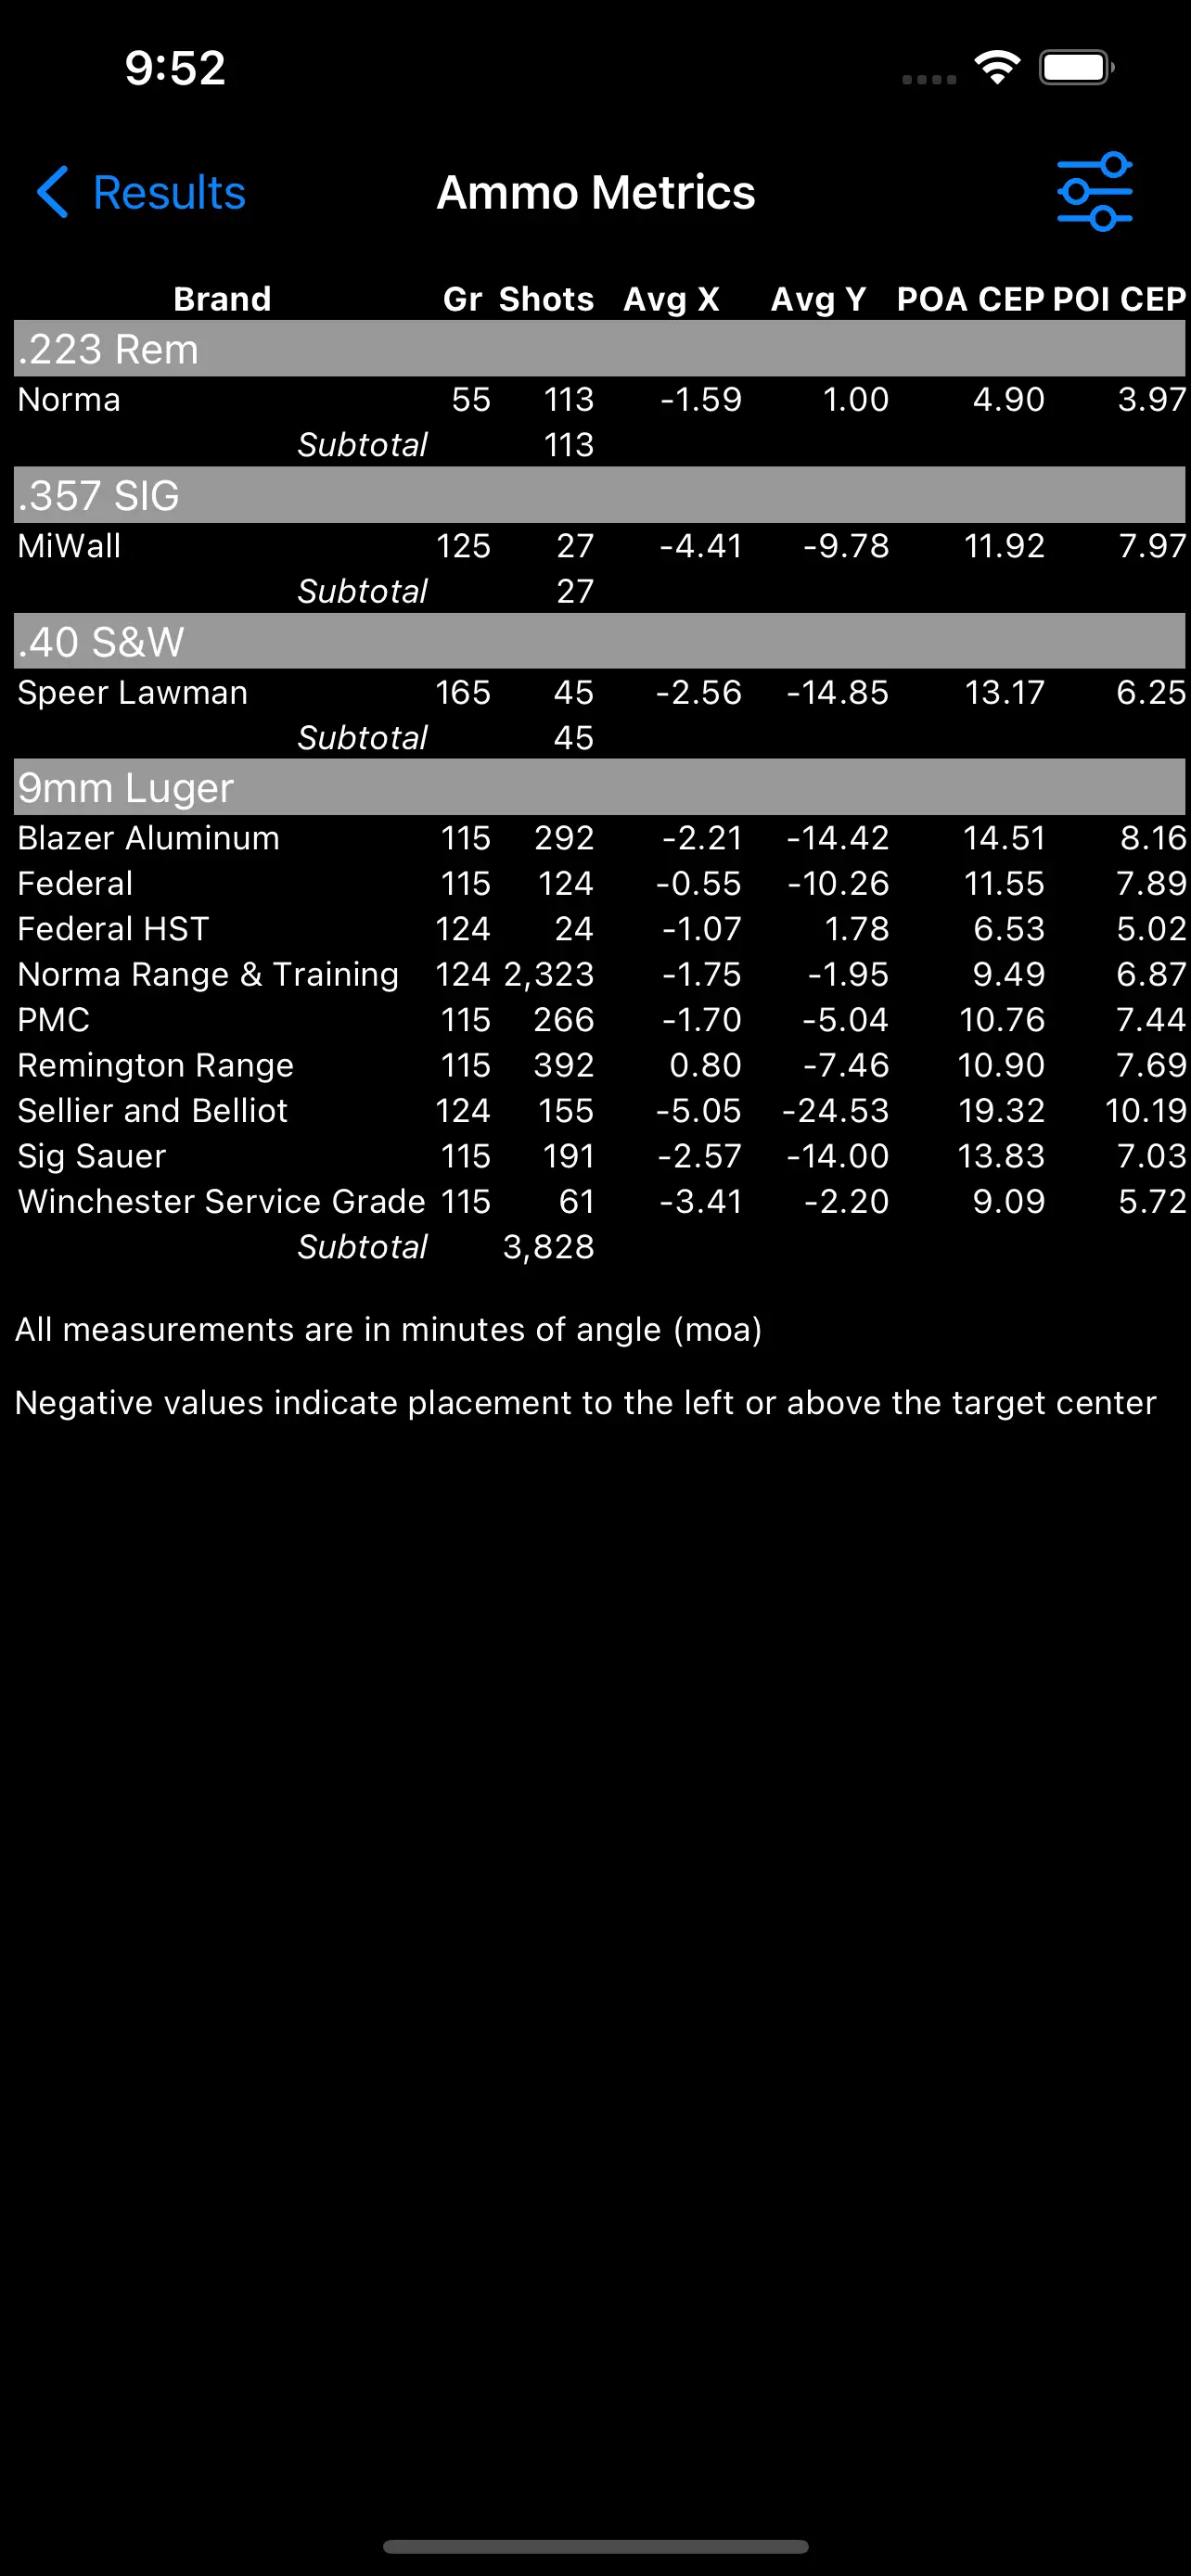
The following information is shown:
- Gr - the weight of the bullet in grains.
- Shots - the number of shots recorded.
- Avg X - the mean horizontal deviation of the bullet hole from the point of aim, measured in MOA. Negative values indicate placement to left.
- Avg Y - the mean vertical deviation of the bullet hole from the point of aim, measured in MOA. Negative values indicate placement to top.
- POA CEP - the CEP in MOA from the point of aim. A measure of the overall accuracy.
- POI CEP - the CEP in MOA from the point of impoact. A measure of the overall precision.
Shows accuracy and precision metrics for each distance from the target.

The following information is shown:
- Gr - the weight of the bullet in grains.
- Shots - the number of shots recorded.
- Avg X - the mean horizontal deviation of the bullet hole from the point of aim, measured in MOA. Negative values indicate placement to left.
- Avg Y - the mean vertical deviation of the bullet hole from the point of aim, measured in MOA. Negative values indicate placement to top.
- POA CEP - the CEP in MOA from the point of aim. A measure of the overall accuracy.
- POI CEP - the CEP in MOA from the point of impoact. A measure of the overall precision.
Shows accuracy and precision metrics for each firearm.
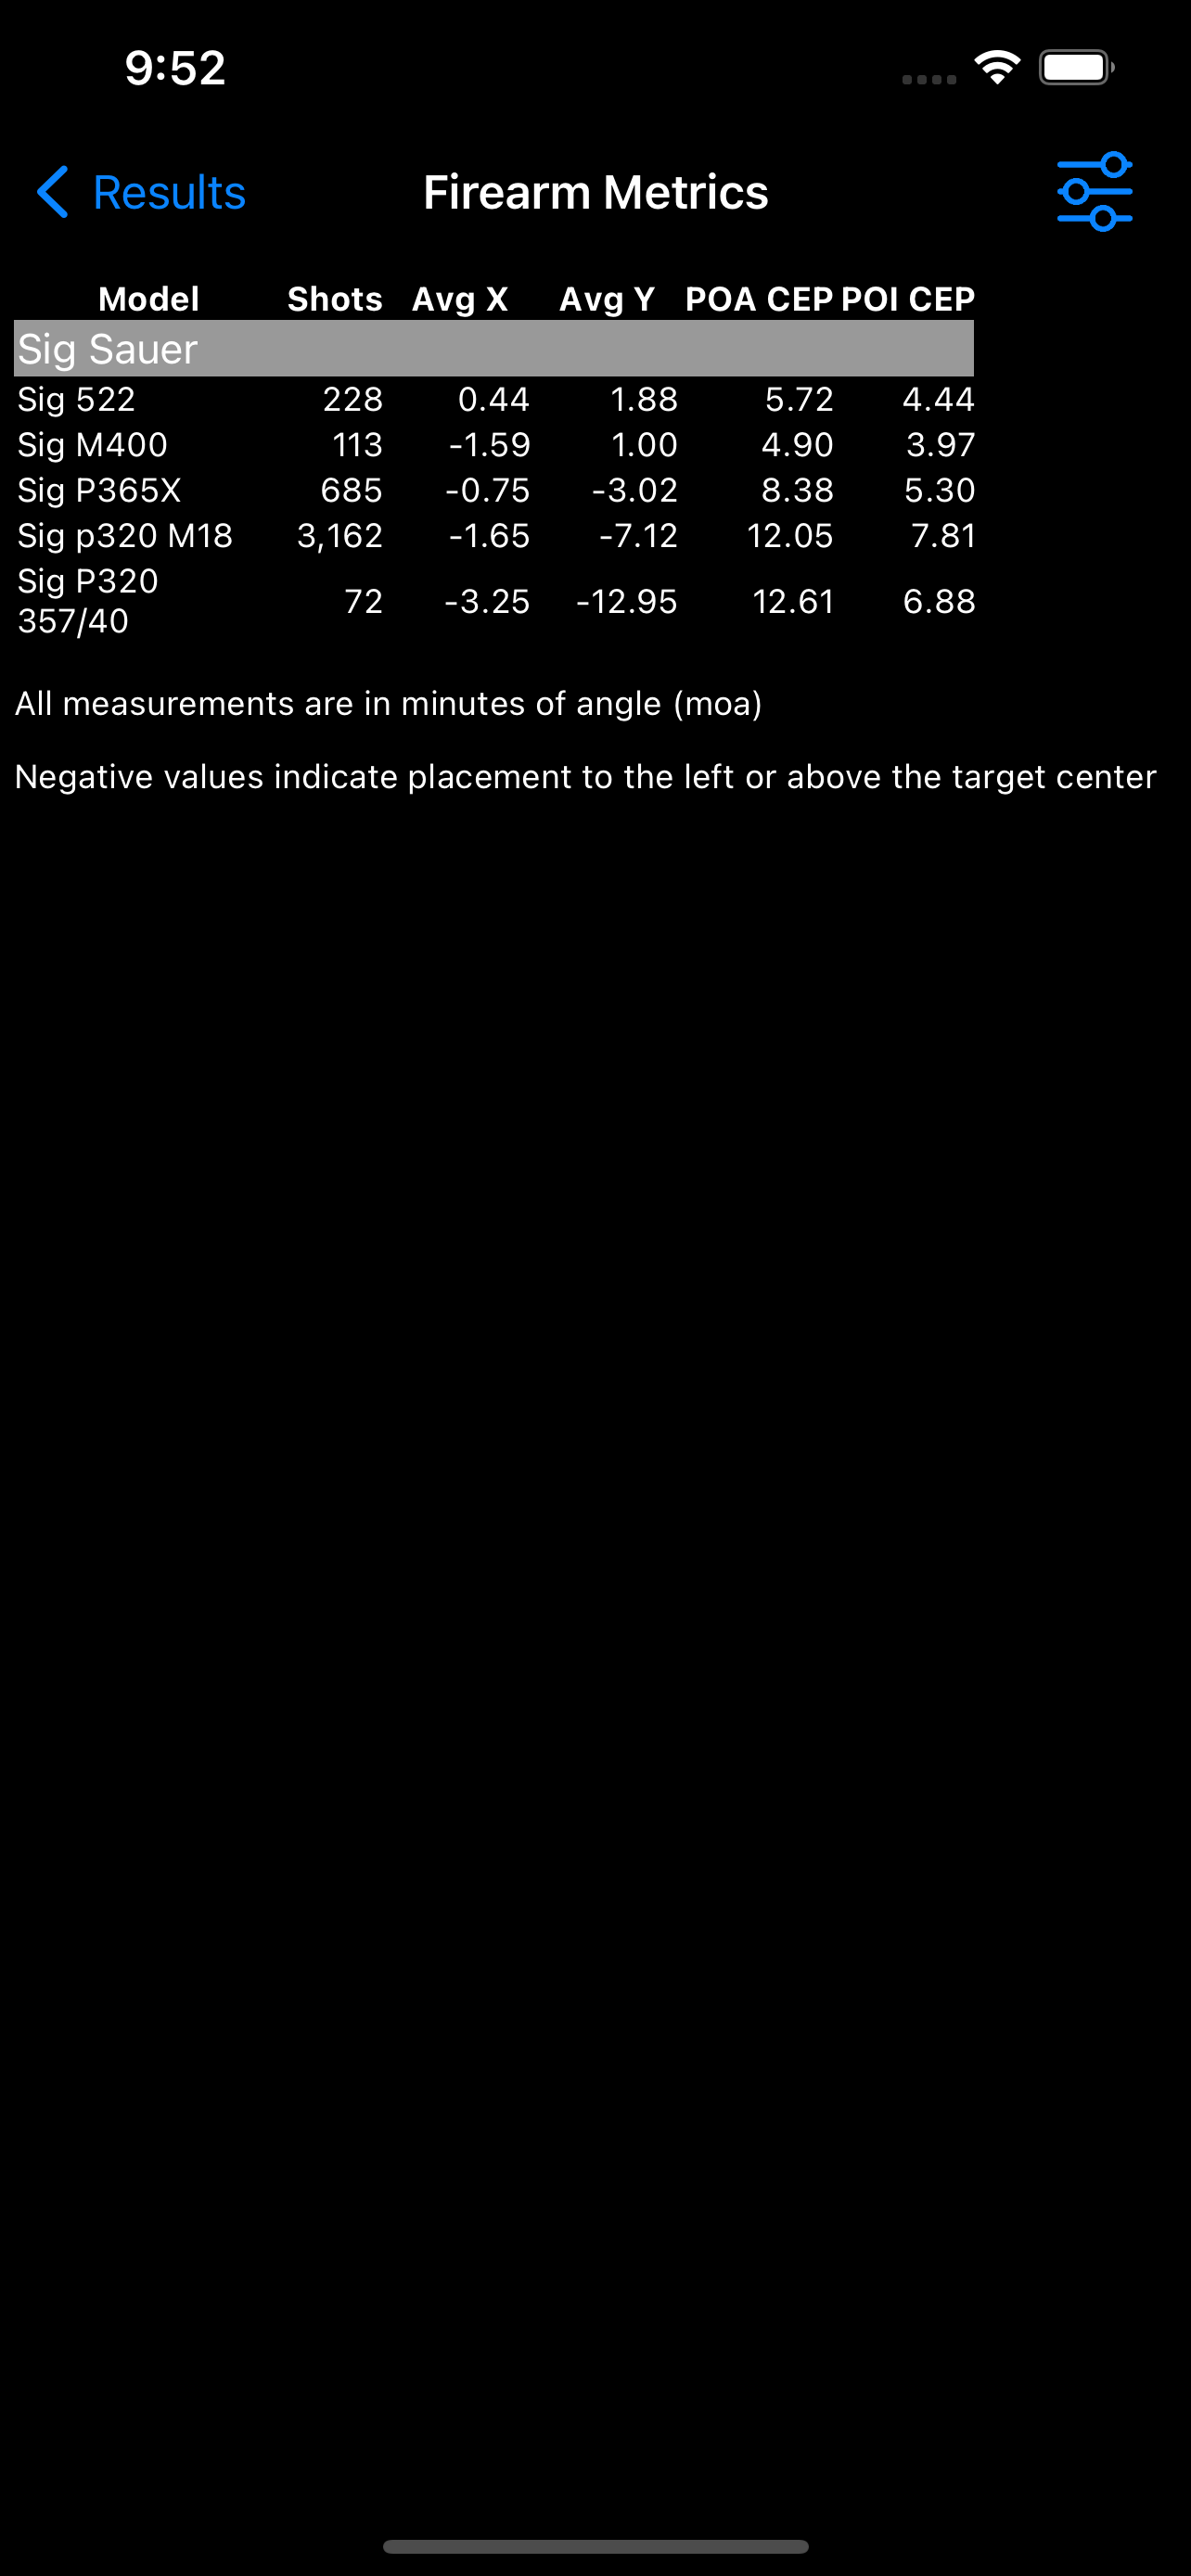
The following information is shown:
- Gr - the weight of the bullet in grains.
- Shots - the number of shots recorded.
- Avg X - the mean horizontal deviation of the bullet hole from the point of aim, measured in MOA. Negative values indicate placement to left.
- Avg Y - the mean vertical deviation of the bullet hole from the point of aim, measured in MOA. Negative values indicate placement to top.
- POA CEP - the CEP in MOA from the point of aim. A measure of the overall accuracy.
- POI CEP - the CEP in MOA from the point of impoact. A measure of the overall precision.
Shows a superimposition of hits from all of the selected targets. Each target is sized to its actual measurements. For example,
an 8" target would be twice as large as a 4" target. If one specific target type is filtered, then that target will be drawn on the screen.
Shows a superimposition of hits from all of the selected targets. Each hit is placed according to the minute of angle relative to the
target. So a 1 moa shot on a 8" target would be at the same location as a 1 moa shot on a 12" target.

Shows a superimposition of the hits on all of the selected targets. Each target is sized to the same size on screen. For example,
on a 8" round target a shot that was 4" from the center would appear at the same place as a 6" from center shot on a 12" target.
This report is useful for targets that you have not assigned a specific target type to.
Shows a scatter plot with various ammo types in different colors. Each type has a CEP (both from POI and POA) drawn around it, with the POI marked.
Shows a bar graph of the number of shots that hit the various score areas or rings.

Shows the circular error probability (CEP) grouped by week. This allows you to see trends in your accuracy. CEP is a statistical measure that predicts where future shots will hit.
It represents an imaginary circle that would contain 50% of future shots, if those shots followed the same distribution of the previous ones. CEP is shown as minutes of angle from the POA.
In addition, the precision of the shooting is shown as a green bar. This represents the CEP from the POI. A yellow dashed line indicates the mean CEP for the sessions shown in the graph.
If a bar is clicked on, the sessions that contribute to that bar are shown beneath.
Shows the circular error probability (CEP) grouped by week. This allows you to see trends in your precision. CEP is a statistical measure that predicts where future shots will hit.
It represents an imaginary circle that would contain 50% of future shots, if those shots followed the same distribution of the previous ones. CEP is shown as minutes of angle from the POI.
A yellow dashed line indicates the mean CEP for the sessions shown in the graph. If a bar is clicked on, the sessions that contribute to that bar are shown beneath.
Shows the number of shots in each month based on the selected filters.

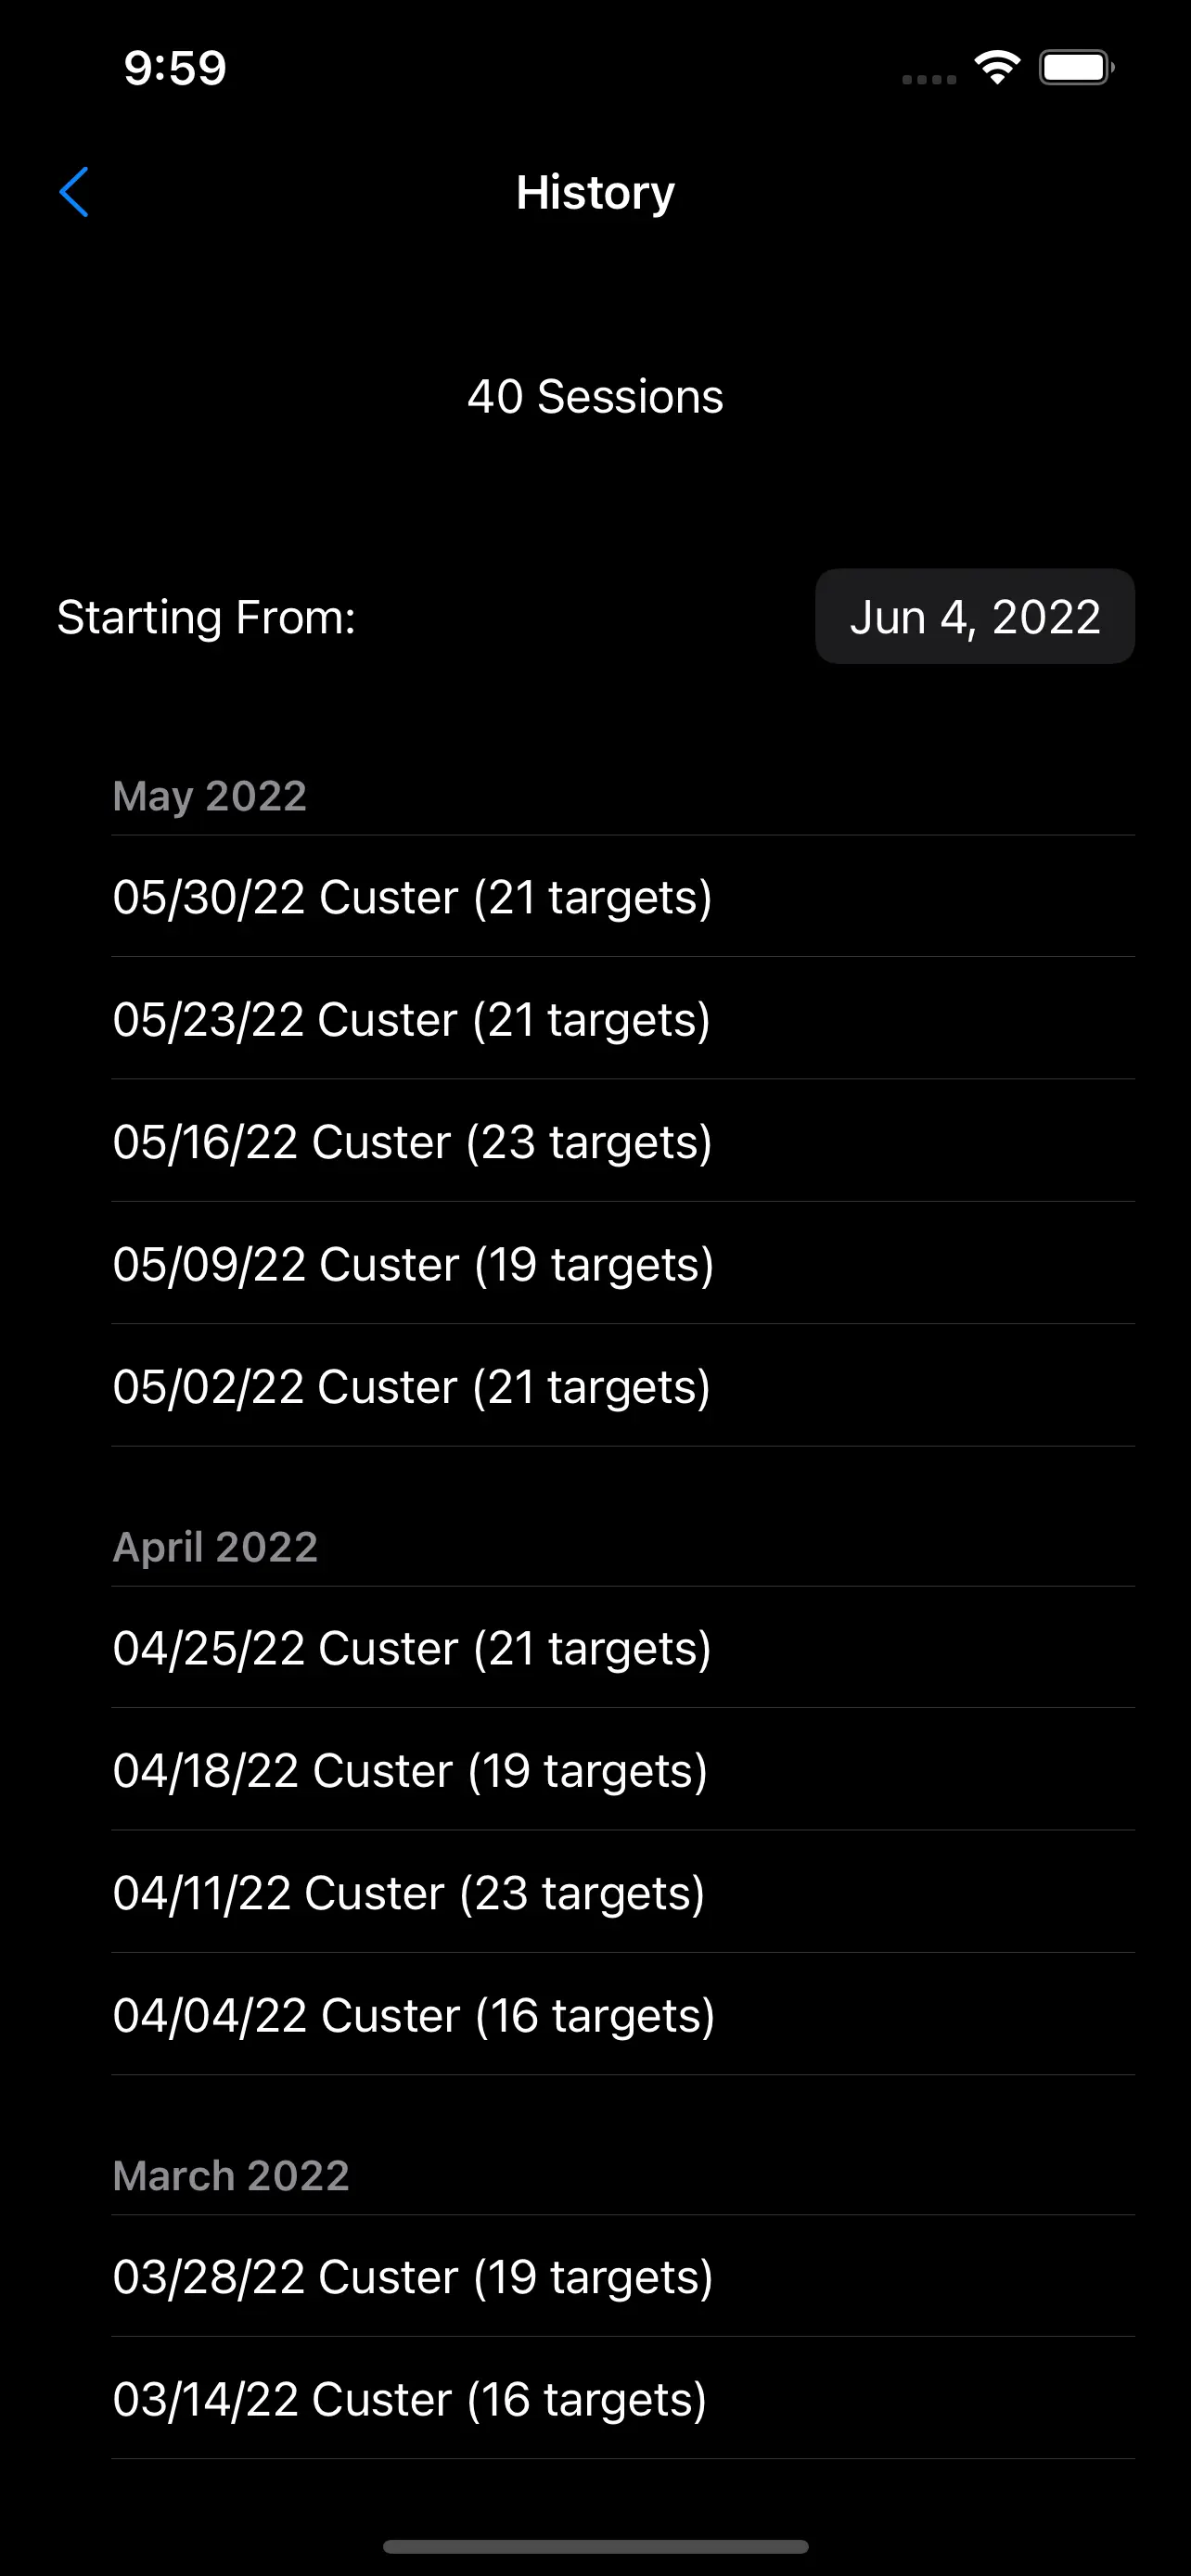
This screen shows a list of your previous sessions. You're able to drill down into those sessions and view the
targets, scores, etc. from each of them.
This screen shows you the firearms, shooting ranges, ammunition, miscellaneous data, and options that you can set.
At the bottom of the screen, there is a tab bar with the following options:
- Guns - a list of firearms
- Range - a list of the shooting ranges
- Ammo - a list of the ammuntion
- Data - miscellaneous data used in the app
- Options - settings for various user preferences
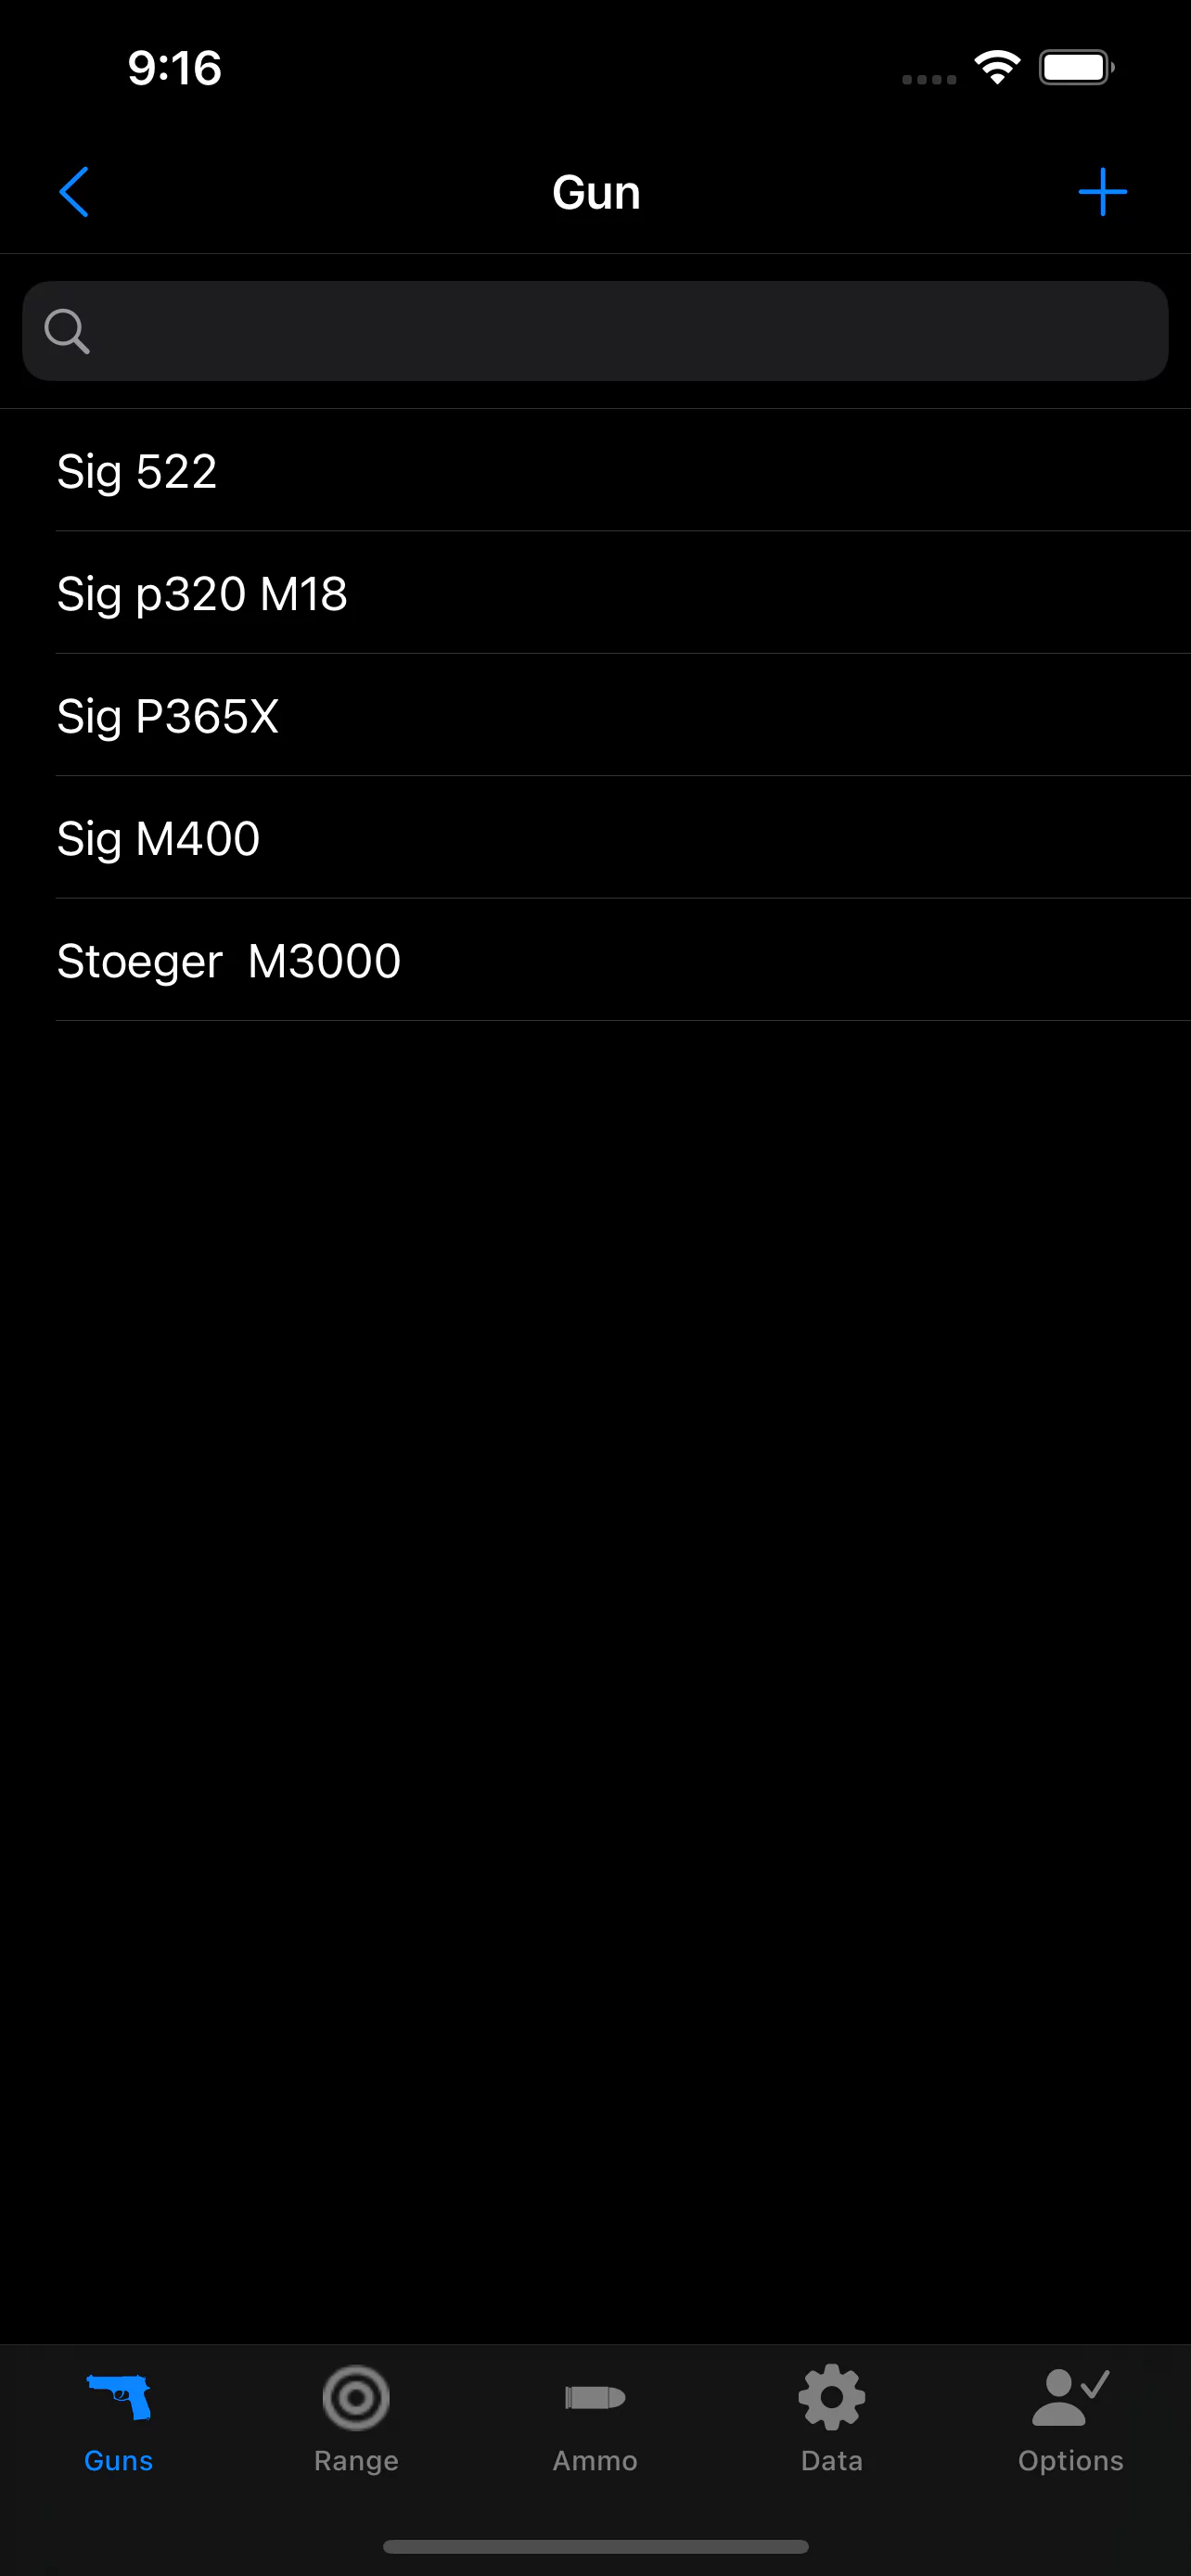
This shows the list of firearms that are configured in the app. You can select an existing firearm to view its details, or press
the plus button (upper right corner) to add a new one. You may delete a firearm by sliding the firearm entry to the left and
pressing delete. The firearm detail page has the following info:
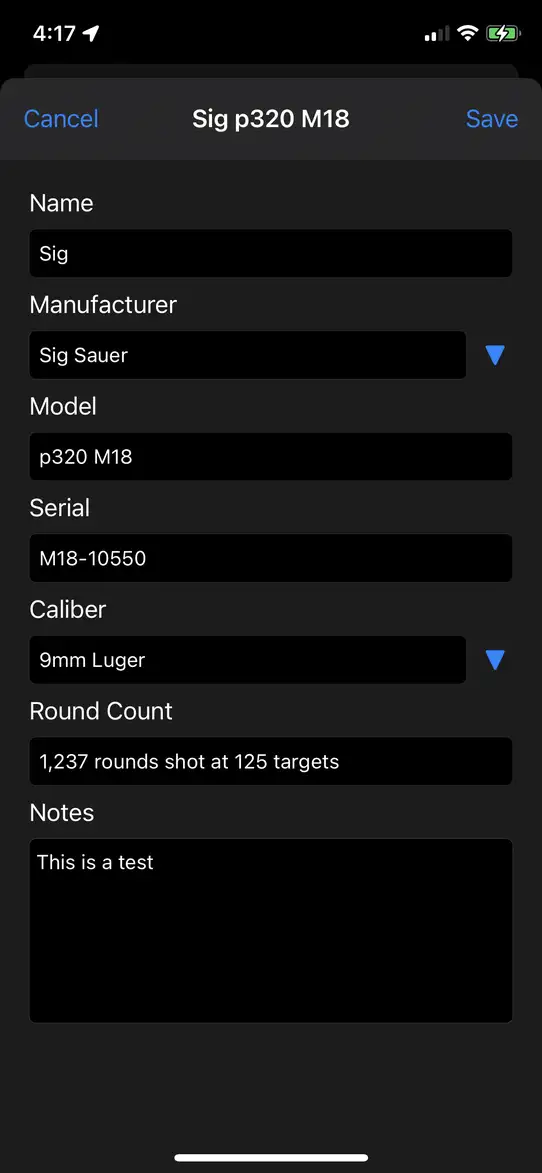
This screen has the following fields. All fields are optional, but manufacturer and model are strongly suggested to be filled in as a minimal set.
- Name - an user assigned name to identify the firearm.
- Manufacturer - the manufacturer of the firearm. The list of manufacturers can be edited in the data tab.
- Model - the model of the firearm.
- Serial - the serial number of the firearm.
- Caliber - the primary caliber of the weapon.
- Round Count - a read-only field computed from the shooting sessions.
- Notes - arbitrary field for any notes you wish to record associated with the firearm.
You're able to record what shooting range your shooting sessions took place at. This screen shows a list of those possible shooting
ranges. You can enter in new ranges, edit or delete existing ones.
You can keep a list of the various ammuntion that you're shooting. By entering in the ammo that you use, you can analyze the specific
shooting patterns from that ammo.
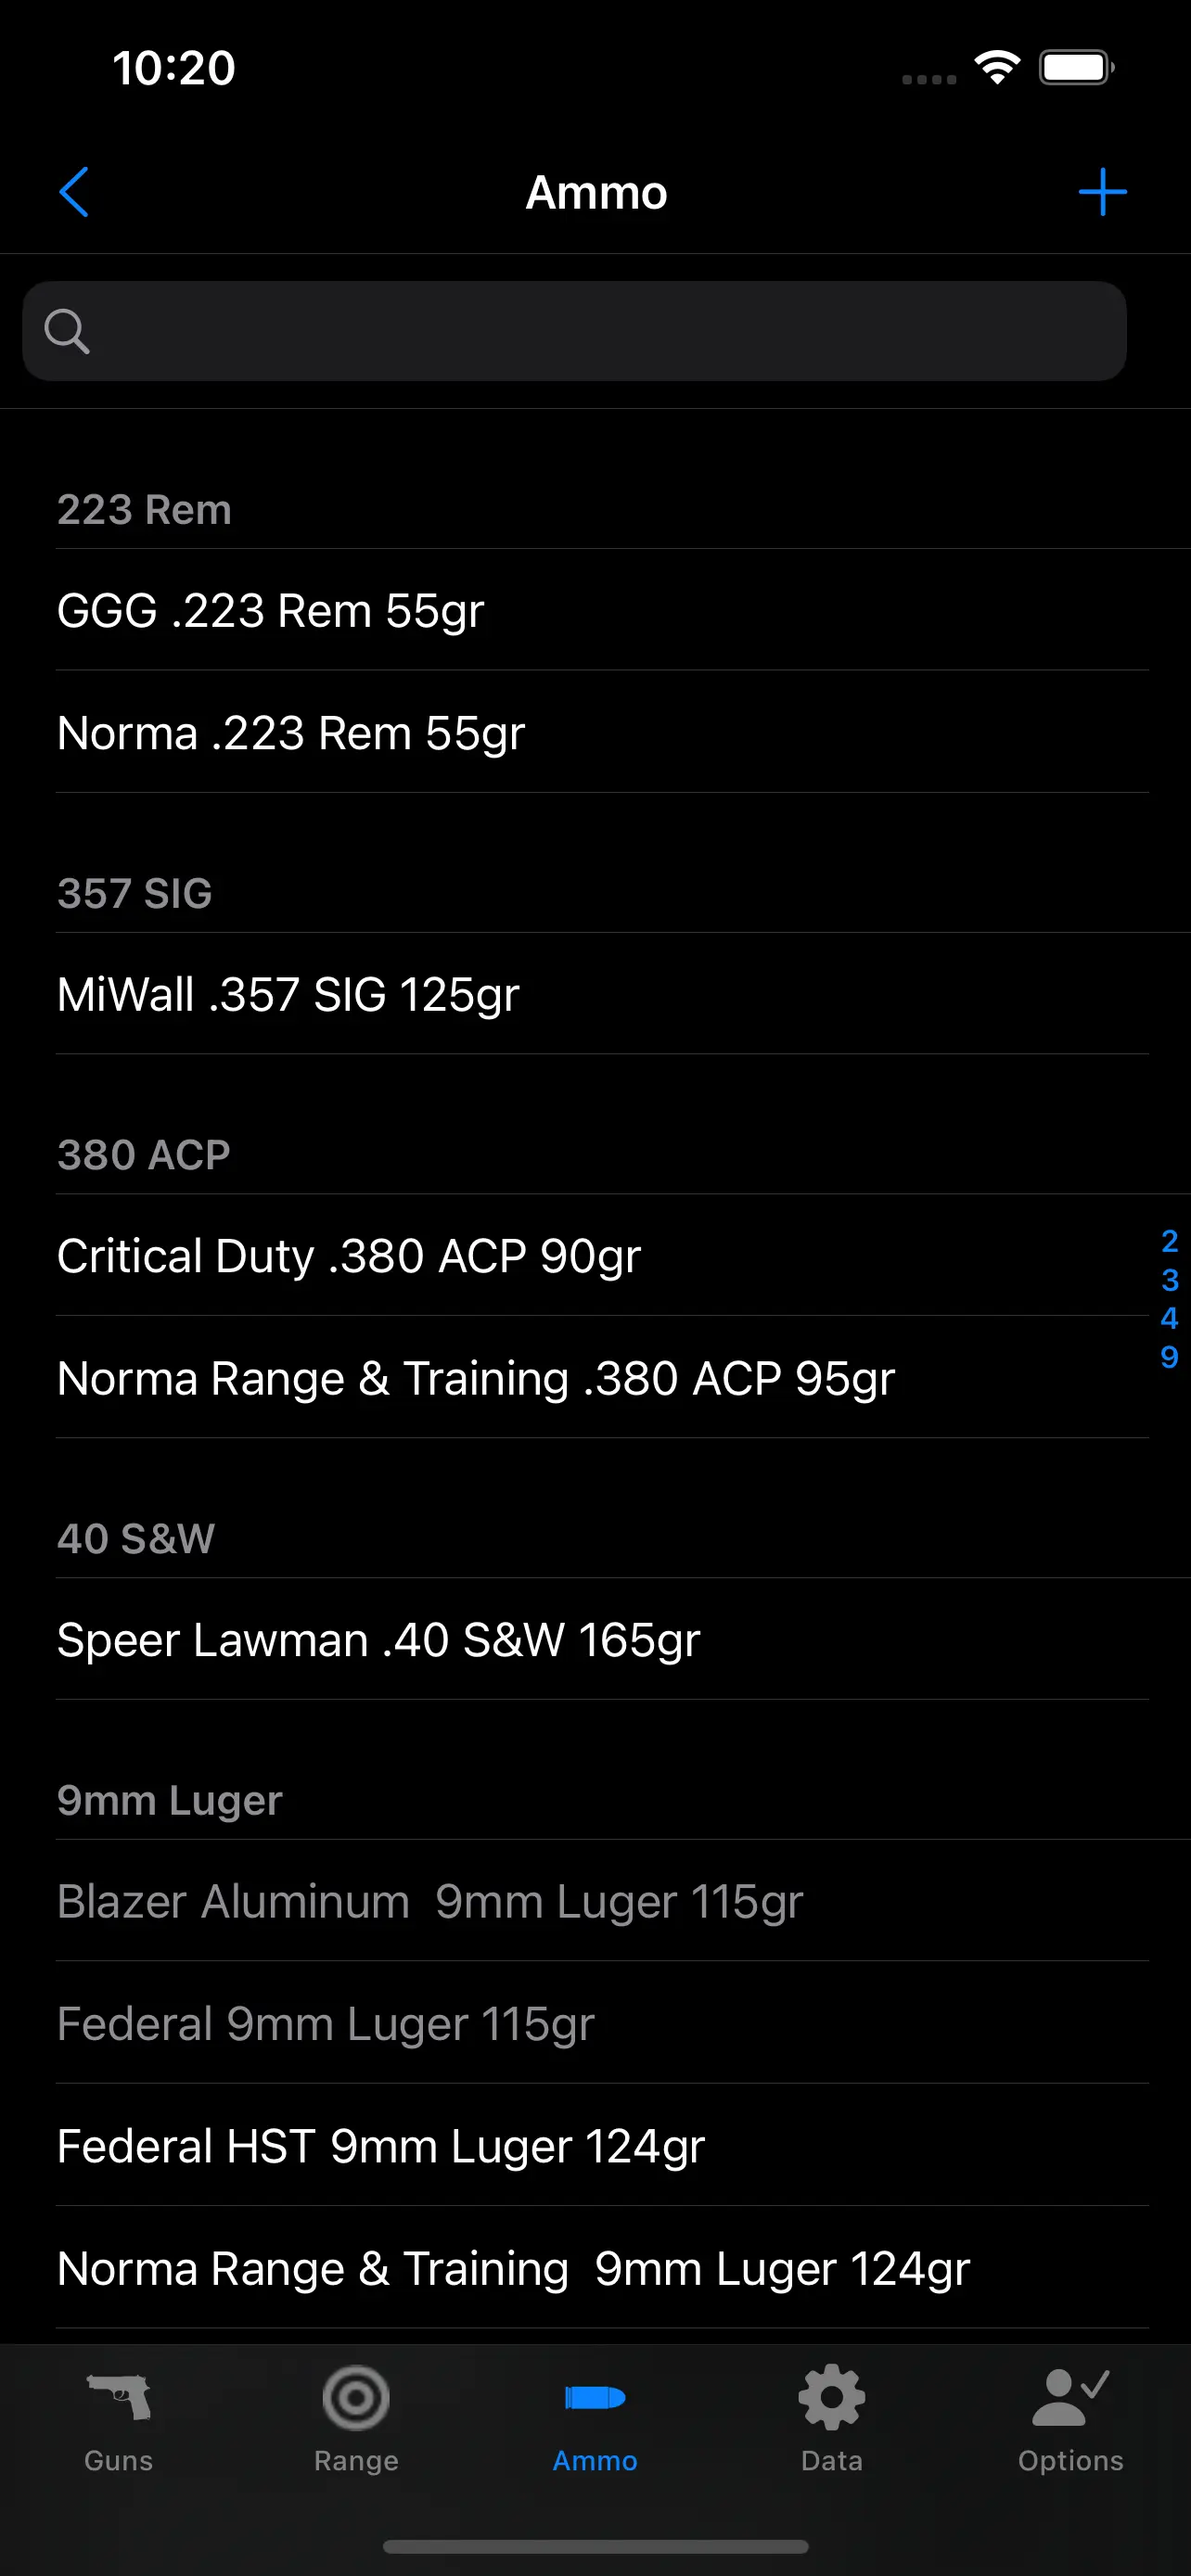
Ammo is shown with caliber and weight (in grains) when that data is entered. You can edit or enter the following data associated with ammunition.

- Name - the manufactuer or other identifier associated with the ammo.
- Caliber - the caliber of the ammo. You can edit the list of calibers in the data tab.
- Grain - the weight of the bullet in grains.
- Enable - if the ammo should be able to be selected for new sessions.
The app comes configured with lists of the most common firearm manufacturers, firearm calibers, etc. You can view and edit the following lists here.
- Caliber - the various calibers that firearms and ammunition may have.
- Drill - the various practice drills that you perform.
- Manufacturer - a list of firearm manufacturers.
- Target Type - a list of the various target types that the app supports.
The following target types are supported:
- Appleseed
- AQT 100 yards
- AQT 200 yards
- AQT 400 yards
- AQT Stage 1
- AQT Stage 2
- AQT Stage 3
- AQT Stage 4
- PQT Stage 1
- PQT Stage 2
- PQT Stage 5
- FBI Qualification
- Generic
- 2" Round
- 3" Round
- 4" Round
- 6" Round
- 8" Round
- 12" Round
- Circular, Generic
- Silhouette 12x18"
- Square, Generic
- IPSC
- IPSC
- IPSC 1/2 Scale
- IPSC 1/3 Scale
- ISSF
- 10m Pistol
- 10m Rifle
- 10m Running
- 25m Precision Pistol
- 25m Rapid Pistol
- 300m Rifle
- 50m Rifle
- 50m Running
- NRA Style
- AP-1
- AP-2
- B-2
- B-3
- B-4
- B-5
- B-6
- B-8
- B-16
- B-27
- B-29
- B-34
- TQ-6
- TQ-7
Note that the generic circular or square target types can be used for most random types, but if you know a measurement of the target (e.g. diameter of a paper plate) you can match that up with the corresponding "Round" type of target to get better metrics.
This is a list of the options that you can select to control how the app behaves or displays data. These are used to customize the app to your
specific preferences. You may change these at any time.
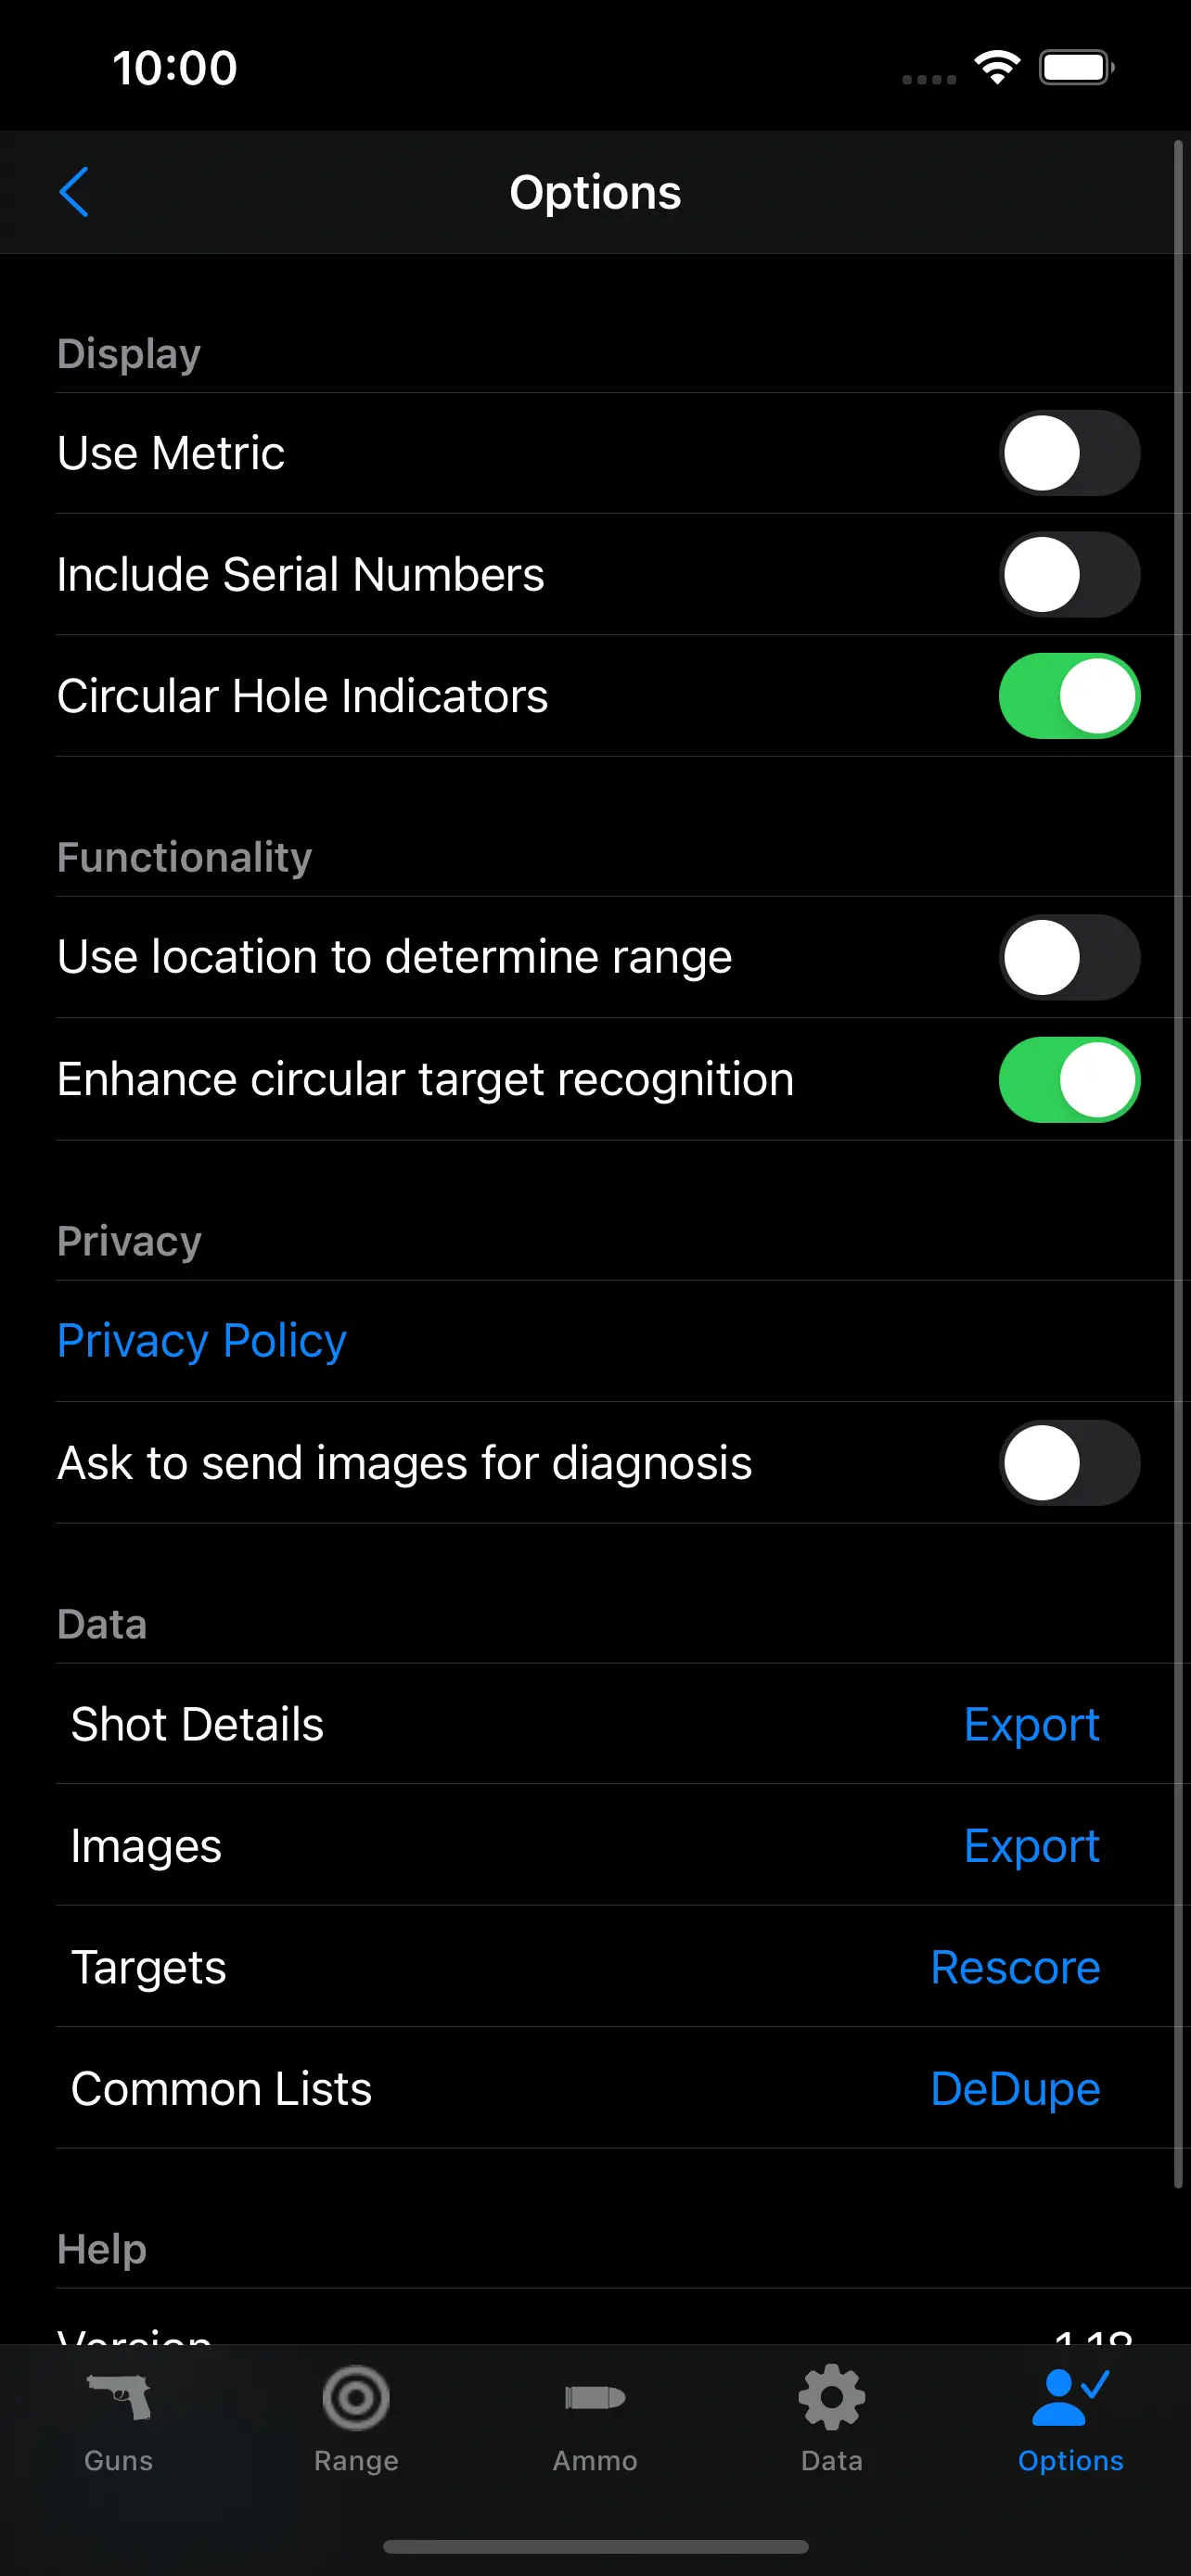
- Use Metric - when selected, the dimensions shown are in millimeters as opposed to inches.
- Include Serial Numbers - when selected, firearm names include the serial number. Useful when you have multiple
firearms of the same make and model.
- Circular Hole Indicators - when selected, the bullet holes are rendered as circles with the selected ammo's diameter. A small circle is also drawn at the center.
When not selected, bullet holes are rendered in a graphical manner, scaled to the bullet diameter.
- Use location to determine range - When selected, when starting a session your location will
be matched against your previously entered shooting ranges to automatically select the proper one.
- Enhance circular target recognition - When selected, additional algorithms are used to refine the position and size of circular targets. Recommened to leave enabled, unless specific issues occur.
- Privacy Policy - takes you to the privacy policy.
- Ask to send images for diagnosis - When selected, enables an option to send in image for diagnosis
when they perform poorly on machine learning recognition.
- Shot Details - Exports a CSV file will all of the shot placement data for additional analysis in other programs.
- Images - Exports PNG copies of all of the target images.
- Targets - This rescores all of the targets. Useful if the scoring algorithm changes in a new version.
- Common Lists - This searches through the common lists (caliber, manufacturer, etc.) and removes unreferenced duplicates.
- Version - the current version of the app.
- Online Help - this web page.
There are numerous ways to analyze target shooting performance. Depending upon the purpose, there are many metrics (a specific way to measure something) that show useful information.
There are two basic properties of a grouping: How large is the grouping, and how far from the point of aim (POA) was the center of grouping, the so-called point of impact (POI). The statistical term "precision" roughly
corresponds to the group size, while "accuracy" refers to the group size and the offset of that group from the POA. Some of the possible metrics are:
- Mean Radius - the mathmatical average distance of a shot center from the overall group center (POI).
- Group Diameter - the smallest circle that contains all of the shots in a grouping.
- Extreme Spread = the largest distance between two shots in a grouping.
- Circular Error Probability (CEP) - technically this is a statistical measure of how likely a future shot following the same distribution would fall within a circle. In more basic terms, it represents a circle where 50% of future shots would fall within.
Of these measures, ignoring how hard they are to compute, CEP has a lot going for it. For most of the other measures, if you have more shots on a target, the measure will increase. So it is hard to compare trends
over time unless the same number of shots are fired at the same distance. CEP has no problem in being aggregated. The more shots, the higher the statistical confidence in the measure.
Furthermore, if you compute a measure in minutes of angle, it becomes invariant with the distance. So you can compare
shots made at any distance. Because of CEP's versatility, TargetDetect uses it for many reports. It is important to remember that it is measured as a radius, so you must double the value to compare it to the other measures that report a diameter.
 TargetDetect
BETA
☰
TargetDetect
BETA
☰